It's Gaming Month here at Mac.AppStorm
and one of the aims of this series is to dispel the myth that Macs are
not suitable for gaming. We've already concluded that that's true but
only to an extent. Support from game developers isn't quite fully
behind the Mac yet so opting to play some games in Windows is still a
popular choice.
Fortunately, your Mac comes preinstalled with Boot Camp Assistant, an application designed to help you install Windows alongside OS X on your Mac and then boot into it on command, say, to play games. It's a somewhat simple process but, nevertheless, we're going to take a documented shot at getting Windows 7 up and running alongside an installation of Mountain Lion.
Additionally, you'll require a wired mouse and keyboard to complete the Windows installation because drivers for wireless keyboards and mice won't be installed at that point. If you're using a MacBook, however, the built-in keyboard and trackpad will suffice.
Boot Camp Assistant, located in your Utilities folder, is a step-by-step process which involves you downloading up-to-date support software and hardware drivers for Windows, burning them to a form of storage and then loading up the Windows installation process. It's a pretty painless process that almost runs by itself — in fact, you'll probably end up leaving it at some point since the support software can take a while to download — and self-explanatory enough to not require some superfluous guidance by me.
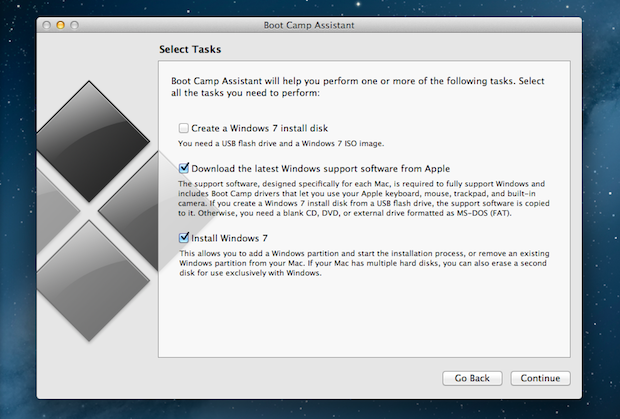
Boot Camp Assistant will take you through the process of downloading support software and getting started
Boot Camp Assistant will also be the place in which you partition a
drive to create an area to install Windows on. Be sure to make
considerations here for the future, since it can be a little tricky to
modify the size of the Bootcamp partition in retrospect.
Have your Windows 7 installation media at hand, though, as Boot Camp will ask for it at some point to begin the process.
From there, it's just regular setup procedure, a lot of which is automatic. Go grab a cup of coffee and maybe a sandwich too. When you return, Windows should be up and running on your Mac.

Installing Windows, just like on any machine
Windows will then install the various drivers and software that are needed to support your Mac's hardware, including Apple peripherals like the Apple Wireless Keyboard and Magic Mouse. You'll also get a Boot Camp control panel installed — just search for it in Windows — allowing you to tweak a few things, like whether or not your function keys retain their OS X purpose (i.e. changing screen or keyboard backlight brightness).

Selecting a default startup disk is easy to do in both Windows and OS X
You can modify the default startup disk in the Boot Camp control
panel in Windows, or in Startup Disk in System Preferences in OS X.
Tip: Quick tip: If you want an Antivirus app to keep your Windows install safe, we'd recommend using Microsoft's free Security Essentials instead of shelling out for a pricey antivirus solution.
Keep subscribed to Mac.AppStorm during August Gaming Month for more OS X-focused gaming content!
Fortunately, your Mac comes preinstalled with Boot Camp Assistant, an application designed to help you install Windows alongside OS X on your Mac and then boot into it on command, say, to play games. It's a somewhat simple process but, nevertheless, we're going to take a documented shot at getting Windows 7 up and running alongside an installation of Mountain Lion.
Step 1. Prepare the Prerequisites
Before you jump into the process of installing Windows, it's important to make sure you have the necessary ingredients at hand. Most important is a copy of Windows but, even then, you'll have to make sure you have the right version. Boot Camp 4.0, the version in Lion and Mountain Lion, requires a copy of Windows 7 Home Premium, Professional or Ultimate; Windows XP and Vista will not work.
Tip: Note that only full retail or OEM versions of
Windows will work, not upgrades. OEM versions of Windows are generally
cheaper and work exactly the same as full retail versions, although they
have the generic limits of being only installable on one machine and
don't come with support from Microsoft. I'd recommend going with the
full retail version, albeit at considerable cost, unless you fully
understand the limits of the OEM version.
You'll also require a CD, DVD or external drive formatted as MS-DOS
(FAT) for burning the support software onto in this process — and an
external SuperDrive if you opt to us a CD or DVD and have a Mac without
an optical drive.Additionally, you'll require a wired mouse and keyboard to complete the Windows installation because drivers for wireless keyboards and mice won't be installed at that point. If you're using a MacBook, however, the built-in keyboard and trackpad will suffice.
Step 2. Run Boot Camp Assistant
Now it's time to actually jump into the process of installing Windows, with starts with a little preparatory work.Boot Camp Assistant, located in your Utilities folder, is a step-by-step process which involves you downloading up-to-date support software and hardware drivers for Windows, burning them to a form of storage and then loading up the Windows installation process. It's a pretty painless process that almost runs by itself — in fact, you'll probably end up leaving it at some point since the support software can take a while to download — and self-explanatory enough to not require some superfluous guidance by me.
Boot Camp Assistant will take you through the process of downloading support software and getting started
Have your Windows 7 installation media at hand, though, as Boot Camp will ask for it at some point to begin the process.
Step 3. Install Windows 7
Boot Camp Assistant will automatically reboot your Mac and take you into the Windows 7 installer. When asked to specify a location in which to install Windows, be sure to select the partition that you made earlier. It will likely be named "BOOTCAMP" but, if not, you should be able to identify it by size. Note that it may need to be formatted within the installer but be careful to only format the new, empty Bootcamp parition to avoid loss of data.From there, it's just regular setup procedure, a lot of which is automatic. Go grab a cup of coffee and maybe a sandwich too. When you return, Windows should be up and running on your Mac.
Installing Windows, just like on any machine
Step 4. Install the Support Software
Once you're able to successfully boot into Windows (if your Mac didn't do this automatically, restart the Mac, hold down the Option (alt) key and then select the Windows partition), go ahead and insert the media you burned the support software to in step 2.Windows will then install the various drivers and software that are needed to support your Mac's hardware, including Apple peripherals like the Apple Wireless Keyboard and Magic Mouse. You'll also get a Boot Camp control panel installed — just search for it in Windows — allowing you to tweak a few things, like whether or not your function keys retain their OS X purpose (i.e. changing screen or keyboard backlight brightness).
Choosing What to Boot
Because you've installed both OS X and Windows alongside each other, you can easily switch between operating systems. This does require a reboot, though, in which you're going to need to hold down the Option (alt) key throughout until a selection screen appears. Here, using the arrow keys of your keyboard, you'll need to select the drive or partition that has your OS of choice on. Don't worry though, they're labeled.Selecting a default startup disk is easy to do in both Windows and OS X
That's It!
Windows should now be up and running, allowing you to go about your daily life as normal and booting into either OS whenever you want. You can load up those Windows-only games and play them on your beautiful Apple hardware now, so there's no compromise between form and function when it comes to games!Tip: Quick tip: If you want an Antivirus app to keep your Windows install safe, we'd recommend using Microsoft's free Security Essentials instead of shelling out for a pricey antivirus solution.
Keep subscribed to Mac.AppStorm during August Gaming Month for more OS X-focused gaming content!


.webp)

