A
wrap-around book cover is a functional and beautiful accessory for any
book, offering protection while adding a layer of craftsmanship and
beauty. It can also turn a set of matching notebooks into the perfect
stationary gift. Today I’m going to show you how to build your own
wrap-around case for a book. Let’s get started.
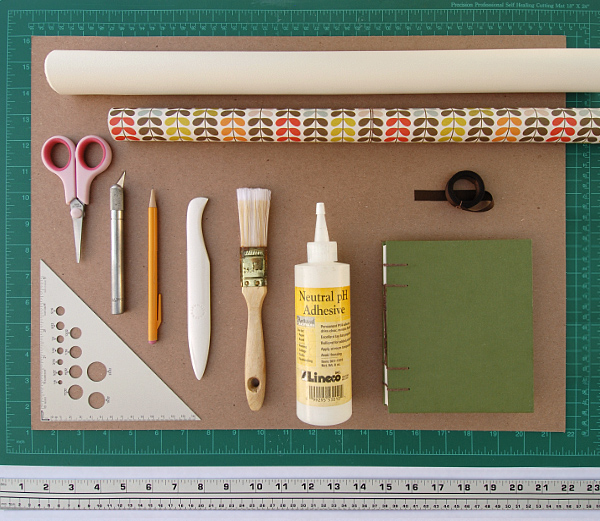
Supplies
Hard or soft cover book
Binder's board
Sheet of medium weight paper for the cover
Sheet of paper for the liner
Ribbon
Scrap of thick cardboard
Bone folder
Neutral pH Adhesive
Glue brush
Ruler
Craft knife
Cutting mat
Newsprint or newspaper
Pencil (optional)
Scissors
You can also use book cloth in this tutorial to cover the outside of
your case. Typically, the material chosen for the outside should somehow
match or complement the book on the inside. For example, if your book
has a cloth cover, consider using a flattering book cloth for your case.
1. Find The Grain Direction of Your Materials
Check and mark the grain direction on your papers and binder’s board. If you're not sure how to mark the grain, visit our tutorial on determining grain direction. Working
with the grain of your materials will help them last longer and look
100% more professional. For this project you will want the grain of your
papers and boards to be parallel to the spine of the book you are
covering.
2. Measure Your Book
Step 1
Measure and record the height of your book. This is the side of your
book that is parallel to the spine. Round up your measurements. If you
round them down, your book will not fit its box.
Step 2
Measure and record the width of your book. This is the side that runs perpendicular to the spine.
Step 3
Measure and record the thickness of your book (also known as the width of the spine).
Repeat steps one to three to ensure your measurements are correct. This will save a lot of possibly wasted time and materials.
3. Find The Thickness of Your Binder’s Board
Measure the thickness of your binder’s board. Try to get the most
accurate measurement possible. Take a note of this on your binder’s
board or a scrap piece of paper. This measurement will be referred to as
“one board thickness”.
4. Cut Your Cover and Spine Pieces
Step 1
First, cut your cover pieces. Measure and cut three long-grain pieces
of binder’s board that are 2mm (1/16 in) taller than your book, and the
same width as your book. As you can see in the photo, your grain lines
should be parallel to the length of each piece. They should be like this
for the spine pieces as well.
Step 2
Now, cut your small spine piece. Measure and cut 1 long-grain piece
of binder’s board that is 2mm (1/16 in) taller than your book and the
same width as the spine.
Step 3
You will also need a large spine piece. Measure and cut 1 long-grain
piece of binder’s board that is 2mm (1/16 in) taller than your book and
one board thickness wider than the spine of your book.
Step 4
Keep one scrap of binder's board to use as a spacer (the grain direction is not important for this piece).
5. Arrange The Board Pieces On The Cover Paper
Step 1
Lay your cover paper face down on the cutting mat with the grain running up and down.
Step 2
Place your ruler on top of the paper and position it along the bottom
edge. Check that the top edge of the ruler is at least 2cm (about 1in)
away from the bottom of the paper (make it a bit more than that if your
paper has a torn or deckled edge).
Step 3
Begin placing the five pieces of binder’s board onto the cover paper,
leaving at least 2cm (about 1in) of cover paper to the left of the
first piece. Place them with the grain direction moving up and down
(same as the cover paper). Keep the bottom edge of each board butted up
against the ruler. Arrange the boards in the following order from left
to right: cover, thin spine, cover, thick spine, cover.
Step 4
Use the scraps of binder's board to measure two board thicknesses between each piece.
Step 5
Mark the placement of each board piece with your pencil. To help
remember the order of the pieces, you can number them from left to
right.
6. Trim The Cover Paper
Step 1
Trim the cover paper so that it is 2cm (about 1in) wider on all four sides of the arranged case pieces.
Step 2
Trim off the four corners of the cover paper so that there is one
board thickness away from the corners of the book board. To do this,
stand one of your board scraps at a 45 degree angle against a corner of
cover board and place your ruler or triangle right up next to the scrap.
Remove the scrap and cut the corner off with your craft knife. I also
like to use the grid on my cutting mat to help position the ruler.
7. Glue Down The Cover And Spine Pieces
Step 1
Remove the case pieces and apply glue to the first cover piece. Place
it back down on the cover paper in the same place it was. Apply
pressure to the board.
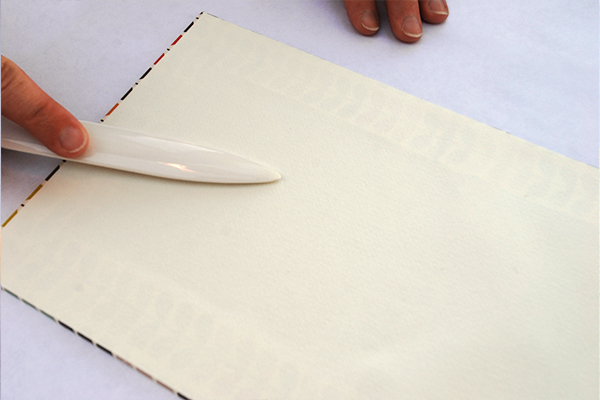
Step 2
Flip the board and cover paper over and rub with your bone folder to push out any air bubbles.
Step 3
Repeat steps 1 & 2 for the remaining four board pieces.
8. Glue The Cover Flaps Down
Step 1
Glue and fold the left and right flaps over and onto the case boards.
Step 2
Rub out the air bubbles with your bone folder.
Step 3
Work the cover around the corners of the case boards with the tip of your bone folder.
Step 4
Glue and fold the top and bottom flaps onto the case boards and spine pieces. Rub them down with the bone folder.
Step 5
Work the cloth into the spaces by folding up the case and applying pressure with your fingers.
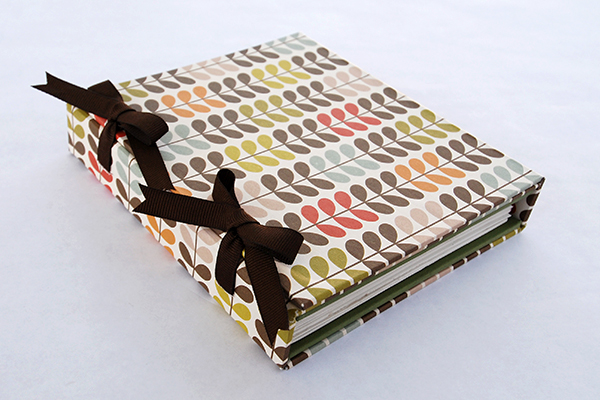
9. Attach Ribbon To The Cover
Traditionally, book boxes and cases are closed with bone clasps.
Buttons or beads are a good alternative, but I think some
chocolate-colored ribbon ties would look beautiful for the pattern I'm
using.
Step 1
Make two 1cm (3/8in) cuts through the middle of the small spine
piece. I made mine 3cm (1 3/16 in) from the top and bottom, but if your
case is for a larger book, you can make the cuts a little closer
together. Make sure to cut all the way through the cover paper.
Step 2
Next, make the same two cuts 1cm (3/8 in) away from the right-most edge of the case.
Step 3
Cut two lengths of ribbon that are long enough to wrap around the width of your book three times.
Step 4
Now you'll have to get the ribbon through the cuts. Gently wedge and
pull one end of the first ribbon through one of the spine holes with the
back side of the craft knife. If you use the sharp side, you'll cut the
ribbon. It's okay if the ribbon rips. You will have enough to trim that
part off later.
Step 5
Take that same ribbon and gently wedge and pull the other end through
the matching hole on the right edge of the case. Make sure the ribbon
lies flat on the inside of the case.
Step 6
Repeat steps 4 & 5 with the second strand of ribbon. Even out the
ends so you have the same amount of ribbon coming out of each slit.
10. Glue Down the Ribbons
Step 1
The ribbons have to be secured to the binder's board. Brush some glue onto the board pieces underneath the ribbons.
Step 2
Before the glue dries, rub the ribbon down with the bone fold, working it into the gaps between board pieces.
11. Add The Inner Lining
Step 1
To finish covering the case, you will need to cut a piece of your
lining paper that is about 4mm (3/16 in) less in height and 4mm more in
length than your case when open flat. This piece will line the inside of
the case and cover all the board pieces.
Step 2
Glue the liner paper and position it 2mm (1/16 in) from the top, bottom, and left sides.
Step 3
Quickly rub the liner paper down with the bone folder only on the
left-most board piece. Work your way to the right by pushing the paper
into the spaces, and then rubbing the surface of the next cover piece to
the right. Continue to do this until you have rubbed the liner down on
all of the board pieces, and into all of the crevices.
12. Tie and Trim The Ribbons
Step 1
Wrap the book in your case and tie the ribbon ties into bows.
Step 2
Trim the excess ribbon.
Enjoy Your Custom-Made Wrap-Around Case
Look at that! Now you can give your book a snug hug with it's very own matching case.
Through this tutorial, I've taught you how to measure and craft a
custom wrap-around case for a special book, using traditional
bookbinding techniques.
Did you try this tutorial? Have you made your own book casing before?
Do you have any tips to share? Hit us up in the comments section below.
TDasany
Lorem ipsum dolor sit amet, consectetur adipisicing elit, sed do eiusmod tempor incididunt ut labore et dolore magna aliqua. Ut enim ad minim veniam, quis nostrud exercitation.
Medical Disclaimer
The information on this site is not intended or implied to be a substitute for professional medical advice, diagnosis or treatment. All content, including text, graphics, images and information, contained on or available through this web site is for general information purposes only. Krobknea makes no representation and assumes no responsibility for the accuracy of information contained on or available through this web site, and such information is subject to change without notice. You are encouraged to confirm any information obtained from or through this web site with other sources, and review all information regarding any medical condition or treatment with your physician. NEVER DISREGARD PROFESSIONAL MEDICAL ADVICE OR DELAY SEEKING MEDICAL TREATMENT BECAUSE OF SOMETHING YOU HAVE READ ON OR ACCESSED THROUGH THIS WEB SITE.


.webp)

