
Australians celebrate their official national day each January 26th. There really is no better way to honor Australia Day than by hosting a BBQ event, and creating a super flyer to advertise the occasion.
We'll be using Adobe InDesign for this tutorial, hopping briefly over to Adobe Illustrator to edit vector images for the design. In the tutorial you'll learn how to create a fun, colorful grid and apply typography and transparency effects to make the design as dynamic and eye-catching as possible.
So throw another shrimp on the barbie and get ready to party, Australia-style!
1. Create a Grid for the Flyer Design
Step 1
Open InDesign and select New Document from the Welcome window or go to File > New > Document.
In the New Document window, keep the Intent as Print. If you won't be printing the flyer but distributing it digitally instead, you should still set up the document for print. You can always export it as an Interactive PDF later.
Set the Number of Pages to 2, for the front and reverse of the flyer, and uncheckFacing Pages.
From the Page Size drop-down menu select A5, which equates to a Width of 148 mmand Height of 210 mm.

Step 2
Under Columns, set the Number to 4 and the Gutter to 2.
Finally, set the Bleed on all sides to 3 mm. You only need to do this if you're intending to send your flyer to print.

Click OK. Open the Pages panel (Window > Pages) to be able to flick more easily between pages 1 and 2 of your document.

Step 3
The four columns you've just created have set up a vertical grid on the flyer. We want to break up the document horizontally (lengthways) as well.
Double-click on the A-Master page icon in the Pages panel to bring up the Master on screen. Anything you place here will appear on all pages of your document, which have the A-Master applied to them by default.
Let's divide the page up into six equal rows. The full height of the page is 210 mm, so each section will be 35 mm in Height. Start by dragging a guide out from the top ruler(View > Show Rulers) to the halfway point, at 105 mm.

Drag a second guide down to 35 mm, and a third to 70 mm.

Drag a fourth below the halfway point to 140 mm and a fifth to 175 mm.

2. Set Up a Series of Layers
Step 1
Return to Page 1 of the document by double-clicking the Page 1 icon in the Pagespanel.
Open the Layers panel (Window > Layers), which should be found, by default, next toPages in the same panel.
Double-click the default Layer 1 title and rename the layer as Background.

Click OK to return to the Layers panel.
Step 2
Click the Create New Layer icon at the bottom right of the panel to create a second new layer, that sits above Background. Double-click to rename the layer as Colored Shapes. Click OK.
Repeat this process to create a further three layers, Border, Strokes, andTypography, until you have five layers in total, in the order shown below.

3. Give Your Flyer a Beach Background
Step 1
Lock the Colored Shapes, Border, Strokes and Typography layers and click on theBackground layer to activate it.
Select the Rectangle Frame Tool (F) from the Tools panel and drag to create a frame that extends across the whole page, up to the edges of the bleed. Go to File > Placeand select a full-color photo.
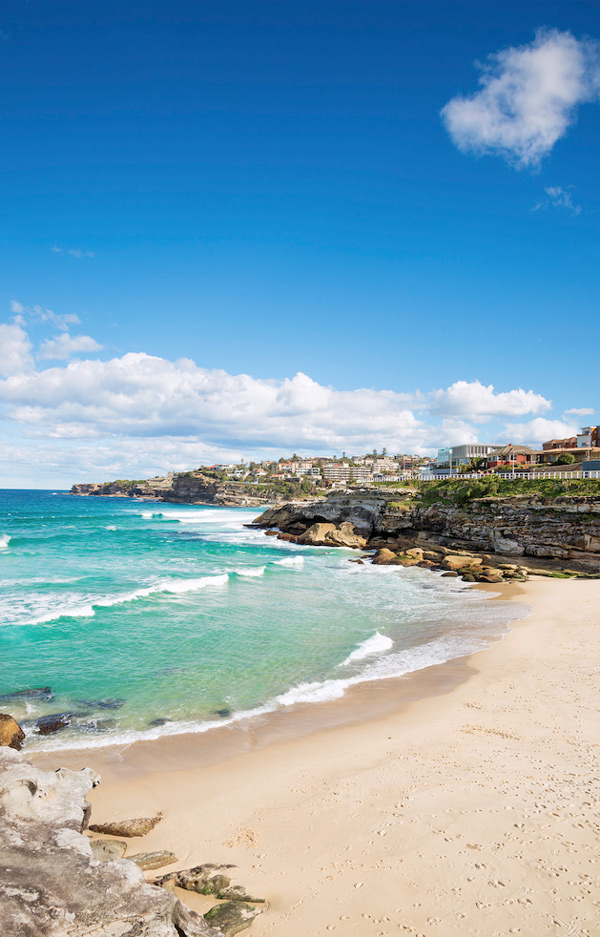
I've picked this image of Tamarama Beach in Sydney, which will work really well as the image has more height than width. A long panorama photo may not work so well, as the flyer design is portrait orientation, so look for images which have similar proportions to your document.
Select the photo, and click Open. Click the Fill Frame Proportionally icon from the controls panel running along the top of the screen.


Step 2
Once you're happy with the arrangement of the image, select the image frame with theSelection Tool (V, Escape) and go to Edit > Copy. Navigate down to Page 2 of the document and go to Edit > Paste in Place to create an identical background on the reverse side of the flyer.

Return to Page 1 of your document (the front of the flyer) and Lock the Backgroundlayer from the Layers panel.
4. Add Some Sunny Color!
Step 1
Unlock the Colored Shapes layer in the Layers panel.

This is the look we want to achieve—groups of colored squares and rectangles which have a subtle 3D look and a transparency.

First, we need to set up a palette of colors. I've used similar colors to the Australia Day logo, which uses a colorful array of blue, green, red and yellow.

Open the Swatches panel (Window > Color > Swatches) and add the followingCMYK swatches using the New Color Swatch option from the panel's drop-down menu. Click Add, and then OK, for each new swatch.

- C=3 M=16 Y=93 K=0
- C=61 M=6 Y=95 K=0
- C=50 M=13 Y=4 K=0
- C=4 M=97 Y=89 K=1

Step 2
Select the Rectangle Tool (M) from the Tools panel and drag to create a small square, about 36 mm in diameter. Place this in the fifth row down the grid, to the far left side of the page.
Set the Stroke to [None] and the Fill to C=3 M=16 Y=93 K=0.

With the square selected, go to Object > Effects > Transparency to open the Effectswindow. Set the Transparency Mode to Multiply and the Opacity to 90%.

From the left-hand menu, select Satin to open the options for applying a Satin effect to the shape. Set the Mode to Multiply, reduce the Opacity to 40%, and adjust theAngle to 120 degrees. Adjust the Distance to 3 mm and Size to 4 mm. Check thePreview box at the bottom left of the window to view your changes, before clicking OK.


Step 3
Select the shape and Edit > Copy, Edit > Paste. Double the Width and Height of the shape, positioning it within the two columns to the far right of the page, within the third and fourth rows down.

Step 4
Edit > Copy and Edit > Paste more shapes, adjusting the Fill Color to the red, blue or green CMYK swatches and extending or reducing the Width or Height of each shape.
Ensure that the shapes always fit snugly within the grid, extending to the edge of the guides or column gutters. They don't have to be completely exact, as the border and strokes which we'll add later will hide any slightly imperfect edges.
Leave some gaps, with no color applied, allowing the ocean and blue sky to peek through.

5. Apply a White Border and Grid
Step 1
Return to the Layers panel and Lock the Colored Shapes layer. Unlock the Borderlayer. Remain on Page 1 of your document.
Select the Rectangle Tool (M) and drag to create a frame that extends across the whole page, and sits along the trim edge.
Set the Fill to [None] and the Stroke to [Paper], from the top control panel. Increase the Stroke Weight to 4 mm. InDesign will automatically align the stroke centrally along the edge of the shape, so only 2 mm of the stroke color will appear on the printed flyer. The extra 2 mm extending into the bleed will help get rid of any imperfect edges once the flyer is trimmed.

Lock the Border layer in the Layers panel and Unlock the Strokes layer.

Step 2
Select the Line Tool (\) from the Tools panel and, holding Shift, drag to create a line that extends from the right side of the page, running along the bottom of the second row of the grid, concealing the edges of any colored shapes. Set the Stroke Color to[Paper] and the Weight to 1 mm.

Now build up the strokes across the whole of the page, laying them over any edges of colored shapes. You can choose to either Edit > Copy, Edit > Paste the original line and rotate for vertical lines (Control-Click [Mac OS] or Right-Click [Windows] > Transform > Rotate 90 Degrees), or select the Line Tool (\) and hold Shift to create each new line.
Set lines around the edges of colored shapes, but don't cross them through the middle of colored shapes. You want to create a random grid, with some large and small square sections mixed in with narrow rectangular sections.
Once you're finished, this is how it should look:

Return to the Layers panel and Lock the Strokes layer.
6. Bring Your Flyer to Life With Typography
Step 1
Unlock the top layer, Typography.
Fonts with a nod to retro, Americana styles look fun, fresh and mouth-watering. For the flyer here I've used the free-to-download font, HamburgerHeaven.
I've also downloaded Ainslie Regular, which is a modern typeface inspired by Australian design, so perfect for an Australia Day flyer!
Select the Type Tool (T) from the Tools panel and drag to create a text frame about70 mm in Width and 43 mm in Height.
Type 'BBQ' and, from the Character Formatting Controls panel running along the top of your screen, set the Font to HamburgerHeaven, Size 126 pt, Align Center and increase the Tracking to 50. Adjust the Font Color to [Paper].
Position this text frame towards the bottom of the larger colored square.

Step 2
Select the text frame with the Selection Tool (V, Escape) and go to Object > Effects > Drop Shadow to open the Effects window. Set the Blending Mode to Soft Lightand reduce the Opacity to 48%. Set the Distance to 4 mm and the Angle to 118 degrees. Under Options, set the Size to 2 mm, Spread to 0% and Noise to 22%. Click OK.
This has applied a very subtle drop-shadow to the text, to give it a slightly lifted effect.

Step 3
Create a second text frame using the Type Tool (T), placing it, allowing a small margin, within one of the colored squares.
Type 'Live music (paragraph break) dancing (paragraph break) fantastic food (paragraph break) and drink' and set the Font to Ainslie Regular, Font Color to[Paper] and Justify All Lines.
Vary the Size, Leading and Tracking of each line of text until it fits snugly within the square.

Step 4
Repeat the same process across the flyer, dropping in text frames within the squares and rectangles, and inserting details about the date, location, time and features of the event. Set the Font of all text in Ainslie Regular, and the Font Color in [Paper]. You can pull out a reference to 'Australia Day' in yellow, C=3 M=16 Y=93 K=0.

Vary the Size, Leading and Alignment of text to suit its position on the flyer.

Step 5
To make your flyer more dynamic, you can also drop in some simple silhouettes. A bouncing kangaroo or BBQ tongs might work well. Some of the images from this set of vectors from GraphicRiver would work really well.
Here I edited a little vector of a BBQ in Adobe Illustrator. I set the Color of the vector to White, before going to Edit > Copy.

Returning to InDesign, you can simply Edit > Paste the vector directly into your document.
Resize your white silhouettes so that they fit within one of the unoccupied colored squares.

Step 6
As a final step for preparing your flyer artwork, return to the Layers panel and Lock theTypography layer. Unlock the Strokes, Border and Colored Shapes layers.
Sweep your mouse across the whole of Page 1 to select all the white elements on those layers. Go to Edit > Copy.

Navigate down to Page 2 and go to Edit > Paste in Place.

7. Export Your Flyer for Print
You've finished your flyer artwork—awesome work, it's looking great! Now let's export it for print.
Step 1
If you're sending your flyer to a printers, remain in InDesign and go to File > Export... to open the Export window. Select Adobe PDF (Print) from the Format drop-down menu. Name the file and click Save.
Note: If you're distributing your flyer online or by email, you should select Adobe PDF (Interactive) from the drop-down menu and select size and quality options that will best suit your chosen distribution method.
In the Export Adobe PDF window, select Press Quality from the Adobe PDF Presetdrop-down menu.

Step 2
Under the Marks and Bleeds section, accessible from the left-hand menu in the window, select All Printer's Marks under the Marks menu, and select Use Document Bleed Settings under the Bleed and Slug menu. Click Export.

Congratulations! You now have your flyer ready to be sent to the printers.

What Have We Learned?
In this tutorial, we've learned how to create a fun, colorful flyer for an Australia Day BBQ event. Of course, the lessons covered here can be transferred to any other print project you might be tackling in InDesign. We've covered how to:
- Set up a grid in InDesign, creating a dynamic layout with an underlying order.
- Layer images and color, to create an easy-to-edit, organized document.
- Apply effects, such as transparencies, drop shadows and satin effects, to text and shapes to give a 3D look to the design.
- Incorporate vector elements and select fonts, to give the design a contemporary, fresh look.
- Export a flyer for print or for digital circulation.


.webp)

