In this tutorial we'll use simple shapes and create cut-outs and gradients to generate depth and dimension within a widescreen-friendly desktop wallpaper. Drop Shadows and offset objects join our gray and white gradients to finish this design off in spectacular style. Use the techniques in this tutorial to create a whole set of cut-out wallpaper designs, and don't forget to share them with us in the comment section below this tutorial.
1. Setting Up the Design
Step 1
First things first, draw a rectangle with the Rectangle Tool (M) over your artboard. Choose a bright color that will pop through your cut-out design. I chose teal (
#33cccc) since it's not only my favorite color, but also fantastic for the raindrops in my design.
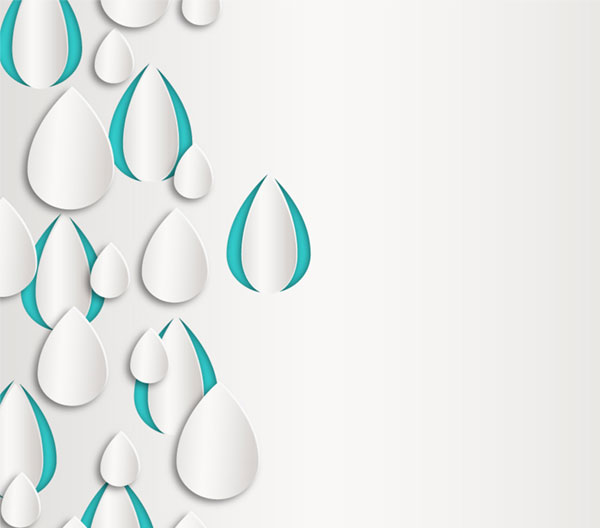
My final design will measure 1920 px by 1080 px in order to fit the resolution of my desktop. The tutorial, however, will mostly focus on the left side of the design.

Step 2
The basic teardrop is a simple shape drawn from a circle.
- Start with a circle drawn with the Ellipse Tool (L).
- Use the Direct Selection Tool (A) to pull the top anchor point upward, creating an egg-like shape.
- Convert the top anchor point from a curve to a sharp point with the Anchor Point Tool (Shift-C).
- Adjust the handles of the side anchor points as needed in order to round out the raindrop shape.

2. Cut Out the Raindrops
Step 1
Lock the teal rectangle in the Layers panel. Draw another rectangle, of the same size, over the artboard. Apply a Linear Gradient with the Gradient Tool (G). In the Gradientpanel, add the following instances of gray:
#dadada, #f8f8f8, #dadada, and#bebebe.
Finally, Copy (Control-C) and Paste (Control-V) the raindrop shape and scatter the pasted copies around the left side of your artboard.

Step 2
Select all of your raindrop objects and Unite them in the Pathfinder panel. Select both the gray gradient rectangle and the united teardrops and hit Minus Front in the Pathfinder panel.

Step 3
Paste the raindrop shape again. Use the Selection Tool (V) to scale the shape inward so it's narrow, but just as long as it was before. Repeat on each cut-out raindrop. Unitethe narrow raindrop objects in the Pathfinder panel.

Step 4
Unite the narrow raindrops with the gradient rectangle, making sure the newly compound shape retains the rectangle's gradient. Go to Effect > Stylize > Drop Shadow and apply the following attributes to the gradient rectangle:
- Mode: Multiply
- Opacity: 50%
- X Offset: -2 px
- Y Offset: 0 px
- Blur: 5 px
- Color:
#000000

3. Rendering the Raindrops
Step 1
Paste the narrow raindrops onto each raindrop section.
- Once again, use the Selection Tool to squish them inward a little bit further so they're narrower than before.
- Apply the same gray Linear Gradient used on the rectangle.
- Repeat for each raindrop.

Step 2
Paste an assortment of raindrop shapes in a variety of sizes around the left side of the artboard.
- Set the fill color of these raindrop shapes to white.
- Paste a second set, slightly offset from the first set down and to the left. Apply the same gray Linear Gradient used throughout this tutorial to each raindrop.
Apply a Drop Shadow effect with the following attributes to each of the gradient raindrops:
- Mode: Multiply
- Opacity: 50%
- X Offset: -5 px
- Y Offset: 4 px
- Blur: 5 px
- Color: Black

Step 3
Finally, let's trim the design to the artboard.
Group (Control-G) everything (background rectangle, gradient rectangle, and all of the raindrops) together.
Use the Rectangle Tool to draw a rectangle over the artboard. Select the rectangle and the design group and Make a Clipping Mask (Control-7).

Great Job, You're Done!
Share your wallpaper designs in the comment section below. Show off other geometric designs, color combinations, or applications of the technique outlined above. As a bonus, download the wallpapers I created from the download button to the right of this tutorial.


.webp)

