Are you an avid lover of things that are chock full of color and assaulted with buckets of glitter? This tutorial will show the step by step process of bringing a little horse with wings from drab to fab. Hold on to your crayons, ladies and gentlemen, and bring your sunglasses as we take flight and soar into another prismatic adventure.
1. Creating the Body
Step 1
We've embarked on a colorful journey, but it didn't start out that way. Like most of my projects, I start with pencil to paper. There were no bells and whistles, merely a mechanical pencil and bound sketchbook. I used my scanner at 300 dpi to scan in the finished line work.
I've cleaned up the line quality in Adobe Photoshop and now we can start our project. I'm working in Adobe Illustrator at a size of 11 x 8.5 inches for this specific project.
I like to keep my layers as neat as I can, and labeling them as you go is a good practice. I've labeled the first layer "Sketch" and locked the layer to make sure that I won't accidentally move or delete the sketch.

Step 2
Using our Pen Tool (P), we'll start to outline our little horse. I've outlined the head, body and front legs as a whole, excluding the back legs.

Step 3
Using these particular colors for the body, I can interchange the shading to vary between the main body and the back leg color. The Stroke is a standard 1 pt, which will be a constant with this particular project. The additional hint of color helps to give him a little extra lift off the page.


Step 4
Using a Radial Gradient of blues, with one side brought to 0% Transparency, I've started adding shading under the limbs. It's very subtle, but effective.


Step 5
In this particular step, we'll add his facial features using the same blue Radial Gradientas the shading.


2. Adding Body Depth With Shading
Step 1
Now that our Pegasus has enough shading, we can add our highlights. The blue of his skin is merely our base. The white will show up nicely over it, especially after applying a Feather effect to it. This seamlessly blends the two layers together for the desired look.

Step 2
Using our Feather effect at a Radius of 0.1 in, we'll put our white layer under the blue details of his face and body.


Step 3
At this point, we'll have a very clean-looking horse base. This is only the first step to our color explosion, so hopefully you can contain your excitement far better than I can.

3. Creating Fancy Feet
Step 1
To create a fancy look to our little winged horse, we'll add golden hooves. Again, we'll be using a Stroke line with a two-toned Radial Gradient of 1 pt.

Step 2
At this point we have used the same color to create our hooves. We've completed all of them, and we can now move on to the next step.

4. Adding Additional Body Shading
Step 1
Next, we will use the same treatment on the back legs as used with our main body. The highlight is just a bit darker than the main body color, to create depth. If we had used the same pure white, this would only flatten the overall piece.

Step 2
At this point, we have treated our highlights, and our body is now ready for a few more details before we can apply our prismatic colors.

5. Adding Wings
Step 1
We'll now start at the base of our wing. I'm using the same treatment as the body, but you'll notice that towards the bottom of the wing base, I have a layer of white that extends over the Stroke line and blends the wing and body once the Feather effect is applied.

Step 2
Our wing is coming along nicely. We'll add texture to our wing to separate it from the "smooth" muscular body. If you're using the same color, it's important to differentiate between the two body features.

Step 3
I want to create billowy, soft base wings, so I'll add a little more highlight to the root of each of these shaded cluster gatherings.
Once I have completed those, I will add the main shape of the wing. We will later complete the wing and add quite a bit of detail to make this feature come alive.


Step 4
We'll add a mixture of longer feathers towards the tips of the wing and shorter ones as they reach towards the base of the wing. It has a very bird-like feel that will serve our needs well.

6. Creating the "Mane" Color
Step 1
If you've been as patient as I have been, then you're soon to be rewarded. We're finally ready to add rainbow colors! In order to keep our fun organized, we'll start by making seven bars using our Rectangle Tool (M).

Step 2
I'm using the basics of my knowledge of rainbow colors to start us off. This will consist of R.O.Y.G.B.V or simply put: Red, Orange, Yellow, Green, Blue, and Violet. I'll start with a hardy red two-toned Linear Gradient with a two-toned 1pt Stroke line and work my way through the basic spectrum colors. I've also taken the lighter color of each of the bars and changed my Transparency to 70%. I'm using this as a blending tool to give our hair a smooth gradation as we apply the layers.

Step 3
Next, I've added pink to our spectrum to give it a smoother transition from red to violet. The pink is also a nice addition for that extra pop of color that I can only assume we both love.

Step 4
Next, we'll start applying our color, starting with the red. We'll follow the color bars as we've laid them out along the the mane. If you need to, you can lay the main color blocks down and then apply the smaller hairs afterward.


Step 5
At this point, I've turned off the layer associated with the Pegasus body. You'll see that you won't need to add every single hair behind the head, especially since you won't see it once we make the Pegasus body visible again.


Step 6
Now that our mane is beautifully rendered, we'll add a bit of shading to the lower half.

7. Rendering the Tail and Ankle Fur
Step 1
Once my mane is completed, I will use the same steps to create a full and vibrant tail to match.


Step 2
I've enjoyed using these colors so much that I've also applied them to the ankle fur of our Pegasus. I've decided to use my warmer colors for the front legs and the cooler colors for the back legs.

Step 3
At this stage, I've started to apply the cooler-colored back ankle fur. I opted to split the colors to allow more room for each color.

Step 4
We can now finish up the ankle fur with some glossy highlights. I love how full and carefree the fur feels. This is a happy animal, so the more spirit we can add to him, the better.

8. Finishing the Wings
Step 1
Let's return to our large fluttery wings. We can't very well leave them as they are—they need just as much attention as the rest of the piece. Using the same coloring as our body shading, I've made small separations in the feather to give it texture.
I can now take my Unite tool and bring all of these little pieces together to form one feather texture.


Step 2
In this step, I've started applying the feather texture to each feather base. To save time, I'll Copy (Control-C) and Paste (Control-V) the same texture to each.

Step 3
After a little more work on the feather textures, we've completed them and can now add shading to give depth. Notice that I did not bring the shadow all the way up the wing. I stopped close to the top, and doing so gives the appearance of the wing curving towards us.

Step 4
I've made a duplicate of our finished wing and added it to the back as its own Layer.

9. Polishing the Facial Features
Step 1
Next, I've taken the ear color and replaced it with a happier and healthier color. A light blush of pink works well with his overall complexion.

Step 2
Our Pegasus is now ready for a bright and vibrant eye, but we won't stop with just a bright color. We can do better than that!

Step 3
Using our Star tool, we'll add our first star of many. I've added a Stroke to it and have changed my edges to Cap: Round Cap and Joint: Round Join in my Strokesettings. I'll now take this and move to my tabs at the top of the page. Go to Object > Expand and click on the Stroke as the only component that you would like toexpand. Press Unite in our Pathfinder tab to form one full star.
We're now ready to make duplicates of varying sizes within our eye.


Step 4
After applying our happy little stars, we can overlay our shine to brighten up his eye.


10. Rendering the Rainbow Bridge
Step 1
Our Pegasus is now ready to ride a rainbow. Using the sorted colors from our color blocks, we'll form a less than even arch of color. I've made this loosely, without the need of a sketch. This is your turn to express yourself and have fun with the process, so make it as loopy as you'd like.


Step 2
The finished rainbow bridge will look something like this. It's now ready to blend.
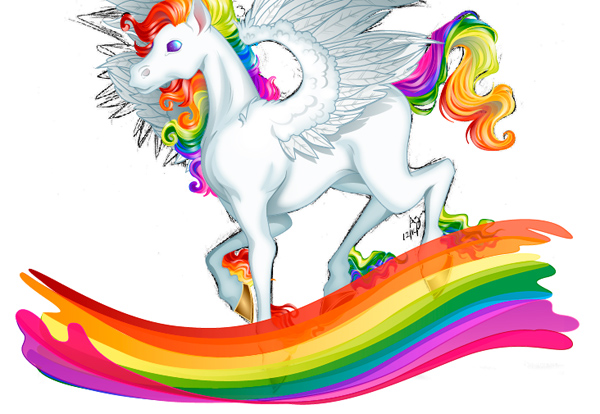
Step 3
Take all of your rainbow bridge pieces and Group (Control-G) them for easier selection. Using our Gaussian Blur with a Radius of 6.3 px, create a blended rainbow. I don't want the rainbow to be too intense, so I've lowered the overallTransparency to 80%.

11. Creating a Background and Clouds
Step 1
Once your Layers are locked, create a new one which will have our background color. I'm using another two-toned Radial Gradient to make a lightly colored background. I love how soft these colors are. They really complement the entire piece.

Step 2
Our next step includes adding an assortment of fun shapes. These shapes will eventually become wispy clouds using our Gaussian Blur.


Step 3
After applying enough fun shapes, we've come up with a rather nice display of clouds. The only thing missing is a mess of glitter!

12. Creating Glitter Symbols
Step 1
One of the simplest ways to make glitter is to make a number of Ellipses (L) and use varying degrees of Transparency. Knowing me, I'll go glitter crazy, so our best bet will be to make this cluster of newly made glitter into a Symbol. This allows us to use the same glitter cluster over and over again, without adding copious amounts of data to our file.


Step 2
In this step, I've already applied two of my Symbols and as they lay over one another, I'm building up his glamorous look.

Step 3
I've applied glitter to his mane, tail, wings and ankle fur, and now to the rainbow bridge itself. I advise you to go as glitter crazy as you feel the need to be!

Step 4
Our last step will be to apply larger sparkles to enhance our glitter. This makes it look more like glitter and less like dandruff.

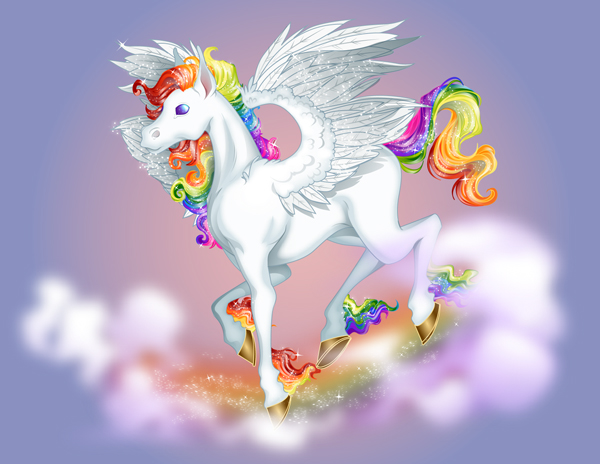
Finished! Our Prismatic Pegasus is Ready to Take Flight!
I really do hope you've enjoyed this tutorial. If you do try to create your own prismatic Pegasus, please share your experiences and hopefully your art with us! If you're in the mood to create more enticingly colorful projects, I recommend you check out: Create a Rainbow Vomiting, Kawaii Unicorn in Adobe Illustrator as well as How to Create a Punk Nouveau Mermaid in Adobe Illustrator. Stay fabulously colorful, friends!


.webp)

