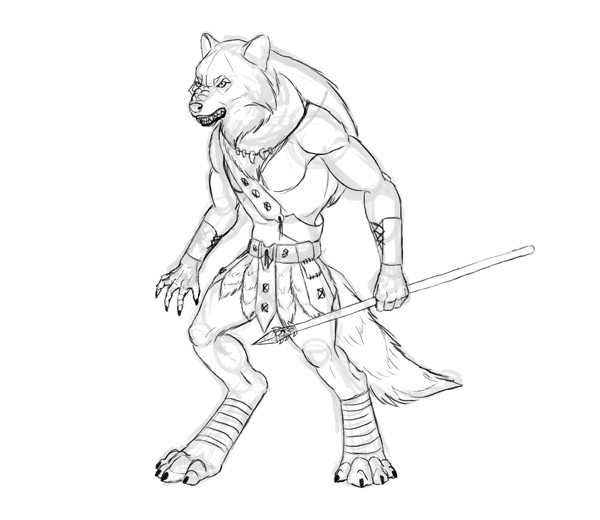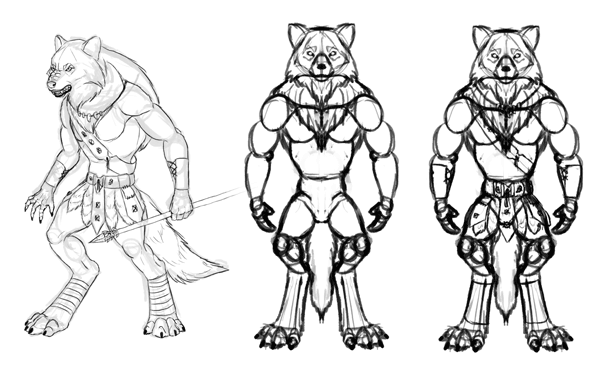
When you design a character on a 2D sheet, everything is clear for you. Sure, you're showing only one side, but you know exactly how the character would look in any other perspective. However, the 3D artist, whose job is to take your design and bring it to the third dimension, can't read your mind. They can only see what you give to them—one side of a multi-dimensional design in your head. To reduce the risk of misunderstanding, when designing a character try to describe as many aspects of it as possible.
One of the ways to do it is to create a model sheet. Its goal is to show more dimensions than only one drawing would. For example, the front view shows you the full height and width, but it tells you nothing about the depth. Also, the front and back may be totally different.

This tutorial will be a simulated process of performing the task of a conceptual artist. I'll show you how to accomplish it step by step, explaining each step in detail—from the analysis of the commission through to the research of the topic, the design, and the full execution of the idea. You don't need any digital drawing software for this, although it's recommended.
1. Commission Analysis
Let's say you're a freelance concept artist. A company producing video games contacts you, you come to agreement, and they tell you what exactly they want you to do:
"It should be one of three playable characters in our game, a male werewolf warrior. In this universe the werewolf is another intelligent race rather than a cursed human, something like the orc or the minotaur. This character is strong, but is more a type of knight than a barbarian. His equipment is made all by himself, because he comes from a tribe, not from a developed civilization.
The game is a kind of fantasy RPG, but its world isn't realistic and harsh. It's very colorful, sometimes exaggerated, and it's also child-friendly. We aim the game to be rated by ESRB as E10+, so it should be a mild version of high fantasy—with all the best things about fantasy, but without the brutal realism that's so popular nowadays (think more Fable than Skyrim or the Witcher). However, we don't want it to be totally fabulous and unbelievable, just a child-friendly kind of realistic."
They also say it's all that can be said about the project, so you've got a free hand about everything that hasn't been described here. What do we do now?
Step 1
We need to convert the information to something more exact—we need facts, not metaphors.
Let's see what we can say about the character:
- male
- werewolf (intelligent, human-like species)
- strong, but not bulky
- comes from a primitive tribe
- uses/wears primitive equipment
That's pretty enough to create a character, but we've got more info. There's a certain style that needs to be followed:
- colorful fantasy
- exaggerated elements
- child-friendly realism
Step 2
Now we need to expand this information. What does it all mean for us?
| Keyword | Expanded Meaning |
|---|---|
| male |
|
| werewolf (intelligent, human-like species) |
|
| strong, but not bulky |
|
| comes from a primitive tribe |
|
| uses/wears primitive equipment |
|
| colorful fantasy |
|
| exaggerated elements |
|
| child-friendly realism |
|
Step 3
It's very important to have the character's personality in mind before starting to design—we can say the inside that we don't draw influences strongly the drawn outside. In this case we haven't got the personality information from the company, which may mean one of two things:
- The company has planned the personality, but didn't think it was important to share it with us.
- The company hasn't planned the personality (yet).
In the first case there's a risk that we will not meet the requirements of the client, because they may have something in mind they didn't share with us, thinking our job is only about the look. To avoid it, always make sure to ask if they have any kind of personality in mind. In the other case it's very likely they'll use your suggestion, as long as it's based on their idea, or at least they'll base the personality on what shines through your design.
The personality shouldn't be totally fanciful—we need to base it on the information we already have. Our character is half-wolf, so we can expect he'll be more or less savage, untamed. He comes from a primitive tribe, not from a civilization that created decorum (good taste), so he can be very straightforward, but also alert and suspicious in contact with strangers. I can imagine him being loyal and honest, just as we imagine wolves, and friendly once one manages to earn his trust.
Can you feel you know the character now? That's just what we wanted!
2. Preparation Process
The most important feature of our character is his species. He's a kind of anthro-wolf, a human-like creature with wolf features. He should look like a wolf that evolved in a similar way to the human, without losing his most distinctive features. To get it right we need to focus on the anatomy of both human and wolf. You can "kinda know" what the human or the wolf looks like, but it's not enough to create a believable character—limited knowledge will limit your creativity.
Step 1: Skeleton Comparison
Wolves and humans are both mammals, so we'll find a lot of similarities in our skeletons:
- Shoulder—notice lack of clavicles at the wolf.
- Shoulder blade—placed on the back at the human, and on the sides of the wolf.
- Wrist
- Fingers—wolves walk on them.
- Ankle
- Heel
- Toes—again, wolves walk on them, not on the whole feet like us.
- Knees—notice they point the same way.
- Elbow
- Sacrum—this is where the tail starts, if the animal has any. Pay attention to the rotation of the hips.
- Neck—more elastic for the wolf. Notice the point where it attaches to the skull.


Step 2
Now we can design the skeleton of a creature that is a mix of all these features. It doesn't need to be anything final, just a way to organize the hints we can use, something to base our ideas on.
Let's imagine a wolf evolved just like the ape: its upright position gave more freedom for the evolution of hands, but for this to happen the feet must have changed, and the pelvis has been rotated.
The man-wolf can still walk on all fours, and it's always ready to do so in case there's a need to move fast. The tail may be longer, giving more stability, and the clavicles were developed to support the arm (no longer legs) movement.
We can also imagine the upright position will lead to the development of more complicated forms of communication, since it makes it harder to use the whole body for this—our wolf-man may have a more expressive face than normal wolves.

Step 3: Musculature Comparison
We need to do the same with the muscles. The position makes a big difference here—wolves don't have "arms" in the literal sense, they only have legs. When mixing both anatomies we need to pay attention to the function of the muscles.


Step 4: Detail Study
We know a lot about the general anatomy of the human and the wolf, but it's not enough. There are details of the wolf body that we need to learn to draw. Expecting them to turn out by themselves when we prepare the design may lead to a big disappointment and waste of time. You can create your own study or use my tutorial about drawing wolves for this purpose.

Hint: even when you're good at drawing both humans and wolves, always do a warm-up before going on to serious things. It makes the process faster!
3. Design
This is the part where we'll use all the knowledge we've gathered to bring the idea to life.
Step 1
Turn on some dynamic music and go into wild drawing mode. Don't think: just sketch your ideas quickly, on a small scale. Once one silhouette is done, go to another. Don't judge, be fast.

Step 2
Pick your favorite! I decided the second one was looking the best, but it happens rarely. Usually the first sketches are still a part of the warm-up, and only after them does your hand start working more fluently.

Step 3
Now take your character to the playground! Test it and see its viability in various poses. It will help you find and refine the weak spots of the design.
If you think it's too much drawing and you'd rather just go on with the very first sketch you've drawn, you may need some more practice. Sketches like these should come very easily to you—if they don't, you may not be ready yet for this kind of job. It's about picking the best idea out of dozens potentially good ones, not about using the only idea you are able to draw.

Step 5
Refine the idea on a slightly larger scale. Details aren't important yet; focus on the silhouette.

Step 6
A naked wolf-man would look like a wild creature instead of a primitive one. Let's sketch a few possibilities for the outfit:

Step 7
I've chosen the middle one. It's quite simple, with armor that's not too heavy. I imagine our character to be as fast and agile as a wolf, and a wolf would despise any armor that restricted his movements. Besides, the wolf-man is already well protected by his fur and doesn't need to wear anything else to stay warm. What did I include in his armor?
- A belt made of leather, without a metal buckle that would be hard to get in a primitive community. I searched for "primitive belt" to find out how it could be done instead.
- A "skirt" made of leather strips studded with stones, and fluffy animal tails for greater protection. It's all very movable, so it doesn't constrain the creature.
- This belt can be used to tie the scabbard to.
- Typical forearm guards, nothing fancy.
- This part of the foot isn't flexible, so we can safely cover it too.
- A pendant with animal fangs: cliché, but still cool.

Step 8
What kind of weapon may our character prefer? It must be something quite simple to make, fitting his fast combat style. I've chosen a spear with a stone blade and sharp fangs at the end. It can be used for piercing (blade), hitting (fangs), and throwing.

Step 9
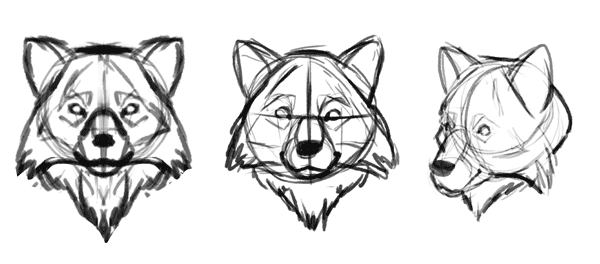
So far we've only paid attention to the whole body, so now let's take a look at the face. Make sure you are able to repeat the shapes and proportions, that they're not random. Check if you can maintain the proportions and the same style in other views, too.

Step 10
Make sure the face is flexible enough to change the emotions. The wolf's face isn't as expressive as the dog's, but we can change it for our purpose. It's a kind of evolved wolf, after all!

Step 11
Put all your ideas in a clean sketch, trying to present them as clearly as possible. It doesn't need to be super refined, but make sure there's no doubt about what is what. The client should now tell you if they like the design, and what they'd like to change before going to the next phase. Listen carefully and ask questions if you're not sure about something—it'll save you a lot of time!

4. Execution
Let's assume the client was ecstatic about our design and we've got the green light. We can start working on the full presentation—front, side and back.
Step 1
Using the previous picture as a reference, sketch the front view.

Step 2
Break the front view into simple forms that will be easy to repeat.

Step 3
Draw horizontal lines crossing the body to divide it into parts.

Step 4
Use the lines to draw side and back views without losing the proportions.

Step 5
To draw arms only once, and show both its sides at the same time, we need to modify the front view:

Step 6
Let's start adding details to all the views, part by part to keep consistency. Keep in mind we've already created the design, and now we only reveal it.
Draw the head:


Step 7
The mane:


Step 8
The torso and arms:


Step 9
The legs:


Step 10
The outfit:


Step 11
The weapon:


Step 12
Clean the lines of the sketch.

Step 13
You can add strong outlines to create a border between the inside and the outside.

Step 14
You can also stress the lines within the outline, to define the most important parts.

Step 15
Do the same with all the views:


Step 16
Take a god look at your model sheet and make sure everything is clear. If it's not, you can be sure they'll either guess it, ruining your idea, or bother you from time to time to dispel a doubt. To minimize the risk, add all the details you can think of.


We're Ready to Fight!
The model sheet is ready to be handed to the 3D artist. You can use exactly the same workflow for every character you wish. Keep in mind that quadrupeds may benefit from showing the top view, too, since this is their actual back.
But this is not the end! What about the colors? They're very important for the character—we shouldn't leave this choice to someone else! In the next part of this tutorial I'll show you how to paint the character quickly, using a simple color palette. Stay tuned!


.webp)
