
Adding shattered glass to a design is a great way to introduce drama and interest. The visual depiction of broken glass is very evocative and full of energy and conflict. Creating it is full of technical challenges. Illustrating it is difficult and time consuming, but photographing it well is no easy task! In this Quick Tip, we will give you a great technique for safely generating shattered glass brushes in Adobe Photoshop.
1. Create the Practical Effect
Before we begin, I know what you are thinking. "How hard can this be? Just bust some glass and take a picture of it!" But this project can actually be a lot more difficult than it looks. The very nature of shattered glass makes it a challenge to work with. It is sharp and can cut. There's no way to break it in a slow and controlled manner. It must be shattered violently, and the shards have a tendency to fly all over the place in a hugely uncooperative, and dangerous, manner.
Once the safety issue is dealt with, the next challenges are backgrounds and reflections. Either one can drastically increase editing time during the brush creation, so it's best to eliminate them on the practical side. Yet figuring out a setup that doesn't show any background or reflection in dozens of shards of tiny glass is no simple matter.
Fortunately for you, this tutorial walks you through how to conquer both those challenges and end up with some clean, crisp shattered glass brushes!
Step 1
The materials you will need are fairly simple and common. You will need:
- Several small panes of glass. I got mine from cheap picture frames on sale at my local department store.
- Some sturdy card stock.
- Spray adhesive. Look for a can that gives a fine mist and dries invisibly.
- Clear plastic bags large enough to hold the glass panes.
- A hammer!

Step 2
I suggest doing this project outside on an overcast day. The heavy cloud cover will give a soft ambient light and make it easier to keep the reflections clear. The key to controlling the shards of glass and stopping them from flying away is to glue them to the card stock. Start by spraying the adhesive on the card stock. Use a very fine mist—you don't want the drops to be visible through the glass. The glue doesn't need to hold the glass securely, it just needs to help keep it from sliding around.

Step 3
Allow the adhesive a minute to dry, and then gently press the glass pane onto the card stock. Be careful not to smear fingerprints all over it!

Step 4
If necessary, trim the card stock down so that the paper and the glass together can fit inside one of the plastic bags.

Step 5
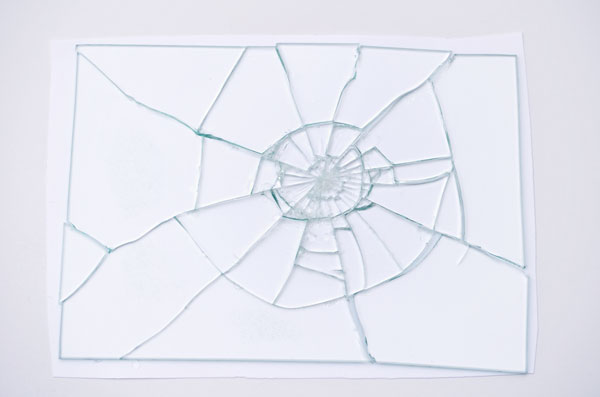
Break the glass with a quick strike of the hammer to the center of the glass pane. The adhesive holds the shards in place and the plastic bag prevents them from flying around.

Step 6
Carefully slide the card stock out of the bag without disrupting any of the glass pieces. Keep the card flat and begin to photograph the broken glass. Shoot from a slight angle and watch that your own reflection doesn't appear on the glass surface.
Step 7
Carefully move some of the glass shards and shoot more photos of assorted pieces of glass, always being aware of your reflection!

Step 8
Repeat the process as many times as you'd like, or until you run out of panes of glass!

2. Process the Photos
Now we turn the corner into the digital world, and adapt our shattered glass shots to work as custom brushes in Photoshop.
Step 1
Open one of the shattered glass shots and use the Crop Tool (C) to crop the image in close to the edges of the glass.

Step 2
Photoshop brushes ignore color information, so it's best if we see the image as Photoshop does, in grayscale. Add a Black & White Adjustment Layer and find the preset that generates the best contrast for your shot. For this image, that was theHigh Contrast Red Filter.

Step 3
Add a Curves Adjustment Layer and squeeze the curve horizontally to meet the histogram edges, which greatly increases the contrast of the image. Then create a steep arc upwards. The goal is to get the parts between the cracks solid white, and the cracks as dark as possible without creating distortion.

Step 4
Add a New Layer to the top and use a soft edged Brush (B) with foreground color set to white. Paint completely around the edges and gently fade the radiating cracks as they approach the edges.

Step 5
Go to Edit > Define Brush Preset and give the new brush a name. Continue this same process for the rest of your shattered glass photos until you've built up a library of custom shattered glass brushes.

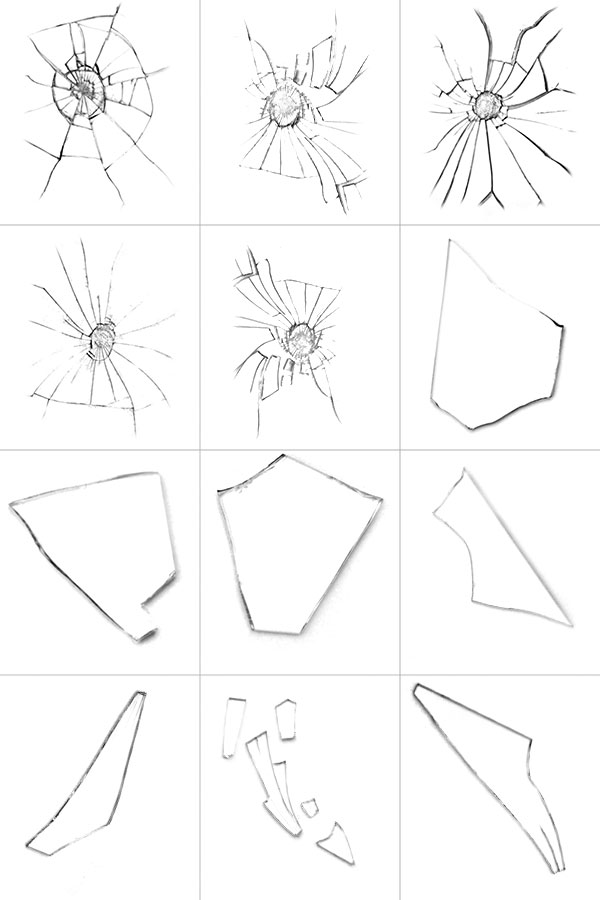
3. Use Our Brushes
While I fully encourage you to follow along and create your own custom shattered glass brushes, I realize that not everybody has the time or opportunity to break glass just for photos. So I've provided an assortment of broken glass brushes free for you to use!
Step 1
Download the attached file for this tutorial,
ShatteredGlassBrushes.abr. Then go to Edit > Presets > Preset Manager. In the Brushes section, use the Load button to navigate to the downloaded file.
This will add 12 new shattered glass brushes to your Brush Presets.
Step 2
Go be amazing! Now use your smashing new brushes to produce some digital artwork with actual glass effects that you didn't have before.
Want More?
Can't get enough custom creative brushes in Photoshop? Check out my previous tutorials on creating custom brushes for Coffee Rings, Smoke Tendrils, or Water Drops. Hungry to learn more about how to use custom brushes in photo manipulation projects? Check out my profile of courses and tutorials here at Tuts+ and find all that, and much more!
Creating your own library of digital resources pulled from real-world practical effects is a skill that will pay off exponentially in the future. Instead of searching stock sites for interesting textures, try creating some for yourself! I'd love to see them in the comments below.


.webp)

