
Bellydance has a long history in Middle Eastern culture, and according to some experts it should be considered a dance of celebration, performance art or folk dance rather than entertainment of a seductive or provocative nature. Its roots are quite unclear, but it has had a presence in the history of Egypt, Turkey, Lebanon, Syria, Greece, and the "Khaleeji" region.
Traditionally associated with religious and erotic elements, the dance was created to fit the nature of a woman's torso muscles, hip and chest movement. Bellydancing focuses mainly on sensually weaving those body parts independently to the beats of the oriental music.
Bellydancers often dress themselves with colorful, highly decorated two-piece costumes (bra and skirt), free flowing gowns, embellished belts, shimmery scarves, coin belts or kaftan wear. They might also adopt props like zills, swords, veils, or canes for their dance.
Nowadays bellydancing can be spotted at weddings, family occasions, celebrations, festivals, and restaurants.
In this tutorial I will take you through the creative process of creating an album cover, from illustrated sketch to final EPS format. Learn to create cover art which you can upload to your track playlist. We will begin by sketching on Adobe Sketch, move on to some handy tools in Adobe Illustrator CC (2014 release), and incorporate Adobe Color CC into the work.
For some musical inspiration while you work, head over to SoundCloud, and immerse yourself with some exotic melodies and lush tunes from the Arab world.
1. Adobe Sketch and Illustrator Setup
Step 1
One of my commonly used pieces of software on-the-go is Adobe Sketch, which you can download right onto your iPad. It's a great tool to sketch out your ideas wherever you are, its tools behave realistically, and you can upload the finished work directly onto your Creative Cloud and send to Adobe Illustrator/Photoshop CC automatically.
Let's begin. Open Adobe Sketch, rename your Project as "Bellydance Cover Art", and start sketching with your finger, or if you have an iPad-compatible stylus, that will work too. I work with the Intuos Creative Stylus, which you can also purchase from Wacom.
Select the first Pencil tool from the top menu, and a dark blue tone, and start sketching.
Draw very lightly at first. The pen works on pressure, so the harder you press the darker the pencil stroke will be. Use the Eraser tool to remove any errors. Once you are satisfied, make sure you are logged in to your Creative Cloud. Now we can share the work, by clicking the Share menu, and Send to Illustrator.

Step 2
Your illustration will open by itself on Adobe Illustrator CC (2014), as "Bellydance Cover Art - Sketch 1.sket".
Now we want to create an album cover, so we need to customize the artboard to be a square fit. File > Document Setup, and select Edit Artboards.
- Name: Bellydance Cover
- Width 22cm
- Height 22cm
Click OK.

File > Save As, Bellydance_Player_Cover_Art.ai.
We need to rename and lock the layer so that we can trace our drawing on top, so openWindows > Layers. Rename the layer as "Sketch".
Double-click the layer to open the Layer Options menu, and check Lock and Dim Images to: 25%, and OK.

On top of the Sketch layer, Create New Layer, and name it "Artwork", so we can begin tracing the work on this layer.
One cool feature of the new Adobe Illustrator CC (2014) is that you can create your own custom Tools panel, to combine all the tools you commonly use for drawing.
Go to Windows > Tools > New Tools Panel, name it "Artwork Tools", and click OK. A new Tools panel will appear. You can just drag and drop any tool from the originalTools bar to the custom panel, and then close the original tools bar, to keep only the tools you need.

You can later save the custom Tools panels in your Workspaces, by creating a workspace dedicated to drawing. Windows > Workspace > New Workspace.
File > Save (Command-S).
2. Tracing Tools
Step 1
Before we begin to trace out the artwork, let's learn some new featured tools.
Typically when I trace, I like to trace the small tidbits on top and move down to the skin, hair and background, since the larger areas don't need much work. The belly dancer's costume is fully embellished, so we can begin by filling up the forms in her outfit.
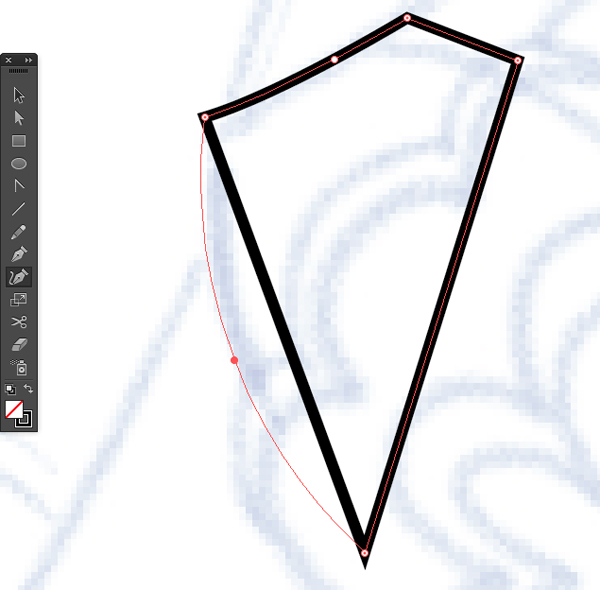
The Pen Tool (P) is one of the most important tools in Adobe Illustrator. In the 2014 release of Illustrator CC, new updates to the tool give you more precision and flexibility when crafting your art. One main feature is the Pen Tool Preview, which lets you see your path (red line) before you place your anchor points, and saves you from cleaning paths later.

Another cool feature to test out is the ability to drag unequal point handles.
In previous versions, when you added a point, equally paired anchor handles were created. Now when adding a new point and holding the Command and Alt keys down, you can vary the length of the new anchor point handles, and control your curves more, without ruining your shape.

Another handy tool to test out is the Curvature Tool (Shift-~). It's basically the Pen Tool (P) with a curving twist option. It helps you to draw your curves more smoothly and quickly.
It's a bit tricky to get the hang of the first time, so take your time to try it out. One trick of this tool is the ability to draw perfect circles. Simply select the Curvature Tool (Shift-~), and click once in the center of each circular guide. With four clicks you can create a circle.

And in case you want to have a straight line between the points, just double-click the center of each guide.

If there is an existing path you wish to fix, simply select the shape with the Selection Tool (V), and then take the Curvature Tool (Shift-~) and select the path, in order to convert it into a smooth curve.
If you find it difficult at first, just use the Ellipse Tool (E), especially when you need to draw the coin ellipses.
Once you get the hang of the new features, all you really need to trace the artwork are the Pen Tool (P), Curvature Tool (Shift-~) and Ellipse Tool (E). Set your stroke to black with no fill color, and start tracing.

Step 2
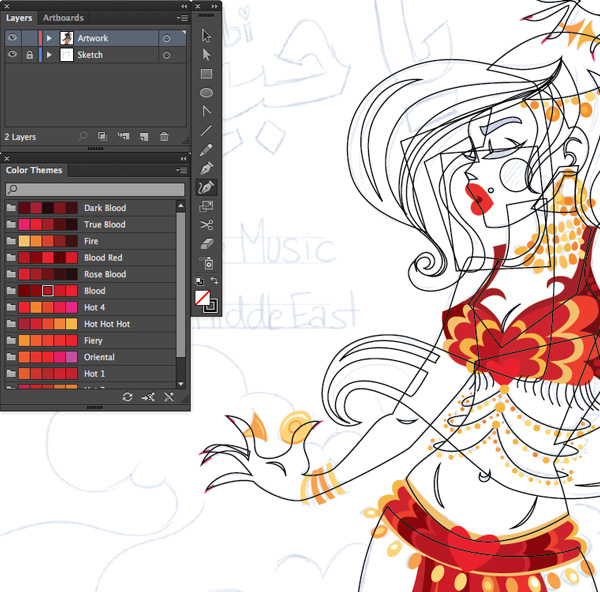
Color is essential to good design, so you need to make sure you choose the right hues. There are several apps to help you choose the right color scheme. I used Adobe Color CC. For this album I decided to go with fiery red tones.
Create your color schemes, name them, and save.

Adobe Color CC generates themes you can sync with Adobe desktop apps like Photoshop and Illustrator, and mobile apps like Illustrator Line, Illustrator Draw, and Photoshop Sketch.
Open Windows > Color Themes.
If you are connected through Creative Cloud, click the refresh button and all your themes will be synced onto Illustrator.

Let's color!
As you go along, arrange the stacking order of the shapes according to their proper layering.
To move an object to the top or bottom position in its group or layer, select the object you want to move and choose Object > Arrange > Bring To Front (Shift-Command-]) or Object > Arrange > Send To Back (Shift-Command-[).
To move shapes by one object to the front or to the back, select the object you want to move, and choose Object > Arrange > Bring Forward (Command-]) or Object > Arrange > Send Backward (Command-[).

Step 3
Next trace the body parts, using the same tools, with the Stroke set to black and Fill to none.
In the Layers panel, Create New Layer under "Artwork", and give it the title "Background".
Trace with the Curvature Tool (Shift-~) one part of the smoke, in the "Artwork" layer, on top of the the belly dancer's hip. Then on the "Background" layer, trace the rest of the smoke illustration.
File > Save (Command-S).

Step 4
Lock the "Artwork" and "Background" layers, Create New Layer on top of "Artwork", and give it the title "Text".
Open Window > Brushes. In the Brushes panel sub-menu, Open Brush Library > Artistic > Artistic_Calligraphic.

The Artistic_Calligraphic panel will open. You will find a 40pt.flat brush. Drag and drop it into the Brushes panel, then close the Artistic_Calligraphic panel.
Double click on the 40pt.flat brush and the Brush Options panel will open. Adjust the setting to:
- Angle: 62 degrees / Random
- Roundness: 35 percent / Stylus Wheel
- Size: 46pt / Random
Click OK.

Click B, a shortcut for the Paintbrush Tool, and with the newly amended brush selected, trace the Arabic text " Ya Habibi", which translates to "My Love". Not everyone has the Middle Eastern version of Illustrator, so it's easier to just draw the text at this point.

Next let's place in the English text. Click T, the shortcut for the Type Tool.
On the top menu bar you will find:
- Character: Here you can select the font of choice. I selected the Brody font.
- Font Size: 59 pt.
Make sure Paragraph is Align Left and Left-to-Right Paragraph Direction.
Now rotate the text Rotate (R), so it's aligned with the Arabic "Ya Habibi".

Next, select the Type Tool (T) again, with Brody font, 32 pt, Paragraph: Align Leftand Left-to-Right Paragraph Direction, and type in "Bellydance Music from the Middle East".
File > Save (Command-S).

Step 5
Lock the "Text" layer, and unlock "Artwork".
Move on to Adobe Color CC and select the skin, hair, smoke and background tones.
Once you are done, move back to Illustrator and the Sync Color Themes panel.

Start coloring the remaining elements on the artboard. While you color, arrange the stacking order of the elements correctly.
Select the object you want to move, and choose between:
- Object > Arrange > Bring Forward (Command-])
- Object > Arrange > Send Backward (Command-[)
- Object > Arrange > Bring To Front (Shift-Command-])
- Object > Arrange > Send To Back (Shift-Command-[).
If you feel you need to add or remove elements, do improvise as you go along.

Window > Stroke, and open the Stroke panel options. Choose Weight: 2 ptand Round Cap: Round Join.
Check Dashed Line, and set Dash to 0 pt and Gap to 5 pt. This will create the bead effect on her dress embellishments. Try to vary the point values to create a variation in the piece.

File > Save (Command-S).
Select the Pencil Tool (N) and add in some more embellishments using the same bead settings.

Step 6
Unlock the "Background" layer and color in the smoke.
Open Windows > Gradient. Select the Rectangle Tool (M) and fill in the background color with a fire (yellow to red) Radial gradient.
Unlock the "Text" layer and give the text color.
For the Arabic illustrated font, Object > Expand Appearance. For the English type, Type > Create Outlines.

Position the text as you find fitting.
Then with the Selection Tool (V) select all the text, and Group (Command-G). Drag slightly downwards, while holding down the Alt key, to Duplicate the text.
Windows > Transparency. Give the new group a Multiply transparency mode. Then Object > Arrange > Send Backward (Command-[), and File > Save (Command-S).

3. Pattern and Effects
Step 1
Lock the "Text" and "Artwork" layers, and move on to the "Background" layer.
Let's add a pattern to the background.
Select the Polygon Tool from our default Tools panel: Window > Tools > Default(the downside of a customized toolbar is the ability to drag the entire tool sub-menu with each tool).
Select All (Command-A), and press Command-2 to Lock Selection. We need to lock all the elements so they don't get in the way of our pattern design.
Create an orange filled polygon.
Select the shape and hold down the Shift key and you'll notice that the shape is constrained to moving only on a horizontal or vertical plane. If you hold down Option/Altand Shift-Drag, it will make a copy that is lined up horizontally.
Now Command-D, to duplicate the action, and fill the artboard dimensions.

Group (Command-G) the polygons and then hold down Option/Alt and Drag to make a copy. Align the second group at an angle to the top polygons and Shift-Drag to copy one last polygon to fill the empty space at the end.

Select both groups, and hold down Option/Alt and Drag to make a copy vertically.Then Command-D to Duplicate and fill the artboard dimensions.

File > Save (Command-S).
Select All (Command-A) and Group (Command-G). Then click Object > Arrange > Send To Back (Shift-Command-[) to send it behind the smoke.
Set Transparency to Screen mode, at 80%.

Object > Unlock All (Command-Option-2).
Unlock the "Artwork " and "Text" layers.
Select all the smoke shapes, with the Direct Selection Tool (V), and give them aScreen transparency mode of 50–85%.
File > Save (Command-S).

Alter the transparency of the smoke as you see fit, and fix any colors or transparencies you find not so accurate in composition.
I went back and fixed the skin tones to a lighter shade, adjusted pattern transparencyOverlay at 43%, added color to the gradient background, and adjusted the text shadow.
Step 2
Finally all you need to do is export the image.
File > Save (Command-S).
File > Export, JPEG format, with Use Artboards checked, and click Export.
In the JPEG Options pop-up box, select RGB for Color Mode, with Screen Resolution of 72 ppi, and OK.

Finally, open your music player of choice and add in the artwork to your playlist.

Congratulations! Your Playlist Cover Is Ready!
We have created a playlist cover art, which you can upload to your favorite bellydance tracks.
We learned how to sketch on-the-go with Adobe Sketch and then share our work through Creative Cloud, and we discovered some handy tools in Adobe Illustrator CC (2014 release) like the new Pen Preview, Curvature Tool, customizing the Toolbar, use of brushes to create text, adopting the functions of Adobe Color CC, and many more tricks.
Hope you enjoyed this tutorial, and looking forward to see your version of the design.
Let's see those creations!


.webp)

