Creating frame animations in Adobe Photoshop is simple, but the real power of it isn't in the tool, but in the way you use it.
Today I'll show you how to create a six-frame animation of a quickly walking kitten. The most intuitive way to create an animation would be to draw it frame by frame, but with Photoshop there's no need for that. I'll show you a set of little tricks that will make animating easier and faster, and the animations themselves smoother.
First we'll draw a kitten from scratch, and then we'll convert it to simple shapes, understand the movement, and adjust the shapes to the movement to give them life.
This is a beginner-friendly version of Create a Run Cycle Animation From Scratch in Adobe Photoshop.
1. Sketch a Kitten
In this part we're going to sketch a kitten in a simple, side view. If you're not a beginner at drawing, feel free to skip it and draw your own sketch.
Step 1
Open Photoshop and create a New File (Control-N). Use 2000 px for Width and1500 px for Height.

Step 2
Create a New Layer over the background. You can use the shortcut Control-Alt-Shift-N, or click the icon as shown below:

Select any Brush (B) you like for sketching, and roughly draw the idea from your head. Do it quickly—don't think too much, and don't erase the lines.

Step 3
Set the Opacity of the layer to 20%.

Step 4
Create a New Layer the same way as before. Now we're going to build more thought-out shapes on the base of the sketch.
Start with a "6" that will imitate the chest and the back.

Step 5
Add another 6-like shape for the head and the back of the neck.

Step 6
A little "C" will make the snout.

Step 7
Two elongated "S"'s will make the legs. Add a short line for the tail.

Step 8
Add two flattened domes for the paws.

Step 9
We need to work on the legs some more to get the shape right. These lines will be the elbow and the heel of the cat.

Step 10
Add more guide lines to divide the legs into parts.

Step 11
Our "skeleton" is done. You can now delete the sketch, and change the Opacity of the skeleton to 20% as we did before.
Step 12
Now we'll be building the actual body. Use the guide lines on the legs to create the chunks as shown below:

Step 13
Now add the paws.

Step 14
Use straight lines to build the shape of the head.

Step 15
Now take care of the lower part and connect the head with the chest.

Step 16
This shape will make the eye socket:

Step 17
Put the eye inside.

Step 18
"Stick" a triangle on the head—it will be the base for the ear.

Step 19
Sketch the ear.

Step 20
Finish the picture with any other lines you can find.

Step 21
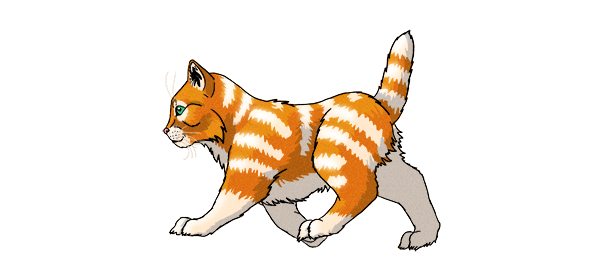
Delete the previous layer, leaving only the background and the line art. Our kitty is done and ready to have fun!

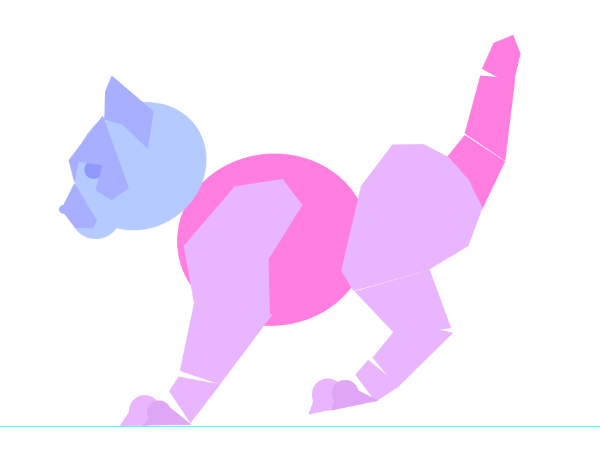
2. Split Up the Body
We need to cut the body into separate chunks to animate them individually. Don't worry, no kittens were harmed in the making of this tutorial!
Step 1
Again, lower the Opacity of the layer and create a new one. Can you see any circles/ovals in the body? Draw them!

Step 2
Try to show the contours of the body by using only straight lines. Just imagine you're drawing a constellation!

Step 3
Take the Pen Tool (P). It doesn't only draw paths for selection, it can also draw editable, vector shapes. Change the mode to Shape and pick any Fill color you like.

Step 4
Click the points ("stars") of your "constellations" one by one, until you've closed the shape. Every shape creates its own layer automatically. For ovals use the Ellipse Tool(U) in Shape mode.


This is what you should end up with:

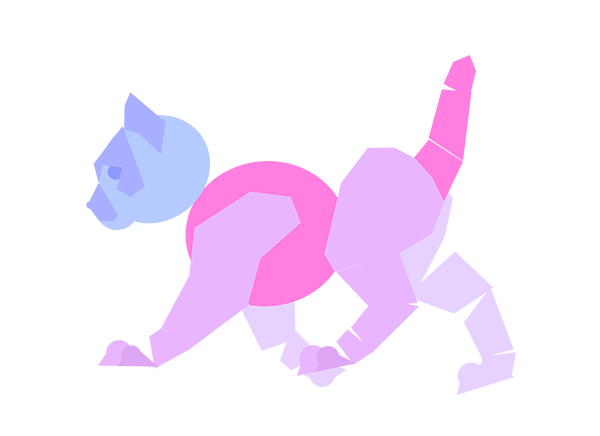
Step 5
A lot of layers have been added to the list! To avoid a mess, Control-select them, and then Group (Control-G) and label them.

Step 6
Test the body! If you Control-click the shape, the group it's in will be selected. You can move a whole body part, and rotate or scale it (Control-T). Because these shapes are vector, they don't lose their quality no matter how strongly you modify them.

3. Prepare the Movement
There are three basic gaits of a cat. Cats can walk, and they can run with great leaps, but there's also a middle way. It's called the pace, and it looks like a fast walk. Do you recall your cat running to you when it hears the "sound of noms"? That's the gait.

The funny thing about this gait is that it's literally based on two frames:
- Left side legs to the front, right side legs to the back
- Right side legs to the front, left side legs to the back

To make it smoother, we're going to add two frames between those, giving us six in total. That's going to be easy!
Let's take a closer look at the frames we'll need:
- Left side legs go to the front; right side legs to the the back; rump goes up, head goes down.
- Left side legs are landing; right side legs take off.
- Left side legs are pushing the ground to the back; right side legs get pulled to the front.
- Left side legs go to the back; right side legs to the the front; rump goes up, head goes down.
- Left side legs take off; right side legs are landing.
- Left side legs get pulled to the front; right side legs are pushing the ground to the back.
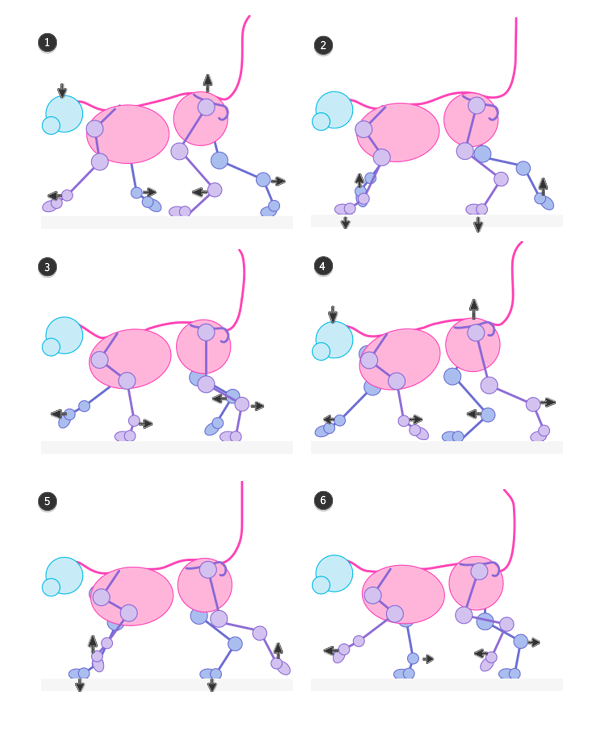
It's still quite complicated, isn't it? Luckily for us, it's a fully symmetrical gait—one side repeats the exact movement of the other, with a slight delay. So we can actually create only one side, and then copy it to the other!
Just see how a one-side movement looks:
- Legs go to the front; rump goes up, head goes down.
- Legs are landing.
- Legs are pushing the ground to the back.
- Legs go to the back; rump goes up, head goes down.
- Legs take off.
- Legs get pulled to the front.


This is exactly what we need to do with our kitten. Let's get started, then!
Step 1
Some kind of ground is necessary to create a proper movement. We don't need to draw anything—just use the Control-R shortcut and drag the top ruler down, under the kitten's paws.


Step 2
We're going to play with all the body parts now, so duplicate (Control-J) all of them and store them in a new group (Control-G) for a back-up. Hide the group by clicking the eye icon next to it.

Step 3
We're starting the actual animation now, using the first frame as a reference. Select the front leg group and press Control-T. This runs the Free Transform Tool that you can use to scale and rotate the object. Can you see the "cross-hair" in the center of the box? You can drag it anywhere to define the real center of rotation.
Do it now—drag it to the place where the arm is attached to the chest...

... then rotate the leg. Hit Enter when you're done, or Escape if you want to cancel the change and try again.

Step 4
In the first frame of the animation our cat is reaching out far with its arms, paws included. Rotate the front paw so that it's ready for landing.

Step 5
In this step both front paws are in the air, so the chest, neck, and head aren't supported. Select the head layer, hold Shift and press Arrow Down to move the head down. In the next frame you'll move it two Arrows Up (which means "a bit higher"), and thenShift-Arrow Up ("back to the base position"), and after that the cycle will repeat.

Step 6
To reach so far with the forelimbs, the chest must be rotated a little.

Step 7
In this step the hips are a bit higher, so just like with the head, hold Shift and pressArrow Up twice.

Step 8
The hind leg imitates the movement of its front counterpart, so rotate it properly.


Step 9
The paws need to prepare for landing too.


Step 10
We're going to move the tail too during the animation for a bit more aliveness of the whole.

We did it! Our cat has the same position as the reference.

Step 11
Select all the parts and duplicate (Control-J) them. Group (Control-G) the original and name it
1. Hide it.
Step 12
Now do the same with the second frame as a reference. Rotate the front leg...

... put the paw on the ground...
... rotate the hind leg, put it a bit lower...

... place the paw properly...

... move the head up...

... rotate the chest...

... and straighten the tail.

If you change the Opacity of the previous frame (group), you should be able to see something like this. You can use it as a base for the next pose.

Step 13
Do the same with every frame. Make sure to keep a half-transparent first frame on when working on the last one—they should be consistent.

Step 14
There is a three-frame delay between the movement of one side in relation to the other. In order to show it:
- Duplicate the legs of Frame 1 and move them to Frame 4.
- Duplicate the legs of Frame 2 and move them to Frame 5.
- Duplicate the legs of Frame 3 and move them to Frame 6.
- Duplicate the legs of Frame 4 and move them to Frame 1.
- Duplicate the legs of Frame 5 and move them to Frame 2.
- Duplicate the legs of Frame 6 and move them to Frame 3.
Place the copied layer at the bottom of the group.


4. Run a Test Animation
Before we go any further, we need to check if the animation looks OK.
Step 1
Delete every layer except the frame-groups and the background, if there are any.

Step 2
Right-click every layer and select Convert to Smart Object. This way the group will be converted to a layer, but if you ever want to get to its content, just double-click it.

Step 3
Open the Timeline panel (Window > Timeline). We want the animation to go on endlessly, so set the looping option to Forever.

Step 4
To create an animation, just open the panel's menu and select Make Frames From Layers. Tadah!

Step 5
That's not all. First Delete the redundant frame made by the background.

Step 6
Select all the layers by clicking the first and the last one while holding Shift—you will now modify them all at once. Click the Frame Delay and set 0.1 seconds.

Step 7
With all the frames selected, Show the background layer.

Step 8
Hit Space and enjoy!

Step 9
If you didn't enjoy it, don't worry, we can fix everything! Just double-click the layer you'd like to change, modify the content (rotate or move what you wish) and Save (Control-S). The change will be automatically applied to the animation. When you're done, open the Timeline menu and Delete Animation—we don't need it for now.
5. Draw Animated Line Art
We've got a perfect base for an animation now! Time to add lines to it. Curious how to keep them consistent across the frames?
Step 1
We're going to use a special brush for the line art. Go to Window > Tool Presets to open the panel below. Then, with the Brush Tool (B) active, open the menu and selectDP Brushes. My favorite line art brush is DP Comic Inker of this set.

Step 2
Create a New Layer above the first frame. The head is the only element that doesn't change during the animation (it only changes position), so we can draw it only once. Here's how I did it:


At the very end, hide the base for a moment and fix the shape, if you don't like something about it.

Step 3
Duplicate the head and place a copy over every frame. Adjust their position to the base.

Step 4
Draw the back, and then make the layer more transparent (less Opacity), go to another frame and repeat.


Step 5
Do the same with every element of the body. The smaller the area you re-create on every frame, the more chance the lines will be consistent.


Step 6
Use the Magic Wand Tool (W) on the outside of every frame. If it does select the inside of the body too, locate and fix the gaps in the outline, and try again.

6. Color the Animation
Step 1
Now, make the selection once again. Make sure to select everything outside the body.

Step 2
Invert the selection (Control-Shift-I). The inside of the body should be selected now.

Step 3
Create a New Layer and drag it under the sketch. Fill (G) the selection with any neutral color. Repeat for every frame.

Step 4
You can now delete the vector bases—they did their job. The filled shapes will be our new bases, but we need to link them with their line arts first. To do this, place your cursor between a base and its line art, hold Alt and click. It will create a Clipping Mask.

Repeat with every frame:

What do we need Clipping Masks for? Place a New Layer between the base and the line art, paint something, and see for yourself!


Step 5
Create a New File for a moment. We need to choose colors for our kitten. You can paint them with a brush, but I suggest you draw them with the Ellipse Tool (U) in Shapemode, so that you can change their color easily. This is what I've chosen:
- Main fur color: #
e38016 - Secondary fur color: #
ffead3 - Eyes: #
1ecc78 - Nose: #
ffa2b8

Step 6
Open the Window > Swatches panel. To clear your list, hold Alt and click the first swatch quickly until they're all gone. Then pick (I) the color you want to add, hold Alt and click the empty area.

Step 7
Create a New Layer clipped to the first frame. Use the DP Comic Inker brush and the secondary fur color to paint the underside. Sharp edges are easier to re-create on other frames than soft ones. Do this for every frame.

Step 8
Grab the Lasso Tool (L) and draw a ragged selection with it. Then Cut the inside. This way we'll fix the edges. Repeat it for every frame.


Step 9
Create a New Layer for every frame and paint the eye and the nose.

Step 10
Let's see how to add stripes to every frame without painting them one by one.
Find the frame where the front leg is as vertical and straight as possible. Then create aNew Layer and paint thick stripes on it.

Step 11
Use the Lasso Tool (L) to draw "furry" edges on the bottom of the stripes. Fill them with their color.

Step 12
Use the Lasso Tool again to cut the top part.

Step 13
Right-click the layer and select Convert to Smart Object. Now the stripes will be easier to modify. Duplicate them, clip if they got unclipped, and drag to the next frame. Adjust the rotation to the next position.

If needed, use the Warp Mode to adjust the shape without re-painting it. When you're done, come back to the frame where the original stripes are, duplicate them once again and go to another "stripeless" frame. Do this with every frame, always using the original to create a copy.

Step 14
You can use this technique to create stripes on the whole body!

Step 15
Let's redo the animation. This time we've got too many layers to use the Convert Layer to Frames method. However, the alternative is still simple:
- Create a New Frame by clicking the white card icon.
- Show the Clipping Mask with its content, and hide others.
- Repeat!

The content of a clipping mask can't be shown without it, so you only need to hide the mask to hide everything that's clipped to it.
Step 16
Test the animation. Check if the stripes work as intended, and fix anything that seems wrong.


7. Shade the Animation
Step 1
Create a New Layer and paint shadows with dark blue (#
112e6a).
Step 2
Cut their edges with the Lasso Tool as before.

Step 3
Change the Blending Mode to Multiply—it will make the layer transparent and dark—and lower the Opacity to 20%. Do the same for every frame. To keep consistency, you can duplicate the head as a separate part.


Step 4
Create a New Layer for the light. Use unsaturated orange (#
ffd790) to paint the light with the same technique as the shadow.

Step 5
This time use Overlay for the Blending Mode—it has a brightening effect. Change theOpacity to 30%.


Step 6
White should reflect more light, so let's add it. Create a New Layer and paint plain white stripes in the illuminated area.

Step 7
Go to Filter > Blur > Gaussian Blur and select the Radius that makes the stripes blend with the body, but without losing their brightness.
If you want to apply the same filter to another frame, just hit Control-F—it will be applied with the same settings as before.


8. Finish and Save the Animation
Step 1
We're going to add waving whiskers now. Create a New Layer above all the frames and paint them, using black, white, or a creamy color.

Step 2
Duplicate the whiskers twice. Leave the original as it is. Select the second one and go to Filter > Liquify, and use the Forward Warp Tool (the one on the top) to change the shape of the whiskers. When you're done, do the same with the third layer.
Now, show the first layer of whiskers for frames 1 and 4, the second for 2 and 5, and the third for 3 and 6. They should be waving now!

Step 3
Add a New Layer on the top and Fill it with black.

Then go to Filter > Noise > Add Noise.

You can make it brighter by adding Filter > Sharpen > Sharpen a few times.

Step 4
If you change the Blending Mode to Overlay, you'll see a nice texture applied to the kitten.

Play with the Opacity to get the effect you like.

Step 5
Ready to finish it? Use the shortcut Control-Alt-I to change the size. The smaller it is, the more detailed it will seem.

Step 6
Use Control-Alt-Shift-S to Save for Web. Since we've used very flat shading and few colors, the overall size of the animation should be less than 200KB, which is perfect for most sites. If it's not, reduce the amount of Colors and play with other settings.

Meow!
Phew, that was a lot of work! But our kitten is finally alive and happy, ready to explore the world. You're now more advanced in Photoshop, so if you liked this tutorial, make sure to check the ones about creating flight animation and the run cycle of the cheetah.
I also would like to hear from you—if you're having problems with any of the steps, let me know in the comments section. I read all of them!


.webp)

