
Certain forms of Kufic, grouped under the broad appellation of "ornamental Kufic", strike the eye with their intricacy and profusion of ornamental forms that all but obscure the text itself. Here we move away from design principles and into the realm of pure creativity and personal taste.
The following peek at some possibilities is therefore meant to open the door to personal exploration, as we are also in fact leaving the realm of writing and entering a separate discipline, that of illumination.
In Kufic, aesthetic intervention can take place on four levels:
- Modifying the form of the letters on a basic level, for instance when setting proportions, stretching a letter, and settling on the opening of bowls and tails.
- Adding stylistic elements that are still part of the body of letterforms, such as the basic design element we worked with in Designing the Letters.
- Adding extraneous forms, a completely independent layer of ornamentation that doesn't affect the body of the word (like a hat that can be removed).
- Creating an ornamental pattern using calligraphic elements.
So far we have worked with the first two levels, which are properly calligraphy; in this lesson we will cover the latter two, where writing meets illumination and pattern-making.
Ornamental Letters
There are no real rules for ornamentation itself. Some forms are classic in Islamic art and have been practiced for centuries, and we'll try our hand at a couple of examples, but there is no obligation to follow such traditional styles.
In fact, it is worth noting that so-called ornamental Kufic almost exclusively belongs to architecture and applied arts (ceramics, engraved metal), and is not used on paper; all the more reason not to feel bound by it when we do work on paper. Your own imagination and skills are the only limit.
One set of principles we do need to bear in mind is that each letter has certain loci where decoration can be attached without interfering with the essential parts. Here are the loci, with examples of decorated letters featuring them.

Further examples of how decoration is anchored to these points can be observed in this well-known rendering of different ornamental Kufic inscriptions reproduced by Hassan Massoudi:

These five samples spell out the same sentence (بسم الله الرحمن الرحيم) rendered in different ways. Below I have highlighted the extraneous parts, so the text appears unencumbered (other than level 2 decoration).

You can see that some of the ornamentation is simply added after or over a letter, to fill the space, while at other times it is inserted right in the middle of a tall letter, or to be more accurate, the body of a vertical letter is bent into a motif.
This is quite effective to create a pattern in the middle space, and is characteristic of Kufic described as knotted, interlaced or plaited, where the strokes of the letters are treated as if they were cords or leather plaits that can be bent and knotted decoratively.
Such motifs bear great resemblance to other knots, such as those seen in Celtic, Armenian and even Greek art. Decoration that is added to the end of strokes, and/or in the space between letters, tends to be florated or foliated, that is, based on flowers, leaves and vines.
Knot Work and Plait Work


Plait/knot work is an art in its own right, and exploring it in great detail is beyond the scope of this calligraphy course. Here we shall simply learn a way of constructing the knot seen in this tile from Kashan, that can be adapted to other constructions. To delve more deeply into more knotwork, I recommend Aidan Meehan's book,Treasury of Celtic Knots: the patterns detailed therein are remarkably similar to what we are seeing here.

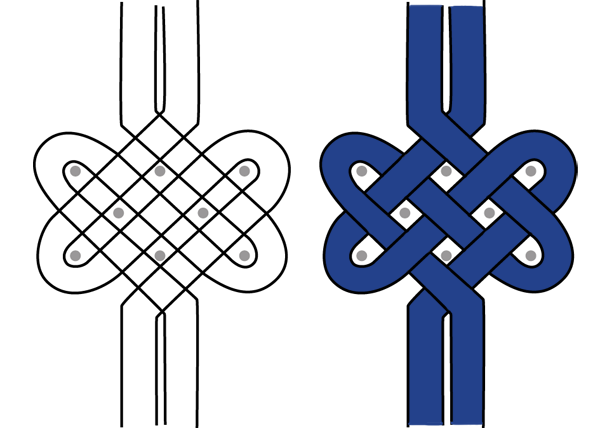
Step 1
We start with the two verticals to be knotted (left).
Draw the grid of dots shown here. If we were making this knot with actual cord, these dots would be pegs around which the cord would wrap. Even though we're working on paper, the dots still function like virtual pegs, around which we'll wrap our lines.
Also draw the middle line of your vertical strokes, shown here in colour: it's simpler to start the knot with a single line than to struggle with the two sides of the stroke. Note that the colours are inverted on the other side of the knot!

Step 2
Wrap the lines around the "pegs" as shown (the line goes to the furthest possible peg before wrapping around), connecting them with the correct colour above and below. This can be done loosely and freehand.

Step 3
Add guidelines corresponding to the thickness of the strokes.

Step 4
Draw the curves around the pegs. To make them perfect you can use a compass or circular template.

Step 5
Join the ends of the curves, following the guidelines: you'll see that the inner curves, following the grey guidelines, join up with the outer curves. It is therefore easy to complete the knot and join it up with the verticals.
Step 6
On the left is the completed knot cleaned up of guidelines. All that's left is to mark the interlaced effect: one stroke above, one stroke below.
Freehand knots
It is also very easy to create a knotted effect freehand, and with practice you get a feel for how to achieve the best-looking shapes and spacing. The knot below was derived from the random pink doodle.

Foliated or Florated Kufic
Stylized biomorphic shapes are a hallmark of Islamic art, where they evoked the promise of a lush green paradise. Patterns based on leaves, flowers, and vines are called zakhrafa, known as arabesque in the West and islimi in Turkey.
Below are basic shapes, both simple and more detailed, that may find their way into an inscription, growing out of various parts of the letters.

Among all these classic zakhrafa motifs, note this last one on the right, in black. It is the top part of an Alif, found in a Persian manuscript, and is decidedly freestyling: the maker was only following his own inspiration, or maybe a local tradition.

Here is a magnificent carving from the Alhambra, where the ornamentation is hierarchically equal to the writing. To make the latter more evident, I have highlighted it below, with the purple corresponding to the nucleus, the parts that actually read. Everything else is zakhrafa, and if you look carefully, it's designed to fill the spaces left by the writing while appearing to be on a level behind it, independent of it.


What does it say, you may wonder? ولا غالب الا الله (There is no victor but God), repeated twice.
Tiling and Symmetry
Tiles are a well-known element of historical Islamic art, but they should not be seen as simply a way of putting ornamentation on a wall. Tiling became a way of designing ornament that had a strong impact on Islamic art as a whole, whether on a wall or not.
Filling a surface was always a key concern, and tiling is filling a surface by repeating a single starting unit, using symmetry—the art of transforming an image in an organized way. What this means is that any basic unit, or module, including a letter, word or even sentence, can be turned into a finite or infinite pattern.
Three Basic Transformations
There are three basic kinds of symmetry that can achieved by hand with simple means: translation, reflection, and rotation.
Translation is repeating the module without changing its size or angle, as if it were moving along a rail.

Reflection creates a mirror image, flipping the image along a given axis.

Rotation uses one point as centre, and turns the module around it.

Compounding or combining these results in unlimited possibilities for patterns.

This can be bewildering, but the module itself (its shape, amount of detail, angles, curves) tends to dictate the operations that will work best for it, and there's no way of finding out without practice, trial and error.
Defining a tile around the module also helps direct the design, and this is an essential step when working on paper or other materials. Otherwise your module floats in space with no guidelines, and then how can you position it accurately?

Now a module can be anything, but what about the tiles? Amazingly enough, there are only two tiles to work with: the equilateral triangle and the square. Here is why:

You'll notice some shapes leave dead space when we tile them. Only triangles, squares and hexagons fill the space perfectly. Hexagons are very occasionally used as tiles, but as a hexagon is made up of six triangles, it is simpler to just use triangles—that's why I didn't list it earlier.
These three are also self-referential: you can make a triangle out of triangles, a square out of squares, a hexagon out of triangles. This doesn't happen with any other shapes.
Just to give you an idea, here's what a few options would look like if a square tile was translated, reflected and rotated:

And with a triangular tile:

That's it for the theory. To work with such transformations in reality and on paper, we need to use the transfer method. All you need for this is tracing paper and two pencils, a hard and a soft one (for a detailed description of these, see the tools section in Geometric Design: The Basics).
The traditional transfer method consisted of drawing the motif on a piece of paper, and then making fine holes along the lines. The paper was then positioned on the desired surface, and pounced with a pigment (dark or light depending).
Alternatively, the back of the paper was rubbed with pigment, and then it was positioned and the drawing transferred—the ancestor of carbon paper. The availability of tracing paper today makes it slightly less labour-intensive, and much less messy.
The Transfer Method Using Tracing Paper

Step 1
Draw your module. Graph paper is not necessary but can make it easier to draw both the module and the tile around it. To learn to construct a triangle and square without a background grid, see Geometric Design: The Basics.

Step 2
Place a sheet of tracing paper over the module and hold it in place with a square or two of masking tape. Trace both the module and the tile, using a hard pencil. Use a ruler if needed.

Step 3
Detach the tracing paper. The side where the module is traced is the top side.

Step 4
Turn the paper over and, using the soft pencil, blacken the back of the lines. There's no need to cover the whole back of the paper or leave a lot of pigment: that would only cause more smudging. A single firm stroke with the flat of a soft pencil is sufficient, and it doesn't need to be accurate as long as it covers the back of the line. Precision will be used in the next step.
Also blacken the angles of the tile: you will need them as placement references, and it will be cleaner than transferring the full tile.
Note: Do not do this over your final paper! You may transfer unwanted pencil to it, and even groove it. Always keep your clean paper aside until you're ready to work on it.

Step 5
Turn the tracing paper again so its top faces up once more, and position it carefully where you want to redraw the module on your final paper. Hold it in place with masking tape. Now, using the hard pencil, go over the module very carefully. Before removing the tracing paper, lift a corner of it to check you got all the lines down.

Step 6
Remove the tracing paper: your module has been transferred to the final paper. Move the tracing paper and repeat as many times as you need to complete the pattern (note how the angles of the tile are used to position it correctly). There's no need to blacken the back again—it goes a long way. Only do that if you notice the transfer becoming too weak.

Step 7
Your finished composition is ready to be inked and/or coloured.
Exercises
Exercise 1
Working on graph paper (you can print out the attached Graph.pdf file), reproduce the knots in the close-up below. For even better practice, reproduce the whole thing: take the line width as 1 cm and go from there.

Exercise 2
Using tracing paper and pencils, play with tiles and modules, creating patterns and experimenting. The downloads folder contains Modules.pdf with two tiles you can trace and two possible modules, but feel free to create your own or reproduce anything else. Experiment with the size of the module within the tile, its placement (touching the edges, not touching, or even overlapping), and the amount of empty space it leaves.


