
Pirot kilims are made with some of the most beautiful traditional Serbian design motifs. The figures all bear colorful names like Devil’s Knees, Tulip, Turtle, Queen’s Sleeve, Hook, Snail, or Mirrors, but are mostly variants of branched geometric forms made with straight and diagonal lines. The predominant traditional colors are black, red and white, but other primary colors can also make an appearance.
Here’s how you make one of your own using Adobe Photoshop.
1. Choose Your Elements
Step 1
First, grasp the basics. There are five traditional parts to the Pirot kilim—from the outside working inwards, they are the Tassels, the Outer Frame, the Border, theInner Frame, and the Field. The outer and inner frame are usually single-colored, and the border and field are the most ornate and decorated parts of the kilim.
In the image below, the Tassels are white, the Outer and Inner Frame are both black, the Border has a white background with red and blue decorative motifs, and the Field is the decorated rectangle in the middle, with a red background and black and blue motifs.

Step 2
Kilim layouts are based on various plays between straight and diagonal lines. Choose one of these traditional layouts for your kilim, or mix, match, and modify them to create your own.
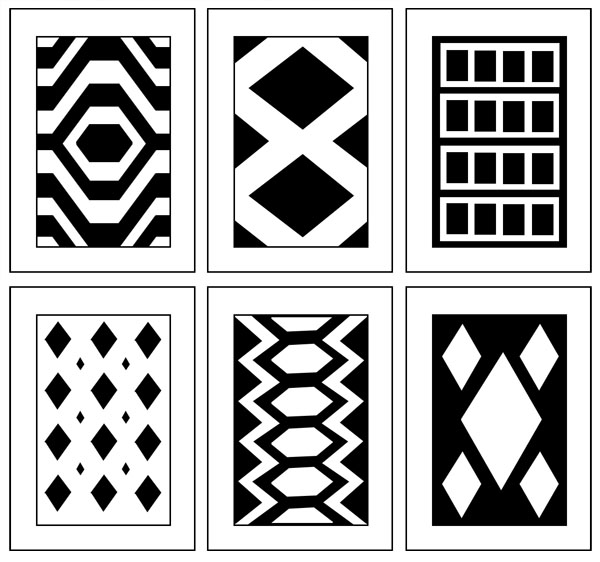
Step 3
Choose the motifs you want to use in your kilim. It’s best to choose a few varying sizes and complexities to ensure you can make a balanced and dynamic layout.
The motifs are mostly highly stylized geometric interpretations of the natural shapes of flowers and animals. All are formed by patching together combinations of rectangles and triangles, and after practicing on the six examples given below you'll be able to easily create your own by following the same principles.
The figures shown below are:
- Top row left to right: Devil's Knees, Turtle, Eyeglasses
- Bottom row left to right: Octopus, Dining Table, and Frog

Step 4
Decide on your colorway. Traditionally, the inner and outer frame are both black, the border is white, and the center field is red—anywhere from light crimson to deep cherry red. Blue, yellow and green also often make an appearance. Of course you could always decide to part with tradition and go crazy.
Here are four colorways pulled from traditional Pirot kilim designs—I've given you a framework of five colors to start from, but you can always add more as you work. You can see that all the colorways share some similarities—black and red almost always make an appearance, followed by shades of white or cream. These three colors are very characteristic for Pirot kilims.
Other colors, mostly primary tones like blue, yellow and green, usually appear in the details. In spite of using very limited palettes, it's possible to achieve a great deal of variety in kilim design.

2. Create the Motifs
Step 1
Most of the motifs are geometrical and have some symmetry, so we’ll make one part and then use the Edit > Transform > Rotate, Reflect, or Flip commands to create them. Let’s start with the Dining Table, which is fairly simple.
Make the Dining Table Base
To make the traditional Sofra or Dining Table motif, we'll start with a long vertical rectangle. You can just drag the Rectangular Marquee Tool into the approximate shape, and then fill it with your foreground color by clicking Alt-Delete, or with your background color by clicking Control-Delete.
Next, we'll make an equilateral triangle whose hypotenuse is somewhat shorter than our initial long rectangle, and position it as shown in the middle image. Click Control-J to make a new copy of the layer with the triangle, and then clickControl-T to access the Free Transform Tool. When the Free Transform Toolcommands appear, hover your mouse cursor over one of the corners of the Free Transform Tool Bounding Box, and hold Shift and drag inwards to slightly reduce the size of your triangle.
Keep making smaller triangles and layering them as shown in the image on the right.

Complete the Dining Table Motif
We want to stack a total of six progressively smaller triangles to complete one side of our Dining Table motif. As your triangles get smaller, you will want to increase their height slightly, by using the Free Transform Tool to draw out the vertex facing right—the one that isn't touching the hypotenuse. Otherwise as the triangles get smaller, the steps of your Dining Table will grow shallower and shallower.
Once you've got six triangles nested inside each other, merge all the parts of your Dining Table together by going to the Layers Panel, clicking on the Layer thumbnail of the Layer with the long vertical rectangle, and then holding down theShift key and clicking on the Layer thumbnail of the Layer with the smallest triangle. This should select all the layers you used to make the Dining Table. With all the layers selected, click Control-E to merge all the selected layers.
Once you have a single layer, use the Zoom Tool to come closer to your design and use a Hard Round Brush at a small size setting to soften the angles of your motif and make it look more organic.
Click Control-J to duplicate your new merged layer, and then go to the top menu and choose Edit > Transform > Flip Horizontal to create the second half of theDining Table. Align the two halves as necessary using the arrow keys, and merge them together once more.

Decorate the Dining Table Motif
The Dining Table motif is usually decorated by a few smaller versions of the same motif inlaid into its center in different colors. Instead of copying your original motif and shrinking it down, rather make new motifs with a smaller number of zig-zag steps—four and two, instead of the original six. Optionally at the end you can add a small vertical rectangle in the color of the original motif, to tie the pieces together.
And it's done!! You've made your very first traditional Serbian Pirot kilim design motif!! Now that you've mastered the basic principle, the rest of them will be easy.

Step 2
The second figure we’ll make is the Frog.
Make the Frog Base
To make the Frog, start with a chubby rectangle using the Rectangular Marquee Tool. Next, make an equilateral triangle whose hypotenuse is somewhat shorter than the width of your base rectangle, and position it as shown in the middle image.
Then we need two smaller, long and narrow rectangles, angled at 45 degrees. You can either make them upright using the Rectangular Marquee Tool and then use the Free Transform Tool to rotate them into place, or you can just use thePolygonal Lasso Tool to draw them at an angle. There is no need to be overly precise, since original kilim designs gain softness and beauty of form from their imperfections. Slight irregularities will help us simulate a hand-made look.

Complete the Frog Motif
Click Control-J to duplicate the layer with the two thin rectangles, and then use Edit > Transform > Flip Horizontal to create the right side of the Frog. When both sides are merged, add little triangles onto the ends of the Frog's legs, as shown in the middle image. They should be facing outwards, like little arrow heads pointing left and right.
When all the triangles are in place, merge all the Frog layers together and soften the hard angles using the Eraser Tool and the Hard Round Brush Tool.

Decorate the Frog Motif
The top part of your Frog is done, so you can use Edit > Transform > Flip Vertical to create the bottom part of the Frog. The Frog is usually decorated by a hexagonal frame which is filled with two colors that meet in a sort of thunderbolt line. I suggest using the Hard Round Brush Tool to draw the hexagonal frame, then creating a layer beneath the frame and painting in the desired colors. And your Frogis done!

Step 3
Now let’s make an Octopus.
Make the Octopus Base
To make the Octopus, start with an upright equilateral triangle. If you're having trouble making a nice-looking triangle, make any sort of triangle you like using the Polygonal Lasso Tool.
Use the Rectangular Marquee Tool to cut off its bottom portion so you're sure it's straight. Then make a copy of your triangle using Control-J, use Edit > Transform > Flip Horizontal to flip the copy, and move the copied layer so the top vertices of the two triangles overlap. You now have an equilateral triangle. If you don't like its angle you can use the Free Transform Tool by clicking Control-T and dragging the tip of the triangle to the desired height.
Next you want to add four very thin horizontal rectangles over your triangle. Space them out evenly: one just above the triangle base, one just under its tip, and two more in the middle. At the end of each 'arm' add another little triangle. These are theOctopus tentacles.

Complete the Octopus Motif
Make sure all your little triangles are on a single layer, and then use the Eraser Tool and the Hard Round Brush Tool to soften them a little before you copy them over to the other side. When they're done, click Control-J to duplicate the layer and use Edit > Transform > Flip Horizontal to create the tentacles for the right side of the Octopus.
Merge everything and soften any remaining hard angles, then make a new copy of the layer and use Edit > Transform > Flip Vertical to complete the Octopusshape.

Decorate the Octopus Motif
The Octopus is usually decorated by painting the tips of the little triangles at the ends of its tentacles, as well as adding a diamond-shaped field of color in its center. This field can then be decorated by any small figure—one option is to draw a horizontal letter 'H' in one color, and then add a tiny two-step ziggurat in another color to each side of the 'H'. And now you have an Octopus.

Step 4
Next we'll make some Eyeglasses.
Make the Eyeglasses Base
To make the Eyeglasses, we will use nothing but long, thin rectangles. You can make them using the Rectangular Marquee Tool and approximate the lengths. Stack them as shown in the three figures below.

Complete the Eyeglasses Motif
Add three more layers to both sides of the Eyeglasses, and then merge everything together and soften the sharp corners using the Eraser Tool and the Hard Round Brush Tool. When the lines look natural, use Edit > Transform > Flip Vertical to create the bottom part of the Eyeglasses. Merge everything and we're ready to add some color.

Decorate the Eyeglasses Motif
The Eyeglasses are usually decorated by filling in their center, using their outline as a guide. You can fill them with one or more colors. Traditionally Eyeglasses are often accompanied by small flecks that resemble seeds or teardrops—one fleck between the two 'lenses' of the Eyeglasses and three flecks in a triangular formation between two motifs.

Step 5
Let's make a Turtle.
Make the Turtle Base
Shockingly, the Turtle motif actually ever so slightly resembles a turtle, as opposed to all the other traditional Pirot kilim motifs. But it starts at an unlikely place—from two long, thin rectangles.
The bottom rectangle should be almost three times longer than the top one. Then make an upside-down triangle with a hypotenuse somewhat wider than the small rectangle on top of it. The hypotenuse of the triangle should touch the bottom edge of the top rectangle, and the tip of the triangle should lie just beyond the bottom rectangle, as shown in the middle image below.
Add one more triangle, a little bigger than the first, but cut off its top third by selecting it with the Rectangular Marquee Tool and pressing Delete.

Complete the Turtle Motif
Next we want to add two little antennae at an angle of approximately 45 degrees on each side of the short top rectangle we started out with. In the middle image I've drawn frames to show you how the little rectangles are stacked to form the final shape. At the end of each antenna is a little upside-down triangle with its tip cut off. Merge everything together and soften the sharp corners using the Eraser Tool and the Hard Round Brush Tool.

Decorate the Turtle Motif
Once we use Edit > Transform > Flip Vertical to create the bottom part of the Turtle, we can start to see the resemblance (sort of). The antennae we made are the turtle's feet, and the central part can be decorated with a nice hexagon that represents the shell.
I suggest drawing the hexagon with the Hard Round Brush Tool so it has an organic feel, rather than perfectly straight lines. The shell can further be decorated with a smaller variant of the Dining Table motif.

Step 6
Let's tackle our biggest challenge: the Devil's Knees motif. It got its strange name from the many kinks and twists it forms.
Make the Devil's Knees Base
We'll start with three long, thin rectangles of varying lengths—the middle one should be the longest, and the bottom one is the shortest. Next, we will use three progressively smaller triangles to connect the middle and top rectangles, as shown in the middle and right images below.

Complete the Devil's Knees Motif
Make a new triangle facing in the opposite direction and use it to connect the bottom rectangle to the rest of the figure. Then add small rectangles at 45 degree angles as shown in the middle image below, and cap them off with small triangles, as shown in the image on the right.

Decorate the Devil's Knees Motif
Once you've softened and rounded the corners on the figure, you can use Edit > Transform > Flip Vertical to complete it. Decorations for the Devil's Knees can be made by drawing large triangles into the top and bottom of the motif, and some smaller triangles into its center, as shown in the image below.
This is the largest and most complex motif we've made, but as you can see they all use identical simple techniques and very basic shapes that stack together in different ways to produce variety. You are now ready to start playing with rectangles and triangles to make your own kilim motifs.

3. Create the Frames and Supporting Motifs
Step 1
Let's make some frames for your kilim.
Simple Frame Designs
As we mentioned at the start, each kilim layout traditionally has two frames—one frame that goes around the entire design, and one that separates the thick decorated border from the central field.
Since both the border and the field carry lots of pretty decorations, the borders are usually made in a single color (often black), to help visually separate the border from the field. The frames can be straight lines, or they can form simple patterns like these:

More Complex Frame Designs
Kilim frames can also have slightly more elaborate designs, like the two shown below. The design on the right is particularly interesting because it creates the illusion of two interlocking patterns holding on to each other. These borders are slightly more elaborate, but still consist of basic geometric shapes, and are easy to make following the steps below, from top to bottom.

Step 2
We need some smaller motifs to fill in the gaps between the larger ones we've made. Here is a selection to choose from, and you can also create your own.
Each of these filler motifs was created by stacking together a few rectangles and triangles, and then smoothing over the sharp corners.

4. Put Together Your Kilim Design
This is it! You've learned about the different parts of the kilim, you've considered different layouts, you've created a bunch of main motifs, smaller filler motifs, and frame designs—now pick your favorite ones and put them together into an awesomePirot kilim!
You can either start from the Outer Frame and work your way inward towards theField, or you can first design the Field and then add frames and borders around it. Don't forget that your border and frames don't need to be the same all around—you can make them simple lengthwise and elaborate on the sides, or the opposite.
Kilim making is all about spontaneous and ever changing design, so the only hard and fast rule is the rule of thumb—if it looks good to you, it's good!
Here's my kilim below—I'd love to see what you come up with!

And Just Like That, You Have a Kilim!
Here's a closer look at those details—TA-DAAAH!

If you would like to learn a little more about traditional Pirot kilim design, check out these handy resources:
You can start from this Wikipedia article on Pirot kilims.
The Pirot Kilim website shows a nice gallery of designs, but also gives some background information on their history and origins in English.
The Lady's Heart is a traditional artisan store that specializes in the creation of kilims and other items with traditional Pirot designs. The website is in Serbian only, but the gallery shows some beautiful examples to inspire you.


