
A glass of cold, fresh milk and a crispy cookie with chocolate chip—many of us have loved this yummy snack since childhood! Let’s refresh these sweet memories and create a realistic glass of milk and a textured oatmeal cookie with chocolate chips, using Adobe Illustrator's basic shapes, Distort and Transform effects, and gradients to achieve a glossy and three-dimensional look. Let’s start!
1. Make a Crunchy Chocolate Chip Cookie
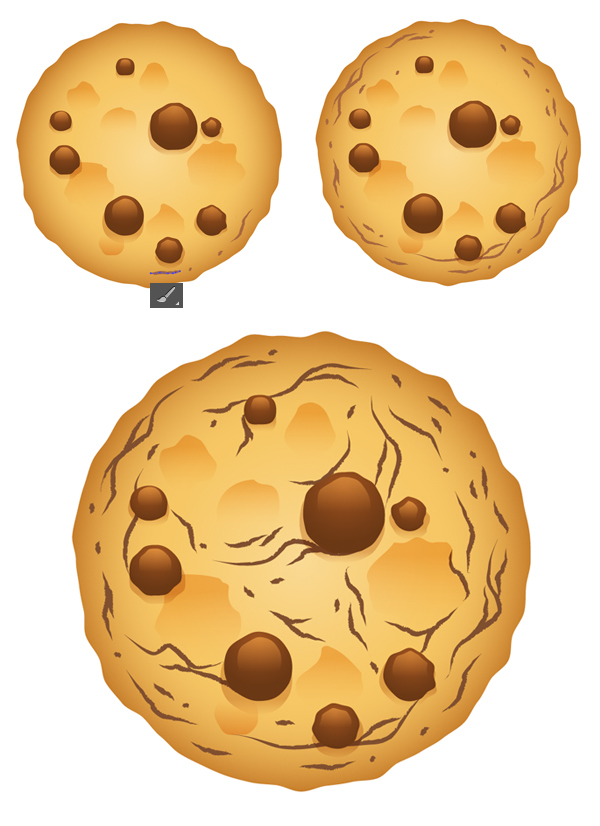
Step 1
Start by making a 250 x 250 px circle, using the Ellipse Tool (L) and holding down the Shift key to make the shape even. Fill it with sandy-yellow color and go to Effect > Distort and Transform > Roughen. Set the Size value to 1%, Relative. And set the Detail value to 5, selecting Smooth Points. Click OK to make the edge of our circle bumpy.

Step 2
Go to Object > Expand Appearance to apply the effect, and use the Warp Tool (Shift-R) to make the edges even rougher in some places.

Step 3
Let’s apply a radial gradient to our cookie, placing the lightest color right in the center of the shape and making the edges dark brown, adding dimension.

Step 4
Let’s make the surface of the cookie more textured, by forming the dimples. Use the Ellipse Tool (L) to make a group of circles, varying their sizes and spreading them randomly above the cookie.
Apply the same Roughen effect as we did for the base of the cookie, but this time make the edges of the circles even rougher by setting the Size value to 5%, Relative, and the Detail value to 10. Set the Points to Smooth and click OK.
Then Object > Expand Appearance to apply the effect and deform the shapes with the help of the Warp Tool (Shift-R).

Step 5
Fill the expanded shapes with vertical linear gradient from white to light orange, switching the Blending Mode to Multiply in the Transparency panel. This way we’re forming the cavities, creating semi-transparent shadows.

Step 6
Now let’s start shaping the chocolate pieces, sprinkled above our cookie. Make a group of round brown circles and apply the Roughen effect with 2% Size value, Relative, and 10/in Detail value, Smooth Points.
Object > Expand the shapes and apply a chocolate-brown radial gradient, placing the lightest part closer to the top edge of each chocolate piece.

Step 7
Select a chocolate chip, Copy it and Paste in Front (Control-C > Control-F). Make the created copy smaller and move it up a bit, closer to the top edge of the chocolate chip. Fill the small shape with vertical linear gradient from dark brown on top to black in the bottom.
Switch the Blending Mode to Screen, thus making the black part of the gradient transparent and creating a glossy highlight.
Repeat the same for every chocolate chip, adding highlights and making the elements more realistic.

Step 8
Select the base shapes of the chocolate chips (without the highlights), Copy them and Paste in Back (Control-C > Control-B). Move the copies down a bit, using the down arrow key of your keyboard. Fill the shapes with vertical linear gradient from light brown to white. Switch to Multiply Blending Mode, forming subtle shadows beneath the chocolate chips.

Step 9
Let’s add more realistic details to our cookie. We’ll create some cracks on its surface, using one of the default Adobe Illustrator brushes. Open the Brushes panel (Window > Brushes), click the Brush Libraries Menu icon in the bottom left corner of the panel to open the drop-down menu, and go to Artistic > Artistic_ChalkCharcoalPencil. Then, find the Charcoal – Thin brush, select it and take the Paintbrush Tool (B).

Step 10
Start drawing out the cracks along the edge of the cookie, making shorter and longer wavy strokes and moving in circles, from the edges to the center of our cookie. Connect some of the cracks and add short pieces and dots, spreading them randomly above the cookie.
Step 11
When you finish drawing the cracks, select them (use Select > Same > Stroke Color for quick selection) and Object > Expand Appearance to turn the paths into rough-edged shapes. Keeping them selected, right click and Make Compound Pathor use Control-8 to turn the separate elements into a single object.
Finally, fill the created compound path with linear gradient from light yellow in the center to dark brown at the edges.

As a result, your cookie should look like this. The cracks are a bit darker than the cookie base, creating a fancy textured effect.

Step 12
Let’s make the cracks more realistic by adding some highlights along their edges. Select the cracks compound path, Copy them and Paste in Back (Control-C > Control-B).
Move the copy down a bit and fill it with a very dark-brown color. Switch the Blending Mode to Screen, making the copy of the cracks lighter than the cookie.

Step 13
Let’s add a few final strokes to our cookie, making it more three-dimensional. Copythe cookie base twice and Paste in Front (Control-C > Control-F > Control-F). Move the copy up and to the right a bit. Resize it, making a copy a bit smaller.
Select the upper shape and the one beneath it and use the Minus Front function of Pathfinder to cut the shapes, leaving only a thin piece along the edge of the cookie. Fill the shape with a vertical linear gradient from light brown to white. Switch to Multiply Blending Mode, making a gentle shadow at the edge of the cookie.
Use the same method to add another thin shadow at the top part of the cookie.

Step 14
Copy (Control-C > Control-F) the base of the cookie once again, and make it much smaller. Fill the created shape with radial gradient from dark-brown in the center to black at the edge. Switch the Blending Mode to Screen, turning the shape into a subtle highlight, and move the lightest part of the gradient closer to the top of the shape.

2. Make a Transparent Glass With Cold Milk
Step 1
First of all, let’s make a bright background to make the transparent parts of the glass and the white milk shape visible. Create a square shape of 600 x 600 px size for the background and fill it with a radial gradient from vivid blue in the center to darker blue at the edges.

Step 2
Let’s start rendering the glass. Take the Rectangle Tool (M) and make a 140 x 270 px shape of white color. Take the Direct Selection Tool (A) and select the lower left anchor point of the rectangle. Press Enter to open the Move options window and set the Horizontal move value to 15 px and the Vertical value to 0 px. Click OK, moving the point 15 px to the right.
Repeat the process for the lower right anchor point, but this time move it 15 px to the left by setting the Horizontal move value to -15 px in the Move window.
Finally, use the Curvature Tool (Shift-`) to bend the bottom part of the shape, making it slightly arched.

Step 3
Let’s make the lower corners a bit smoother by selecting the lower side anchor points with the Direct Selection Tool and setting the Corner Radius to 5 px in the upper control panel.
This feature is available only in Adobe Illustrator CC. However, if you’re using earlier versions, you can make the corners smooth by selecting them and convert to smooth with the Convert function in the control panel on top. And then edit the position of the anchor handles with the help of the Anchor Point Tool (Shift-C).
And let's form the top part of our glass. Use the Ellipse Tool (L) to make a squashed shape in the top part of the glass. Make its width fit the width of the glass. Create a copy of the ellipse and Paste it in Back (Control-C > Control-B), because we will need this copy a moment later.
Select the top ellipse together with the glass shape and Unite them in Pathfinder, merging separate pieces into one single shape. Duplicate this shape (Control-C > Control-B) and keep it for a while. You can toggle the visibility of the shape by clicking the eye icon in the Layers panel.

Step 4
Now select the copy of the ellipse, which we made in the previous step, copy it once again (Control-C > Control-F) and Bring to Front (Control-Shift-]). Select the top ellipse and the copy of the merged glass shape and use the Minus Front function of Pathfinder to cut off the upper part of the glass shape, making it slightly arched.
Lower the Opacity of the shape down to 65% in the Transparency panel.

Step 5
Return to the copy of the merged glass shape, which we made in the previous step. It should be located beneath the cut glass shape.
Apply a horizontal linear gradient with the following settings: fill the right side of the gradient slider with light-blue color and set its Opacity to 50% in the Gradient panel. Fill the right part of the gradient with the same light-blue color and same 50% Opacity. Finally, add a third color by clicking in the middle of the gradient slider in the Gradient panel and apply a white color with 0% Opacity, making the middle fully transparent.
Lower the Opacity of the whole shape down to 50% in the Transparency panel.

Step 6
Let’s make the front glass-shape semi-transparent as well by applying the same three-colored gradient. You can pick it from the back shape, using the Eyedropper Tool (I).

Step 7
Now let’s return to the copy of the ellipse, which we’ve saved from the previous steps, and Bring it to Front (Control-Shift-]). Or just create a new ellipse on top of the glass, if you have no copies left. Fill the shape with light-blue color and go to Object > Path > Offset Path. Set the Offset value to -1 px, creating a smaller ellipse inside.
Select both circles and use the Minus Front function of Pathfinder to cut out the inner circle, creating a thin rim at the top of the glass.

Step 8
Let’s add thickness to the glass to make it more three-dimensional. Select the front glass shape, Copy it and Paste in Front (Control-C > Control-F).
Squash the shape a bit, making it a few pixels narrower. And lift it a few pixels up, using the up arrow key of your keyboard.
Now select the two shapes and use Minus Front to delete the inner overlapping part, so that we have only the outer edge left, which forms a light rim along the sides of the glass.

Step 9
Now let’s fill our glass with fresh, cold milk!
Take the Ellipse Tool (L) and make a squashed white ellipse, placing it closer to the upper quarter of the glass, making it fit the inner shape (leave some space at the sides of the glass to make them look thicker).
Copy the front glass shape and Paste in Front (Control-C > Control-F). Start squashing the shape from the sides and from the bottom, making it narrower and shorter (the red outline in the screenshot below), so that it fits the width of the white ellipse.

Step 10
Make the shape shorter, leaving more free space in the bottom of the glass. And fill the shape with horizontal linear gradient, consisting of four alternating colors: white, light-blue, white, light-blue.
Great! We’ve filled our glass with milk, creating a realistic milky surface with the help of our gradient. Let’s move on and add more details to the glass.

Step 11
Glass surfaces are very smooth and shiny, and usually have a lot of reflections, highlights and overtones. So let’s add more realism to our glass, making it more glossy!
Use the Rectangle Tool (M) to create two narrow stripes on the left-hand side of the glass. Select both stripes and turn them into a Compound Path (Control-8). Select all the lower anchor points of the glass using the Direct Selection Tool (A), and move the selected group to the right, making the shape skewed and parallel to the left side of the glass.

Step 12
Duplicate the front glass shape. Select the created copy together with the stripes and use the Intersect function of Pathfinder to cut the unneeded pieces outside the glass. Fill the shapes with linear gradient from white to black and switch to Screen Blending Mode, making a glossy highlight.

Step 13
Keeping the stripes selected, use the Eraser Tool (Shift-E) to draw a line across the stripes, making a gap. Finally, adjust the position of the linear gradient, putting it horizontally and placing its black transparent side closer to the middle of the glass.

Step 14
Use the same method to add a highlight on the right-hand side of the glass. And finish up by scattering some water-drops above the glass surface. Check out Part 3, Step 5 of the Create Detailed Spa Stones and Flowers in Adobe Illustratortutorial to discover how to create such simple yet realistic drops.

3. Render a Simple Composition
Step 1
Great, now we have a glassful of milk and a crispy cookie, which can be combined into a simple and balanced composition.
First of all, let’s resize both objects, if needed, placing them in the center of our Artboard. And put the cookie in front of the glass (Control-Shift-]).

Step 2
We need to separate the cookie from the glass, showing that the objects are not flat. We can do this by adding a subtle shadow beneath the cookie. Copy the cookie base and Paste it in Back (Control-C > Control-B). Move the copy down and to the left a bit, filling it with linear gradient from light-blue to white and switching to Multiply Blending Mode to turn the shape into a semi-transparent shadow.

Step 3
Select the front part of the glass together with the created cookie shadow, and use the Shape Builder Tool (Shift-M) to delete that part of shadow outside the glass. Just hover your mouse over the unneeded part until you see the gray selection, and click it while holding the Alt key.

Step 4
Let’s add another cookie beneath the first one. Copy the whole cookie-group with all its elements and Paste it in Back (Control-C > Control-B). Make a copy a bit smaller and move it to the right.
Copy the base-shape of the new cookie and place it on top (Control-C > Control-F). Make it darker by filling it with radial gradient from dark brown to white and switching to Multiply Blending Mode, thus adding contrast to the bottom cookie.

Step 5
And let’s make the front cookie stand out more by adding another shadow. Copy the base of our front cookie and Paste it in Back (Control-C > Control-B). Move it to the right, covering the back cookie, and use the Shape Builder Tool (Shift-M) to get rid of the unwanted piece.
Fill the shape with horizontal linear gradient from brown to white and switch to Multiply mode, forming a shadow.

Step 6
Finally, let’s make the objects more three-dimensional by placing a group of shadows beneath them.
Create a squashed ellipse under the glass and fill it with squashed radial gradient from blue in the center to white at the edges. Switch to Multiply Blending Mode, making a soft shadow beneath the glass. Add two smaller shadows under each cookie.
Awesome! Now all the objects look as if they are on a horizontal surface.

Yum! Our Milk & Cookies Scene Is Finished!
Great job! We've successfully completed this tutorial. I hope you had fun while drawing these sweet elements and learned some new tips and tricks which will make your workflow easier and inspire you to try something new! Be creative and stay tuned for more!


.webp)

