This is the story about a project of mine. A big one. A mixture between PHP and Node.js.
It's a single page application from one point of view and an SEO
optimized website from another. Tons of JavaScript, CSS and HTML was
written. In a single word, a spaghetti nightmare for any developer.
There were falls and rises. Producing and solving bugs. Fighting with
the latest technologies and ending up with a wonderfully simple library,
which is the topic of this article.
The Beginning
As it normally happens, the project was considered not so big. The
brief came in, we discussed how the development would be handled, what
technologies would be used and how we will use them. We made a plan and
got to work. In the beginning we had a few pages, which were controlled
by a CMS. There wasn't so much JavaScript code at first because our
system delivered most of the content.
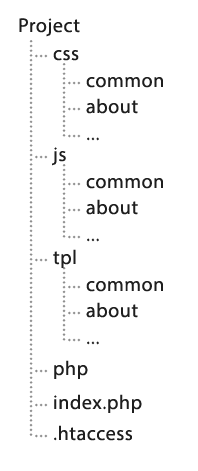
Here is a rough structure of the project:
We put our client side code into different directories. The server side code was only PHP at the moment, so it went in to the php directory. We wrap everything into around 30 files and everything was OK.
The Journey
During the period of a few months, we were trying different concepts
and changed the project's code several times. From the current point of
view, I could spot four big issues which we met.
Problem #1 - Too Many Badly Structured Files
It looks like the client was happy with the result and decided to
invest more in his Internet appearance. We were asked to build a few new
features. Some of them were just new content places, others were
additions to already existing pages. We started adding more and more
files in all of the folders above. It started to get a little bit messy,
so we decided to create subdirectories for the different pages and save
the necessary code there.
For example, the CSS styles for the about page were in css/about/styles.css. The JavaScript in js/about/scripts.js
and so on. We used a PHP script which concatenates the files. There
were, of course, parts of the site that were on several pages and we put
them in common directories. This was good for a while, but
it did not work well for long because when the directories became full,
it was slow to modify something. You had to search for three different
directories to find what you needed. The site was still mainly written
in PHP.
Problem #2 - The Big Turning Point or How We Messed Things Up
At that time, mobile applications became popular. The client wanted
to have his site available for mobile devices and this is the big
turning point in the project. We had to convert the site to a single
page application. And not only that, it had to have tons of real-time
features. Of course, not all the content of the site had to be loaded
dynamically. The SEO was still an important part of the client's vision.
We chose the MEAN stack
for the upcoming parts. The problem was with the old pages. Their
content had to be served by PHP, but the pages' logic changed and it was
completely made with JavaScript. For several weeks, we felt like the
passengers of Titanic. We were in a hurry to release something, but
there was hole after hole and very soon, our ship was full of water
(bugs).
Problem #3 - A Tough Working Process
We used GruntJS for a while, but migrated to Gulp.
It helped a lot because we increased our development speed. However, it
was still too annoying to add or edit existing components. The solid
architecture that we had in the beginning was transformed to a complex
mixture of files. Yes, there was strict conventions for naming and
placing these files, but it was still too messy. We then banged our
heads together and came up with the following format:
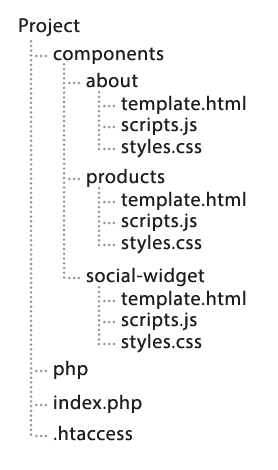
We split the site in to different components, that were like black
boxes. They live in their own folder. Everything related to the
component was saved inside its directory. We designed carefully, the
APIs of the classes. They were testable and communicative. We found that
a structure such as this worked better for us because we had tons of
independent modules. Yes, we are mixing the JavaScript files with CSS
styles and HTML templates, but it was just easier to work on a unit
basis, instead of digging deeply into several directories.
Problem #4 - Angular vs. Custom Code
Those pages which were old and which we had to deliver via PHP, were
also full of JavaScript logic. However in some cases, Angular did not
work very well. We had to make small hacks to make the things run
smoothly. We ended up with a mixture between Angular controllers and
custom code. The good news was that the budget of the project was
expanded and we decided to use our own framework. At that time, I was
developing my own CSS preprocessor.
The project goes really, really fast. Very soon I ported my library for
client side usage. Line by line, it was transformed to a small
framework, which we started integrating into the project.
Why Create a New Framework?
This is probably what you're asking. Well, there is a dozen of others
that provide a wide range of capabilities. Yes, that's true, but ... we
did not need a wide range of capabilities. We needed specific things
and nothing more. We were ready to accept the fact that by using a
popular framework, we may add a few kilobytes to the overall page load.
That wasn't a big problem.
The status of our code-base was the
issue. We were focused on building good architecture and we all agree
that sometimes the custom solution fits better. The usage of Angular,
Ember, Knockout or Backbone comes with its benefits, but the truth is
that there is no universal framework.
I like the words of Jeremy Keith, in his talk The power of Simplicity,
he said that the most important thing while choosing your tool is the
philosophy of the person who made the tool and if that philosophy aligns
with yours. If the ideas of the framework do not align with yours, very
soon, you will go against them. The same thing happened to us. We tried
using Angular and there were too many difficulties. Problems that we
were able to solve, but we used hacks and complex workarounds.
We
also tried Ember, but it did not work, because it is heavily based on
its routing mechanisms. Backbone was a nice choice and it was the
closest thing to our vision. However, when I introduced AbsurdJS we decided to use it.
What AbsurdJS Did For Us
AbsurdJS was originally started as a CSS preprocessor, expanded to an HTML preprocessor
and it was successfully ported for client side usage. So, in the
beginning we use it for compiling JavaScript to HTML or CSS. Yes, you
heard me right; we started writing our styles and markup in JavaScript
(probably sounds strange, but please keep reading). I pushed the library
forward and a dozen of functionalities were added.
Divide and Rule
When you have a complex system, with many pages, you really don't
want to solve big problems. It is much better to split everything into
smaller tasks and solve them one by one. We did the same thing. We
decided that our application will be built of smaller components, like
so:
1
2
3
4
5
6
7
varabsurd = Absurd();
varMyComp = absurd.component('MyComp', {
constructor: function() {
// ...
}
});
varinstance = MyComp();
absurd.component defines a class. Calling the MyComp() method creates a new instance.
Let's Talk to Each Other
Having all these small components, we needed a channel for
communication. The observer pattern was perfect for this case. So, every
component is an event dispatcher.
01
02
03
04
05
06
07
08
09
10
varMyComp = absurd.component('MyComp', {
doSomething: function() {
this.dispatch('something-happen');
}
});
varinstance = MyComp();
instance.on('something-happen', function() {
console.log('Hello!');
});
instance.doSomething();
We are also able to pass data along with the message. The definition
of the components and their "listen-dispatch" nature is pretty trivial. I
adopted this concept from the other popular frameworks, because it
looks natural. It was also much easier for my colleagues to start using
AbsurdJS.
Controlling the DOM
Along with the PHP served markup, we had dynamically created DOM
elements. This means that we needed access to the existing DOM elements
or new ones, that will be later added to the page. For example, let's
say that we have the following HTML:
1
2
3
4
<divclass="content">
<h1>Page title</h1>
<p>Lorem ipsum dolor sit amet, consectetur adipiscing elit.</p>
</div>
Here is a component which retrieves the heading:
1
2
3
4
5
6
7
absurd.component('MyComp', {
html: '.content h1',
constructor: function() {
this.populate();
console.log(this.el.innerHTML); // Page title
}
})();
The populate method is the only magic method in
the whole library. It does several things like compiling CSS or HTML,
it binds events and such things. In the example above, it sees that
there is an html property and initializes the el
variable which points to the DOM element. This works pretty good for us
because once we got that reference, we were able to work with the
elements and its children. For those components that needed dynamically
created elements, the html property accepts an object.
01
02
03
04
05
06
07
08
09
10
11
12
absurd.component('MyComp', {
html: {
'div.content': {
h1: 'Page title',
p: 'Lorem ipsum dolor sit amet, consectetur adipiscing elit.'
The JSON above is translated to the same HTML markup. I chose JSON
because from a JavaScript point of view, it is much more flexible. We
are able to merge objects, replace or delete only parts of it. In most
of the popular frameworks, the templates are just plain text that makes
them difficult for manipulating. AbsurdJS also has its own templating engine.
The this keyword in the expressions above, points to the component itself. The code between <% and %>
is valid JavaScript. So, features like computed properties could be
easily developed directly into the template's definition. Of course, we
are able to use the same template engine with already existing markup.
For example:
... could be controlled with the following component (the result is the same):
1
2
3
4
5
6
7
8
absurd.component('MyComp', {
html: '.content',
title: 'That\'s awesome',
availableFor: ['all browsers', 'Node.js'],
constructor: function() {
this.populate();
}
})();
Anyway, the point is that we were able to define templates or create
such from scratch. We are also able to control the data that is injected
in an easy and natural way. Everything is just properties of the good
old JavaScript object.
What About the Styling?
We successfully split the whole system in to small modules. The parts
that were before Angular controllers, became AbsurdJS components. We
realized that their HTML was tightly attached to their definition, that
completely changed the management of the markup in the application. We
stopped thinking about the concatenation, conventions or anything like
that. We did not have to create HTML files at all. When I look back, I
could see this exact moment in our commit history. It is easily visible
because many files were removed from the code-base.
Then I thought, what will happen if we do the same thing with the
CSS. It was of course possible because AbsurdJS was a CSS preprocessor
and could produce CSS. We just got the compiled string, create a new style tag in the head of the current page and inject it there.
01
02
03
04
05
06
07
08
09
10
11
12
13
14
15
16
17
18
absurd.component('MyComp', {
css: {
'.content': {
h1: {
color: '#99FF00',
padding: 0,
margin: 0
},
p: {
fontSize: '20px'
}
}
},
html: '.content',
constructor: function() {
this.populate();
}
})();
Here is the style tag which is produced:
01
02
03
04
05
06
07
08
09
10
<styleid="MyComp-css"type="text/css">
.content h1 {
color: #99FF00;
padding: 0;
margin: 0;
}
.content p {
font-size: 20px;
}
</style>
And day by day we transferred the CSS styles from the SASS files
(because, at some point, we chose SASS as a CSS preprocessor) to the
AbsurdJS components. To be honest, it was pretty easy because all the
mixins and variables which we have, were defined as JavaScript functions
and variables. The sharing of the styles was even easier because
everything was JavasSript.
That Awkward Moment
... when everything works perfectly but you feel that something is wrong
We were looking at the code. It worked. AbsurdJS drove even the old
parts. The new stuff uses the same library. The HTML and the CSS were
nicely separated and placed directly into the components' definition.
However, I felt that there was something wrong. I stopped for a while
and asked myself: "What is the Web made from?".
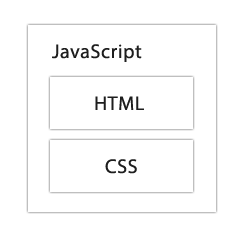
And what we did, is a little bit different. It looks more like the picture below.
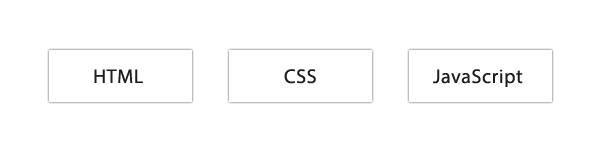
I've been building websites for more than ten years and I remember
the times when we all fought for the big separation of these three
building materials. And what I did in this project is exactly the
opposite. There was no CSS and HTML files (almost) at all. Everything
was JavaScript.
Many people will say that this is ridiculous and
we should give the client's money back. Yes, this could be true, but
this concept worked perfectly in our case. We did not write an
application. In fact, we wrote a bunch of independent components. I
believe that the Web will be a combination of ready-to-use components.
We,
as developers, will have to develop such components and probably
connect with and use such components written by others. Projects like AbsurdJS or Polymer are showing that this is possible and I encourage you to experiment in this direction.
Advertisement
Back to Reality
So in the end the client's business went well. It was so good that he
decided to launch a new service. And guess what. He wanted some parts
of the existing application transferred into the new project. I can't
tell you how happy we were to move components from one place to another.
We did not have to setup something, copy HTML markup or CSS files. We
just got the JavaScript file of the component, placed it somewhere and
created an instance of it. It just worked because there were no
dependencies. I'd not be surprised if some of these components are put
up for sale very soon. They are pretty light and provide nice
functionality connected with the client's product.
Yes, we broke some rules. Rules that I personally agree with. Rules
that I followed for many years. However, the reality is that we all want
quality and sometimes that quality is reachable by breaking the rules.
We want to produce good, well structured code which is easily
maintainable, flexible and extendable. We do not want to look back and
say, "Oh my gosh ... was that written by me!?". When I look back now, I
know why the code looks the way it does. It looks like that because it
was written for that project specifically.
Conclusion
If you found this tutorial interesting, check out the official page of AbsurdJS. There are guides, documentation, and articles. You can even try the library online.
Like every other tool, AbsurdJS is designed for specific usage. It fit
well for our project and may fit for yours. I don't even call it a
framework, because I don't like this definition. It's more like a
toolbox rather then a full stack framework. Feel free to experiment with
it, make pull requests or submit issues. It's completely open source
and available at GitHub.
With the complexity of most modern computers, it can be hard to manage all of it's different functionalities.
Especially security in an open Wi-Fi setting which can be particularly difficult to manage: Turn this on… Turn that off…
and remembering to turn it back when you return home can be time
consuming and difficult. It's in scenarios, such as this one, where ControlPlane can automate to enhance the functionality of the Mac.
ControlPlane Explained
Think of ControlPlane as a process overseer thats helps to manage a Mac. It looks at all the Evidence Sources available to it, runs them over some Rules, makes a decision based on the Evidence Sources and the Rules to set the Contexts of the Mac.
When the Contexts of the Mac change, ControlPlane executes Actions to manage the situation.
Get Started
The easiest way to get started with ControlPlane is with HomeBrew. If you haven’t installed HomeBrew, yet, check out the Homebrew tutorial.
Once Homebrew is installed, install Cask with these commands:
1
2
brew tap phinze/cask
brew installbrew-cask
With HomeBrew and Cask installed, execute the following command:
1
brew cask installcontrolplane
The
advantage of using Cask is that it will automatically install updates
for you. With one command, all programs installed with Cask can be
updated. This makes keeping a system up-to-date that much easier!
Alternatively, you can download ControlPlane from the developer's web site and install it in the conventional way. ControlPlane Icon
ControlPlane places an icon of a plane in the status bar. The color of the plane depends upon the current context. ControlPlane Menu
Clicking on the status bar icon, ControlPlane displays the main menu.
This displays the current context, where to go for more information,
the ability to check for updates, and the Preferences dialog. General Preferences
The Preferences dialog is where ControlPlane is managed. In the General tab, the operational options for ControlPlane can be modified. Those options are: Enabling automatic switching–This allows ControlPlane to switch contexts automatically without your intervention. This should be enabled. Start ControlPlane at login–This allows ControlPlane to start on login. Since you do not want to remember to launch it, it is best to enable this option. Use Notifications–This option will cause ControlPlane to
display a notification message upon changing context or performing an
action. It needs to be on for figuring out the correct rule settings.
But when your system is configured, it is best to turn off. Check for updates on startup–With this option set,
ControlPlane will check for a new version every time it is launched.
This keeps your system up to date with latest fixes. Hide from status bar–This option hides the icon in the status
bar. I like to keep this unchecked so I can easily see what is the
current context. You can set the icon to show just the icon, just the
current context, or both. Use switch smoothing–This gives the context switching more of a
dampening effect. What that means is that with this turned on, context
switching will be performed more slowly. With it off, the switching is
performed quicker, but also sometimes unnecessarily. It is best to keep
this option turned on. Restore previous context when ControlPlane starts–When
ControlPlane starts, this options will set the last context state as the
current state before starting to calculate a new state. This helps in
situations when you turn the computer off while in one context and turn
it back on when in a different context. If this option is turned off,
then none of the actions for moving context will be ran. But with this
on option on, they will. Use a default context–This option gives you the ability to set
a default context. Therefore, if ControlPlane can not figure out a
context based on Evidence Sources currently available, then it will use
the default context. Confidence to switch–This option gives you the ability to set a
confidence level for the changing of context. If the current evidence
is not above the confidence level, then no switching is performed. Advanced
The Advanced tab is only for the brave. Looking at
it gives you an idea of what is going on with ControlPlane, but it is
best to leave this area alone. It is very easy to set a parameter wrong
that will cripple your computer. I advise to just look, but not touch
this area.
Contexts
Once operational parameters are set, there needs to be some Contexts for ControlPlane to monitor. You can think of a context as an operational state of the computer. Without Contexts, there is nothing for ControlPlane to do. Contexts
I have two main Contexts defined: Home and Not Home.
You can also have sub-contexts by selecting an existing Contexts when you create a new one. Be careful, I kept making new Contexts as sub-contexts without realizing it. But, if you do, just drag it to the left and it will change levels.
To create a new Contexts, click on the + button at the lower left hand corner. Adding a Context
You will see the sub-dialog open asking for the name and color for the new Context. What I like to do is assign a dark main color for the upper level Contexts and lighter shades of that color for the sub-Contexts.
Always check the Preview picked color in status bar check-box so that you can see the color of the Contexts in the ControlPlane icon. Go ahead and create the Contexts you want.
Evidence Sources
With the Contexts define, the Evidence Sources need to be defined. Since selecting an Evidence Sources causes ControlPlane to monitor that source, you do not want any more activated than you will use. Evidence Sources
The Evidence Sources that I am using are:
Active Network Adapter
Assigned IP Address
Attached USB Device
Current Location
Nearby Wi-Fi Network
Power Source
With these checked, you'll be able to create the rules for when your MacBook is at home and for when it's not.
Rules
The next step is to set up some Rules. Rules are used to relate Evidence Sources to a percentage chance that it relates to a particular Contexts. The hard part is getting the percentage accurate enough to trigger the change of Contexts, but not so close to the border that it switches a whole lot. Rules
As you can see, there are many rules with various stages on the sliders. To add a new Rule, click the + button at the lower left hand corner. Adding a Rule
Each Evidence Source adds to the list of possible Rules that can be used. For my setup on the MacBook Air, I setup a rule for Active Network Adapter and set it to Wi-Fi link active with a percentage of 80% of being Home context.
I added a rule for the Attached USB Device being my G3 Adaptor to a percentage of 90% for the Not Home context. I also setup a Current Location Rule for what my system says is my home (it is really over 100 feet off!) to a Home Context at 100%.
I also set up two Rules for Assigned IP Address. If it was my local networks address range (netmask set to 255.255.255.0), I assigned a 90% to the Home Context.
If the address range is for my G3 provider (netmask set to 255.255.0.0
since it could be any number in that range), I assigned a 90% to the Not Home Context.
Actions
Once ControlPlane is changing Contexts, you can set up some Actions to be performed when the Contexts switch. Actions
Set two ToggleFileSharingActions. One for turning off file sharing when I enter the Not Home Context and one for turning on file sharing entering the Home Context.
Set two ToggleContextStickiness Actions. One for turning it on when in the Not Home Context and one for turning it off when in the Home Context.
What the ToggleContextStickiness does is force ControlPlane to only switch Context on a 100% certainty. That way, once ControlPlane detects it is Not Home, it will not switch until it is definitely in the Home Context. Adding an Actions
Set up these Actions by clicking the + button at the lower left hand corner of the Actions list. With these basic Actions set up, the system will now turn on and off File Sharing based on Home or Not Home Contexts.
Advertisement
Alfred and ControlPlane
There is a handy Alfred workflow called Control Tower.
You can use it to control ControlPlane. Some of it's options are
outdated, but the main functionality keywords work great. I mostly use
it to enable/disable ControlPlane.
Conclusion
That is how you set up ControlPlane for turning your file sharing
on/off based on context. Using these techniques, you can add other
contexts and/or sub-contexts and control other aspects of your computer.
That's just the beginning, though, and the possibilities are limited
only by your imagination!
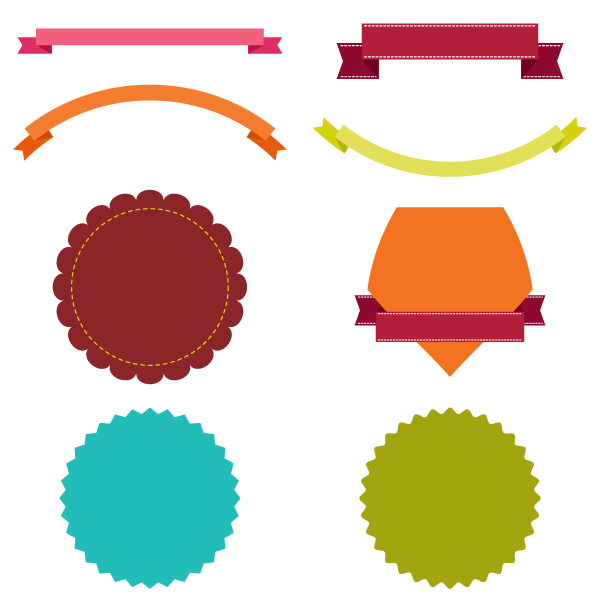
What You'll Be CreatingIn this tutorial you will learn how to create different banner,
label and badge templates which you can use in your future art
projects.
1. Create a Traditional Banner
Step 1
After creating a New document, take the Rectangle Tool (M) and draw a long rectangle. Set its color to (R=241, G=96, B=124).
Step 2
Draw another rectangle to the back by pressing Control-C, Control-B keys. Make it darker (R=221, G=47, B=97).
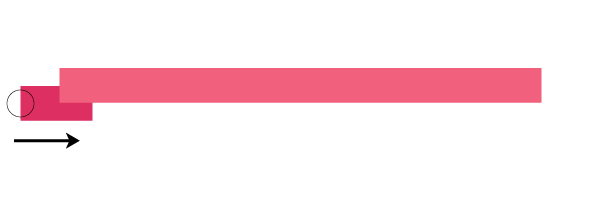
Step 3
Switch on the Smart Guides (View Smart > Guides) and put an anchor point in the middle of the left side of our rectangle. Take the Direct Selection Tool (A) and move the anchor point to the right.
Step 4
Select two created shapes and make a copy of them (Control-C, Control-F). Then go to Pathfinder panel and press the Intersect button. Color the new shape in color R=196, G=14, B=66.
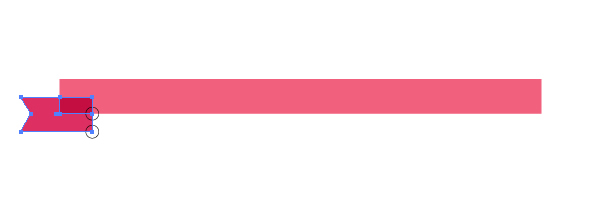
Step 5
And now - the trick: take the Direct Anchor Point Tool (A) and select two anchor points as shown in the image below. Go to Align panel and press Vertical Align Bottom. You will get this:
Step 6
Select the darkest shape, right-click on your mouse and choose Arrange > Send Backward.
Step 7
It's good if the Smart Guides (View > Smart Guides) are still switched on. It will be easier for you to make a reflection.
Select the darker (R=221, G=47, B=97) and the darkest (R=196, G=14, B=66) rectangles (remember to hold the Shift button for selecting two shapes at the same time) and press right-click on your mouse. Then select Transform > Reflect and Vertical axis of reflection in a new appeared window, and press Copy. Move the new copies to the right. That's it!
2. Create a Curved Upwards Banner
Step 1
Make another copy (Control-C, Control-V) of this banner and change its color to orange. I used R=244, G=125, B=48 (orange), R=232, G=90, B=12 (darker orange) and R=207, G=77, B=6 (darkest orange). But of course, you can use any color you want.
Step 2
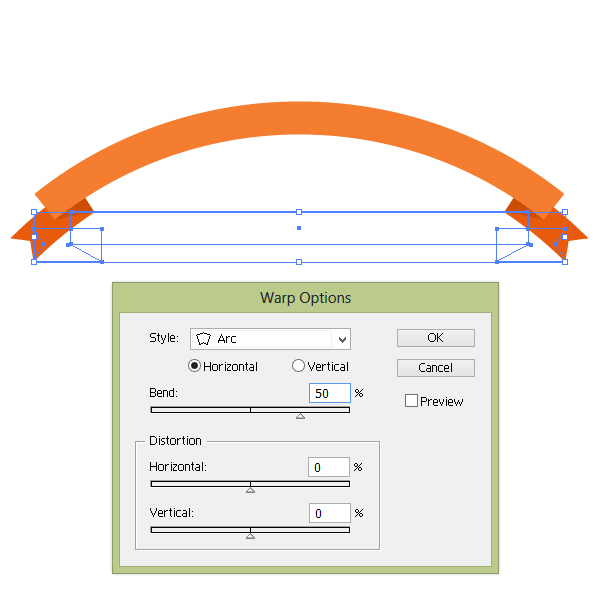
Group the whole banner (right-click > Group). Go to Effect > Warp > Arc and adjust the options like on the image below.
Step 3
Let's create a curved downwards banner.
Make a copy of
the orange banner and change its color to yellow. Make sure that the
whole banner is grouped. Go to the Appearance panel and click on the Warp: Arc. In the appeared window in a Bend section set the value as -50%. Below you can see result:
3. Create a Banner with a Stitched Effect
Step 1
For changing colors use the next values: R=179, G=30, B=59 (lightest red); R=142, G=9, B=47 (darker red); R=109, G=3, B=33 (darkest red). Stretch the banner using the Selection Tool (V).
Step 2
Draw two white lines using the Line Segment Tool (\).
Step 3
Go to the Stroke panel and check Dashed Line. In a first dash box enter 4 pt.
Step 4
Put these dashed lines on the back shapes of the banner.
Step 5
And on the other side.
4. Create a Badge with the Zig-Zag Effect
Step 1
Using the Ellipse Tool (L), draw a blue ellipse (R=34, G=188, B=185).
Step 2
Go to Effect > Distort and Transfort > Zig Zag. Adjust the options as shown on the image below:
Step 3
Create one more copy of this label, make sure that resulting shape is selected and take a look on the Appearance panel.
Click on Zig Zag and in the Points section check Smooth instead of Corner. Change the fill color to R=163, G=165, B=16.
5. Create a Badge with the Pucker & Bloat Effect
Step 1
Take the Polygon Tool and simply click on your artboard. In window enter 20 sides and press OK. Set its color at R=138, G=37, B=41.
Step 2
Now press Effect > Distort and Transform > Pucker and Bloat. Move the slider to the right until you get 9%, OK.
Step 3
Take off the fill color. For the stroke color use values: R=213, G=209, B=14.
Draw a circle inside, using the Ellipse Tool (L) and on the Stroke panel check the Dashed Line box. Set 8 pt in a first dash box.
6. Create a Basic Shield Shape
Step 1
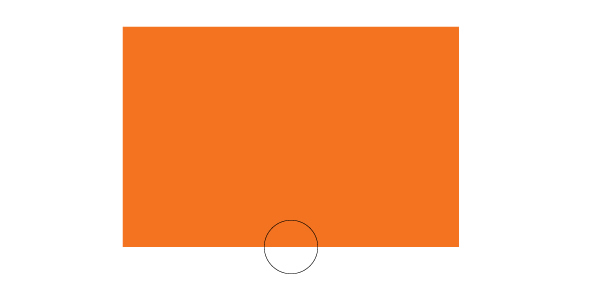
Take the Rectangle Tool (M) and draw a rectangle with the fill color R=243, G=115, B=33. Using the Smart Guides to put an anchor point on the bottom of the rectangle with the Pen Tool (P).
Step 2
Press the Direct Selection Tool (A) and shift down the new anchor point.
Step 3
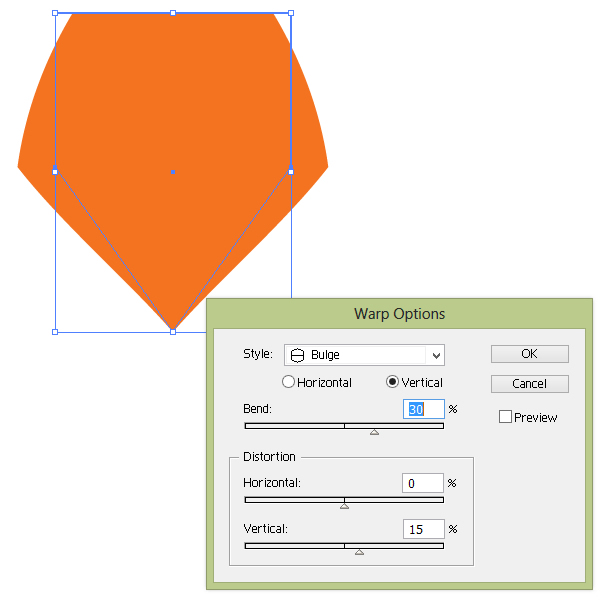
Press Effect > Warp > Bulge and adjust the options in appeared window like on the image below.
Step 4
Put the banner, created in a Step 3 in a front and see how it looks.
Step 5
Make a Horizontal reflection of the banner: select the whole banner, right-click on the mouse and press Transform > Reflect. Then choose Horizontal, OK.
Advertisement
Step 6
If your banner was grouped, Ungroup it (right-click >Ungroup). Put the corresponding parts to the back (Control-X, Control-B).
Great Job, You're Now Done!
So, in a few simply steps you learned how to
create different banners, labels and badges. You have the templates, just add some text and design elements.
Congratulations, you did a wonderful job!
Following the publication of the recent Shopify Theme Series
A few people have reached out to ask me about some of the workflow
tools I use when building themes. Let's begin by looking at the Desktop Theme Editor for Mac.
Desktop Theme Editor for Mac
As Shopify
is a hosted platform, you need to upload your theme files to view
changes in your store. Whilst you can of course use the theme editor in
the admin area, many of us like (and prefer) to work locally on theme
files using our chosen text editor - Sublime Text 2 in my case. The Desktop Theme Editor for Mac allows seemless syncronisation between local files and your Shopify theme
It can get a bit labour intensive having to ZIP up your theme and
upload it in order to see small incremental changes, but ,thankfullyt
there are two tools which solve this problem. The first one I'd like to
discuss is the Desktop Theme Editor for Mac.
This app, which is free to download from the Shopify app store,
works in the background to seamlessly synchronise changes made to your
local theme folder to a development or live Shopify store. This means
you are able to work locally in your favourite text editor, make
changes, add/delete files and then simply go to your store - hit refresh
- and see the changes.
Setting up the Desktop Theme Editor is straight forward:
Download the app from the Shopify App store, install and open.
Login to the app with your Shopify store details.
Pick the relevant theme you would like to work on locally. Note:
the theme has to be available in the store. If you are starting from
scratch simply upload your boilerplate theme via the store admin area
and then select it from the list.
Choose an appropriate location to save the theme.
Open up your theme in your preferred text editor.
Make a change and wait for the notification to appear that the change has been applied to your store.
Refresh your browser store to see the changes.
It's a great utility, very easy to set up and will certainly
streamline your theme development. Full details on the app including a
screencast are available on the Shopify docs site.
Shopify Gem
If you don't use a Mac, or have a preference for the command-line, you might be interested in the Shopify Theme Gem
available on GitHub. This achieves the same end result as the Desktop
Theme Editor, but instead of installing a native app you install a Ruby
Gem. The Shopify Theme Gem is a powerful command-line tool for working with your theme files
Once you have installed the Gem (full instructions
are available on GitHub) you'll have access to a wide range of
command-line features in addition to those offered by the Desktop Theme
Editor. These include the ability to:
Download all the theme files
Upload a theme file
Remove a theme file
Completely replace shop theme assets with the local assets
Open the store in the default browser
Both these tools make building themes very straightforward. The
synchronisation is quick and seamless and certainly speeds up your
workflow process.
Timber
I'm sure I am not the only person to have my own boilerplate for theme development. I maintain mine on GitHub and use this as a basis of themes I work on. Timber — A faster and easier way to build Shopify themes
My boilerplate theme is really basic and whilst it works for me you might like something a bit more fully formed such as Timber.
This starter theme was recently released by the Shopify team and
describes itself as "a faster and easier way to build Shopify themes".
It's much more of a framework than my own and ships with many useful
features.
Here's what's included:
Required Templates - Every theme template, both required and optional
Basic Markup - All the essential HTML and Liquid output and logic tags for each template
CSS Framework - A barebones set of styles that you can quickly customise for your own needs, including a fully responsive grid framework
Snippets - Reusable segments of commonly used code such as pagination blocks, breadcrumbs and newsletter sign up forms
Timber is definitely worth looking at. You can also try out a demo store to see how it functions in its basic form.
Sass Support
It's a little known fact that Shopify also supports Sass, albeit with one small caveat. Compilation of your *.scss.liquid
file happens on the Shopify servers so you don't need to worry about
running a local pre-processor for your Shopify theme development. The
resulting output CSS is compressed and comments are also removed.
I mentioned one caveat. Currently you are unable to use @imports in your Sass files, due to security implications on the Shopify platform. This currently prevents you from using helpers like Compass and Bourbon, but the good news is that solutions are being looked into.
However it's not all bad news. Timber includes a number of useful mixins
in its own Sass file and you can of course include your own - just
remember that they have to live in the same file as your style
declarations.
Better Workflow
The Desktop Theme Editor, Shopify Gem, Timber and Sass support all
represent ways in which, with very little effort on our part, we can
start to improve the way in which we build Shopify themes.
Beyond these tools many talented Shopify theme developers are using
their own tools and ideas in their daily workflow. If you have a useful
technique you'd like to share I'd love to hear it, feel free to drop a
note in the comments.
Camera moves add meaning and emotion to a scene, but sometimes there's
no room to move the camera. The solution is to combine clever use of
camera height with actor movement. Your pans, tilts and actor blocking
can make simple setups look like complex camera moves.
After
the American industrialist Charles M. Schwab made his fortune in the
steel industry in the early 20th century, he invested his wealth in what
was considered the most ambitious private house in New York City.
Costing $7 million, and with 75 rooms, Riverside was built over a full
city block on the Upper West Side of Central Park. After Schwab died,
New York's mayor Fiorello La Guardia was offered the opportunity to make
Riverside his permanent residence. He declined, deeming the house too
grand for a public official.
How did Schwab become such a wealthy man, living in New York's most
enviable mansion? Two reasons. First, he knew a good idea when he saw
one. Second, thanks to his ability to spot a good idea, he used a simple
but effective system to keep track of what he needed to do each day.
In the early 1900s, Schwab was approached by efficiency expert Ivy
Lee. Lee promised he could drastically improve Schwab's efficiency. If
Lee's system worked, Schwab was to pay whatever he thought the system
was worth.
Schwab agreed. He met with Lee for a few minutes, during which Lee taught him a simple technique. It had three components:
At the end of each day, write down the six most important things you plan to accomplish tomorrow.
Arrange the list in order of importance, with the most important task at the top.
The next day, work down your list. Once you've finished one item, move onto the next.
According to business lore, Schwab was so delighted with the results of this technique that he sent Lee a check for $25,000.
Some people herald this as the birth of the to-do list. The truth is,
lists have long been part of human culture. In ancient times, the world
was organized around religious beliefs and practices, and lists lie at
the heart of many major religions. Think of the Torah's Ten Commandments or Buddha's Four Noble Truths. As Italian novelist Umberto Eco pointed out during an interview with the German newspaper Spiegel:
The list is the origin of culture. It's part of the
history of art and literature... Wherever you look in cultural history,
you will find lists. In fact, there is a dizzying array: lists of
saints, armies and medicinal plants, or of treasures and book titles.
Lists are essential to human culture because they help us make sense
of the world. Lists allow us to organize the world around us, and—more significantly—our own lives.
Enter the to-do list. At its most basic, a to-do list is a list of tasks you plan to complete today.
Keeping a to-do list has multiple benefits. A to-do list helps you to:
Stay focused on the task you're working on.
Remember what you need to do and when.
Be more productive.
Stay motivated.
Reduce your stress levels.
Let's look at some of these benefits in more depth.
A to-do list helps you stay focused in two ways. First, whenever
you've completed a task, you can turn to your to-do list to see what you
should do next. This stops you wasting time and mental energy recalling
what needs to be done. You've already made the decision on what you'll
do next. As productivity expert Brian Tracy once said:
Every minute you spend in planning saves 10 minutes in execution.
Second, knowing you've got a to-do list helps you remain focused on the task at hand.
Your mind wanders less because it knows everything it needs to be aware
of is taken care of in your to-do list. This has been proven by
psychology experiments.
In their book Willpower: Rediscovering the Greatest Human Strength, Roy Baumeister and John Tierney summarize a study in which participants were asked to read ten pages of a novel.
Some of the group, before they sat down to read the novel, were asked
to note down important uncompleted projects in their lives, and to make
a plan for how they'd complete those projects. The participants who
were asked to do this focused better on the text, found their minds
wandered less, and displayed a better understanding of the text they'd
read.
Baumeister and Tierney conclude:
The persistence of distracting thoughts is not an
indication that the unconscious is working to finish the task. Nor is it
the unconscious nagging the conscious mind to finish the task right
away. Instead, the unconscious is asking the conscious mind to make a plan.
The unconscious mind apparently can’t do this on its own, so it nags
the conscious mind to make a plan with specifics like time, place, and
opportunity. Once the plan is formed, the unconscious can stop nagging
the conscious mind with reminders.
In other words, your to-do list acts as a memory bank. With a to-do
list, you can let go of everything that needs doing in the future,
because it's taken care of. Then you can give 100% of your attention to
what you're working on right now.
Although to do lists help with productivity, they're not a panacea. Researchers over at the productivity app iDonethis
looked into the to-do lists of the app's users. They found that 41% of
items on to-do lists are never completed. For to-do lists to work for
you, you need to know how to create and use them in the right way.
Now you know what a to-do list can do for you, let's look at how you can start using them—the right way. Just follow these five steps:
Step 1: Capture Tasks
Before you can write a to-do list, you need tasks to fill it with.
You could, like Charles Schwab, sit down at your desk at the end of
each day and think "what do I need to do tomorrow?" Having this space to
reflect can be helpful. But the problem is that you'll often remember
what needs to be done at awkward times. Maybe you remember tasks when
you wake up in the middle of the night, or when you're deeply involved
in a completely unrelated project.
Because of the arbitrary way in which we remember what needs doing,
it's a good idea to have a system for capturing every task that you
believe might need adding to your to-do list. This could involve
carrying a notepad around with you, installing a note-taking app on your
phone, or emailing yourself each time you remember a task. The
important thing is that your capture system works for you and your
lifestyle. Leo Babauta of Zenhabits explains his preferred method:
Carry a small notebook (or whatever capture tool works
for you) and write down any tasks, ideas, projects, or other information
that pop into your head. Get it out of your head and onto paper, so you
don’t forget it.
On top of helping you remember tasks, writing tasks down stops them
nagging at the back of your mind. As we know from Baumeister and
Tierney, this frees up your mental energy so you can better focus on the
task at hand.
Note that at this stage you're not deciding whether or not you'll
follow through on the task. It's best to note down all ideas you have,
even for tasks or projects you're sure you have no time for. That way
you keep your mind free of mental clutter, and you'll never experience
the regret of thinking "what was that great project I imagined earlier? I
wish I write it down".
Step 2: Filter Your List
Once you've got a capture system in place, you'll need to filter the
tasks you note down. That means deciding which tasks you actually need
to do (or want to do), which are crazy ideas you'll never get round to,
and which are projects for the future.
Set aside a time each day when you'll take tasks from your capture system, and put them into a to-do list for the next 24 hours.
Make sure each task is specific and actionable. If you won't be able
to tell when a task counts as done, it shouldn't be on your to-do list.
Research shows that putting vague tasks on your to-do list will make you more likely to procrastinate.
You need to be able to look through your task list and say "yes,
that's done". Need help setting tasks that are appropriate? Take a look
at our tutorial on SMART goals. Tasks on your to-do list are just small goals, after all.
You may develop your own system for deciding what to keep on your list and what to discard. Alternatively, the Eisenhower Matrix is great for helping you set priorities. Talking of setting priorities...
Step 3: Prioritize
You've got a list of items you plan to complete for the day ahead. But which should you do first?
Your to-do list isn't finished until you prioritize the tasks on the list. You can do this with:
The Eisenhower Matrix. This can help you distinguish between urgent tasks and important tasks.
The Eat the Frog method. Here, you ask yourself which task you least
want to do. You do that first to get it out of the way. It's a bit like
being told to eat your veggies first as a kid so you can enjoy the rest
of your meal.
The Final Version approach. This is the opposite of Eat that Frog in that you organize your list around what you most feel like doing.
You can find out more about how to Eat that Frog or use the Final Version approach in our tutorial on starting with a productive mindset.
Step 4: Set a Time Limit for Each Task
Research shows that if we allow ourselves an unlimited time to
complete a task, we'll take longer to do it, and we'll do a worse job.
Without deadlines people give in to the temptation to procrastinate.
For example, a study
by Dan Ariely and Klaus Wertenbroch found that students working to
self-imposed deadlines performed better on papers than those who gave
themselves "as long as it takes" to complete the papers.
When setting yourself a time limit, it can help to use the Pomodoro technique.
This technique divides your work time into 25 minute chunks. The more
you use the technique, the better you'll get at estimating how long a
task should take.
If a task is going to take longer than two hours, then you should
break it down into smaller tasks. That way you can better estimate how
long each task will take, and set appropriate deadlines.
Step 5: Get to Work
Now your list is ready, you can work on the tasks! Start with the
task at the top of your list, and work your way down. When you've
completed a task, cross it off and move on to the next one.
As you complete your list, bear in mind the following:
Don't beat yourself up if you don't get everything done. Over
time, you'll get better at estimating what's possible for you in one
day's work. And you can always add tasks that don't get finished to
tomorrow's to-do list. The point of your to-do list is to keep you
focused on high priority tasks, not to keep you working late into the
evening.
Distractions will occur. Sometimes, you'll have to deal with
them immediately. Often, you'll be able to return to your task having
noted down a new task in your capture system. It's worth leaving room in
your task list for surprise tasks, so that distractions don't derail
your day.
Still getting overwhelmed? Try the 3 + 2 rule. Limit your
list to five items on your to-do list: three main things you want to get
done, and two smaller tasks. That way you'll find it easier to complete
your list, and you'll build your self-confidence at getting things
done.
Give yourself credit for the things you do that aren't on your to-do list. An easy way to do this is to add them to your list after
you've done them, then immediately cross them off. Not only does this
feel good each time you do it, it also means that at the end of each day
you've got a realistic overview of the work you've done.
Over to You
Do you use a to-do list to help you stay productive? If so, what do
you do to make your list as effective as possible? What strategies have
you learned in this tutorial that you plan to implement? We'd love to
hear from you, so let us know in the comments, below.
Medical Disclaimer
The information on this site is not intended or implied to be a substitute for professional medical advice, diagnosis or treatment. All content, including text, graphics, images and information, contained on or available through this web site is for general information purposes only. Krobknea makes no representation and assumes no responsibility for the accuracy of information contained on or available through this web site, and such information is subject to change without notice. You are encouraged to confirm any information obtained from or through this web site with other sources, and review all information regarding any medical condition or treatment with your physician. NEVER DISREGARD PROFESSIONAL MEDICAL ADVICE OR DELAY SEEKING MEDICAL TREATMENT BECAUSE OF SOMETHING YOU HAVE READ ON OR ACCESSED THROUGH THIS WEB SITE.


.webp)

