
1. Set Up Your Document
Since we're about to create a holiday card, I recommend using one of the most common greeting cards paper sizes – A6 (105mm x 148.5mm).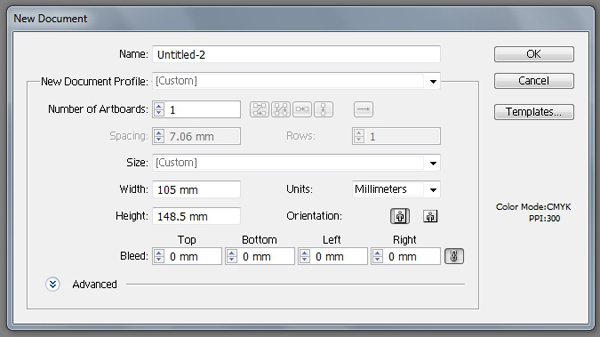
2. Create Your Sketch
Step 1
Create a sketch. For me, the best part of the holidays season is the gift giving/receiving, so I decided to draw a boy holding a wrapped gift. I am using a pen tablet but you can also draw your sketch on a piece of paper and then scan it and import it into Illustrator. I made a hand written greeting, saying "happy holidays" right under the drawing. I recommend making your own lettering which will give a unique touch to your artwork. I wrote "happy holidays" in this example, but feel free to use your own personal messages while going through the tutorial.
Step 2
Rasterize the sketch. Select the drawing and go to Object > Rasterize.
Step 3
Choose 150 dpi from the dialog box.
Step 4
Drop the Opacity to 50% and lock the layer (Control-2). Create New Layer to add your vectored shapes.The sketch will be visible enough so we can trace the shapes. Being locked, it won't bother us from accidental clicking.

3. Trace the Sketch
From this point on, we're going to use mostly the Pen Tool (P). I advise for beginners in vector graphics to explore this tool and its possibilities to the maximum. It can be difficult to grasp at the beginning, but once you figure it out you, will fall in love with it - I promise you.Step 1
Try not to add many anchor points. This way your lines will be more smooth and eye-catching.
Step 2
When you trace shapes that are part of a larger one and need to stay in its border, don't try to be precise. Let them go out of the border (like the lines on the winter cap). We'll get to them later.
Step 3
After we trace the drawing, we can also trace the handwritten message.The good thing about tracing handwriting is that we don't have to worry about its accuracy since it's not made out of geometric shapes.


Step 4
Copy the head's main circle. I colored it yellow so you can easily recognize it.
Step 5
Paste it in front (Control-F) of one of the cap's stripes.
Step 6
Select them both (the main circle and the line) and use the Intersect option in the Pathfinder panel. Notice how the shapes align perfectly! Now, repeat these simple steps for the other shapes which are overlapping.
4. Color Your Design
Step 1
Delete the sketch layer. Pick some colors you're going to use for this card. I picked eight. There is always a possibility to add some more color to your palette by using lighter or darker shades of your already picked colors.I usually make the palette accessible by making little rectangle shapes colored in my palette of choice. I also label them so I can easily find the one I need. Choosing pastel colors we'll get a certain vintage feel. Instead of white we will use a pale shade of yellow and instead of black, a dark shade of grey.

Step 2
Let's start with the background. Make a rectangle in the size of our card (105 x 148.5mm), and color it with the off-white/pale yellow. Right-click on it and select Arrange > Send to Back.
Step 3
Select the background of the drawing and with the Eyedropper Tool (I) click on the rectangle labeled as "background 2".
Step 4
Repeat the eyedropper color selection step for all the other shapes (sweater, face and hands, hair, cap, gift and ornaments).
Step 5
The image should look like this. I added one more color box with dark grey color.
5. Add a Subtle Texture to Shapes
Step 1
To add some detail on the hair, select the hair shape – Copy and Paste it in the same place (Control-F). Swap the fill and stroke color (Shift-X).
Step 2
Double-click on it to enter the Isolated Object Mode. Delete the upper two anchor points.
Step 3
Open the Brushes panel and in the options menu, find the Open Brush Library sub-menu. Click on it, and you will get brushes in various categories. Open the Artistic category, and select the Chalk Charcoal Pencil subcategory.
Step 4
You will get a library of rough brushes. Select a suitable brush. I will use the one labeled as "charcoal pencil". Drop the Stroke Weight to 0.5pt. This way we will get a "hand made" feel to the illustration. Feel free to repeat this step on the clothes and the decorations.
6. Add Details to the Illustration
Step 1
After we make sure we have done the majority of the coloring, we can work on adding some details.For example, I created two small shapes at our boy's arms which will separate his arms from the background. Be sure to fill them with the same color as the background.

Step 2
The same way we can add reflection in his eyes, by creating two simple shapes in a slightly lighter color than his eyes are.
Step 3
Also, we can add some reflection to the ornaments. They will look more eye-catching and more festive. Just try to follow the object's contour. Use a very light shade of the object's color you are adding reflection to. For example, if you have a red ornament, try pink for its reflection,
7. Create Your Text
Step 1
OK now, let's work on the handwritten message.Select the text and click on the Swap Fill and Stroke option at the bottom of the toolbar. Your text will appear black.

Step 2
Use the Pathfinder panel to make gaps in the desired letters. We will use the Minus Front command to cut out the forms in order to have a fully shaped letter. Just select both of the shapes (a letter shape and a gap shape), and click on the Minus Front command in the Pathfinder panel.
Step 3
Now, once we have our message ready, we can color it in a fashion that will blend in perfectly with the illustration. Using the Eyedropper Tool, pick a color used on the illustration. I went for the background's blue.

8. Let it Snow!
Step 1
We are almost there! What we are missing is some detail on the background.Let's draw some retro styled snowflakes. Using the Pen Tool (P), try to draw at least three simple snowflakes.

Step 2
In order to get diversity in our background and to save a bit of time, why not try using Rotate and Resize the three snowflakes we have. I did that twice, so we now have nine "different" looking snowflakes, when basically we have only three different designs.
Step 3
Start arranging the snowflakes on the blue part of the background. Try not to overcrowd the space. If you feel like you need more than nine snowflakes, feel free to duplicate a few more.
Step 4
When you are done with them, Group them together (Control-G) and using the Eyedropper Tool (I), color them with the same color of the background.
9. Refine Your Design
Step 1
We need just a few more details and we are done! Let's add stripes to the red sweater.Using the Pen Tool (P), draw a few simple curved rectangle shapes - no more than four.
When you are done, make them as Compound Paths. Go to the Object > Compound Path > Make (or use the shortcut Control-8). This way, the four objects will act and be treated as one and it will ease the Pathfinder process.

Step 2
Copy the red sweater shape, click on the striped shapes we just created and paste in front. This way we'll paste it in front of them and in exactly the same position we copied it.
Step 3
Select both the red sweater shape and the stripes, and in the Pathfinder panel click the Intersect option. This way we'll get the desired stripe shapes which are a result from intersecting the previous two forms. Color them light pink and place them in front of the red sweater.
Step 4
Adding a final touch – since our holiday boy is out in the snow, we'll give him slightly red cheeks. Draw two simple circles using the Pen Tool (P) or use the Ellipse Tool (L). Paint them in a very light shade of pink and place them underneath the eyes.
Great Work, You're Now Done!
Check out the finishing result. We have one vintage-styled Christmas card!Feel free to add another detail that you think will fit well. For example, I added two swirly decorative lines at the beginning and at the end of the "Happy Holidays" message.


.webp)

