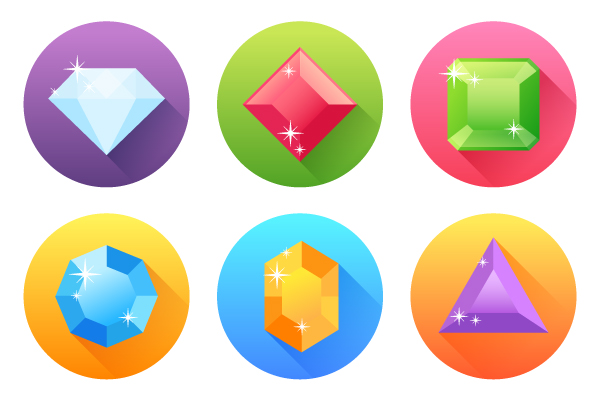
1. Form a Perfect Shiny Diamond
Step 1
Launch Adobe Illustrator and make a New Document (Control-N) of 600 x 600 pixels, in RGB Color Mode.
Step 2
For convenience, we will use Ruler Guides. Just click-hold on the Rulers (Control-R) and drag the guide lines onto the artboard. Align them at the center of the artboard using the Align panel.
Step 3
Now we can start making our diamond! We'll begin with its bottom part. Use the Polygon Tool with 3 sides to create a triangle. Set the Radius to 150 pixels and position your shape as shown on the screenshot below.
Step 4
Duplicate your triangle and squash the copy by holding the Alt key and moving one of its sides closer to the center.
Step 5
Go on and create the upper part of our diamond by adding a rectangle by means of the Rectangle Tool (M).Take the Direct Selection Tool (A), select upper right anchor point and move it closer to the center (hold down Shift key in order to move the point straight horizontally). Repeat the same moves for the upper left anchor point of the rectangle. Our diamond shape becomes more and more recognizable!

Step 6
Let's make the top of our diamond more detailed! Start by adding another rectangle, inscribed in the center of the upper part. Form a small triangle shape inside the newly created shape and use the Reflect Tool (O) to mirror it over the horizontal axis.
Step 7
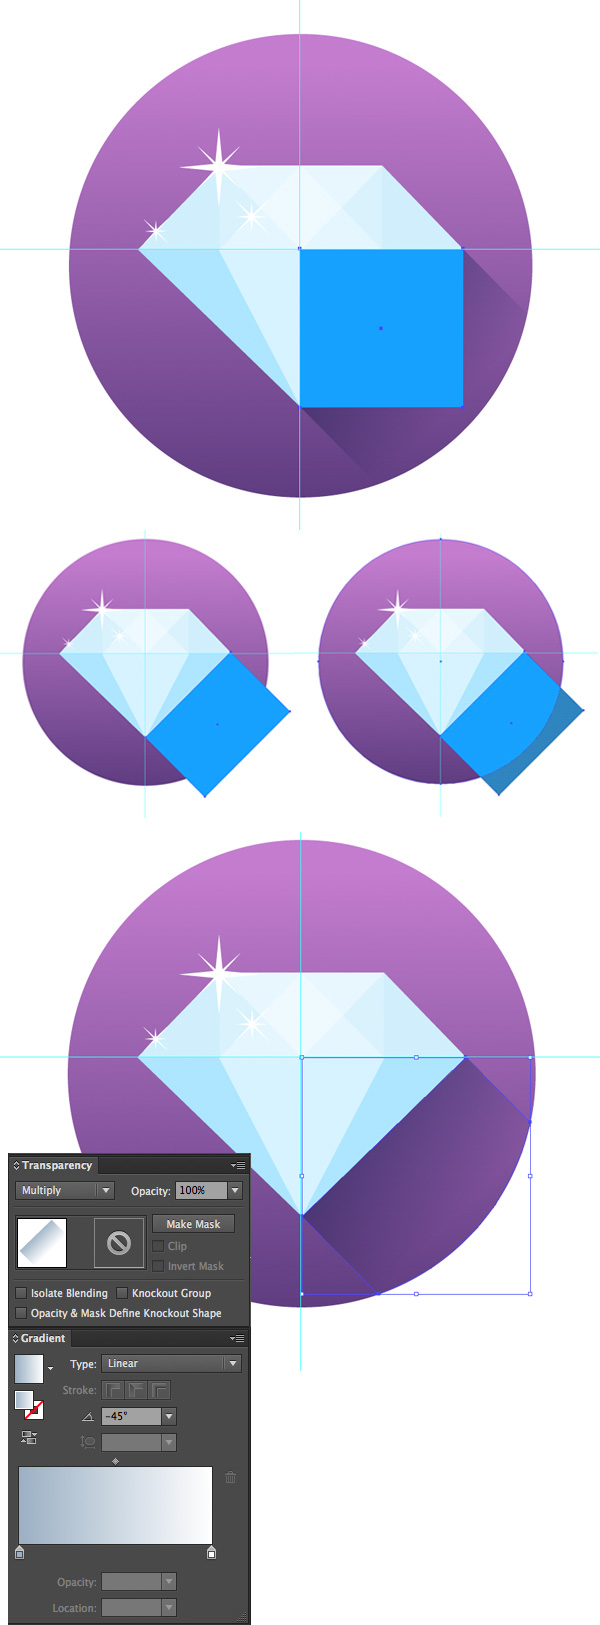
Now we can color our diamond and make it shine! We'll be using the following palette:
Start coloring by the lower part and gradually move to those on the top. Fill the lower triangle shape with sky blue color (R=173, G=230, B=255) and the upper part with lighter blue (R=208, G=239, B=252). Fill those shapes on top with pure white and slightly reduce the transparency of the objects by setting the Opacity value to 50%, thus making the diamond more realistic and bright.


Step 8
Let's make it shine! Take the Star Tool and create a 4-pointed simple star. Adjust the sharpness of its corners and the length of its beams by holding both the Control-click while making the object. Create another star on top of the first and rotate it to 45 degrees using the Rotate Tool (R).
Step 9
Switch the fill color of our sparkle to white. Make several copies of the spark and position them on top of the gem, playing with their size.
Step 10
Now we need to add a basic icon shape as a background. Create a circle using the Ellipse Tool (L) and fill it with linear gradient from dark-violet (R=95, G=61, B=129) in the bottom to lilac (R=195, G=125, B=207) on the top.
Step 11
The last but not the least thing is to render a popular among flat-style graphics effect of a long shadow. Start by forming a rectangle of any color with the Rectangle Tool (M). Rotate it to 45 degrees and align its side with the right edge of your diamond.Place the object under the diamond (Control-[) to hide any unnecessary parts of it. Select both the background circle and the rectangle shape and use the Shape Builder Tool (Shift-M) to delete the unneeded part by clicking on it, while holding the Alt key. Finally, fill the shape with linear gradient from greyish-blue (R=154, G=176, B=197) to white. Switch the Blending Mode to Multiply, thus forming a shadow, cast by our diamond.

2. Create a Vivid Blazing Ruby
Step 1
Start by forming a square with the Rectangle Tool (M) and rotate it to 45 degrees.
Step 2
Grab the Line Segment Tool (\), create two straight crossing lines and position them right in the center of the square. Select everything and use the Divide function in the Pathfinder panel to split the square into four separate sections.
Step 3
Now we can fill each part with different color to emphasize the facets of our gem. I've used the following palette for the ruby:

Step 4
We need to add more reflections and highlights to our ruby in order to show its glass texture. For this purpose, copy and paste in front (Control-C > Control-F) the upper right section of the ruby and make it slightly smaller than the original shape. Fill the new copy with linear gradient from dusty-yellow (R=209,G=181,B=96) to black and switch the Blending mode to Screen, this way creating a highlight. Use the Reflect Tool (O) to make the mirrored copy of the highlight on the other side of our gem.
Step 5
Continue adding minor details to our ruby, making it more dimensional. Put a smaller square, rotated to 45 degrees, on top of the gem and align it to the center of the image. Fill the new shape with linear gradient from darker pink (R=228, G=20, B=64) to rose-pink (R=225, G=107, B=126) color. Finally, decorate our ruby with a few twinkling stars that we've created earlier for the diamond.
Step 6
Put the ruby on a circle, filled with linear gradient from darker green (R=81, G=163, B=37) to lighter yellow-green (R=201, G=230, B=85), and form a nice long shadow to give the icon a popular flat-design look.

3. Make a Marvelous Twinkling Emerald
Step 1
Take the Rounded Rectangle Tool and create a shape of approximately 233 x 233 pixels size and Corner Radius set to 30 pixels. Use the Convert Anchor Point Tool (Shift-C), clicking on the anchor points one by one, in order to convert them to corners (or just use the Convert selected anchor points to corner function in the control panel above to transform all the points at once). Now we have a square with the corners cut off.
Step 2
Move on and add more facets to our precious gem. Use the Polygon Tool to create a triangle, transform it and place it so, that its sharpest corner faces the center of your artboards, as shown on the screenshot.

Step 3
Apply a gentle linear gradient from dark green (R=21, G=155, B=24) to brighter grass-green (R=143, G=220, B=46) to the basic emerald shape and fill the facets with gradient from greyish-green (R=148, G=199, B=65) to black, switching it to Screen mode.
Step 4
Let's make our gem more shaped. Form another triangle on top of other parts of the emerald, turning its corner to the center of the artboard. Delete the unneeded parts using the Shape Builder Tool (Shift-M) and resize the new shape, making it slightly smaller than the emerald base.
Step 5
Now we can fill the new shape with the same linear gradient as the facets and switch it to Screen mode (or just use the Eyedropper Tool (I) with its default settings to pick the necessary object appearance). Duplicate this shape in order to place the copy on the upper part of our gem.
Step 6
Duplicate the basic emerald shape and rearrange its position, bringing it to front (Shift-Control-]) and placing on top of all other objects. Switch the fill color to the linear gradient from pale-green (R=201, G=235, B=120) to darker chartreuse-green (R=83, G=192, B=44). Finally, add sparkles to make our gem shiny and attractive.
Step 7
Add a final touch to the icon by forming a circle, filled with linear gradient from darker pink (R=247, G=62, B=87) to lighter Barbie-pink (R=255, G=132, B=185) and draw a long shadow. Now you're done with the emerald! It's time to move to the next gem.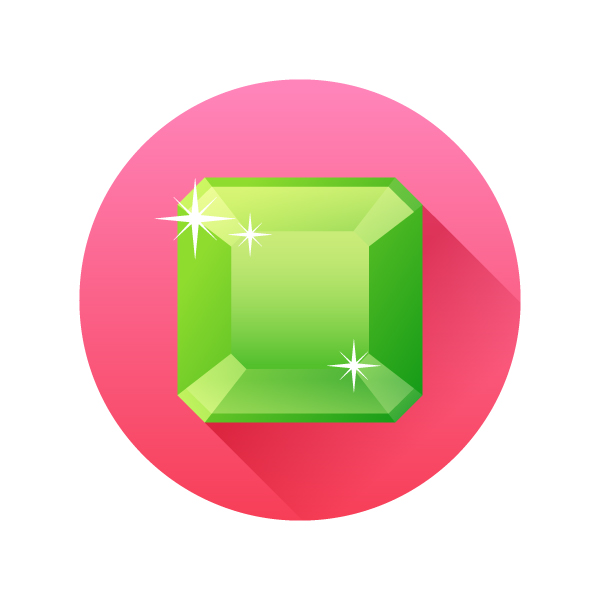
4. Render a Clear Sparkling Sapphire
Step 1
We will use the Polygon Tool again for making a basic shape of about 130 pixels size, but this time set the Sides quantity to 8, thus forming an octagon. Rotate it, if needed, so that its corners are aligned wth the Guides. Create a straight line with the Line Segment Tool (\) and use the Rotate Tool (R), setting the Angle value to 45 degrees and hitting the Copy button in order to duplicate the line.
Step 2
Continue making copies of the line with the Reflect Tool (O) so that they cross every corner of the octagon, forming a bunch of stylized rays, converging in the center. Finally, select the lines and the octagon and use the Divide function in the Pathfinder panel to break the object apart.
Step 3
Now the easy part! Just select every slice of our octagon, one by one, and fill it with various shades of blue. Here is my palette, the colors were applied sequentially, moving clockwise.

Step 4
Complete rendering our sapphire by putting smaller octagon on top and filling it with linear gradient from light sky-blue (R=183, G=238, B=255) to darker blue (R=38, G=183, B=255). Flavor your gem with a pinch of sparkles.
Step 5
Complete the icon by filling its base with warm linear gradient from orange (R=255, G=132, B=0) to honey-yellow (R=255, G=242, B=88) and putting a gentle shadow.

5. Mould the Glittering Sunny Amber
Step 1
Start by making a simple square and go to Object > Path > Add Anchor Points. Select the anchor point, which appeared right in the middle of the upper side of the square and pull it up a bit. Repeat the same for the lower anchor point, thus forming a nice extended hexagon.
Step 2
Draw several straight lines forming a group of rays, which will split up the object, as we did it with the basic sapphire octagon shape.
Step 3
Fill each segment with gentle amber colors from the palette, making the gem sunny and warm.

Step 4
Cover the shape with another hexagon of a smaller size and fill it with mild gradient from bright yellow (R=255, G=232, B=54) to pale-orange (R=255, G=178, B=72), deepening the inner glow of the jewel.
Step 5
Tart our amber up with a couple of sparks and finish the icon by applying a rich blue gradient of darker hue (R=66, G=135, B=155) on one side and lighter (R=87, G=241, B=255) on the other.

6. Shape a Mystical Sparkling Amethyst
Step 1
This time our gem will have a triangle shape. Draw it with the help of the Polygon Tool, setting the size to approximately 150 pixels and the Sides value to 3.
Step 2
Now we need to create another triangle, squash it slightly and rotate, placing it as shown on the screenshot below. Let one of its sides align with the right side of your gem's basic shape. Add the similar triangle for the left side and for the lower part of the basic shape.
Step 3
Fill each shape with different hue of lilac color, according to the following palette:


Step 4
To make our gem more dimensional, put a small triangle on the very top and fill it with linear gradient from a pale-lilac (R=232, G=181, B=255) to darker purple (R=172, G=77, B=219). Don't forget to add some tiny sparkles.
Step 5
Finish up by adding the icon base and filling it with linear gradient from reddish-orange (R=255, G=88, B=46) color in the bottom to bright yellow (R=255, G=233, B=87) on top.

Wow! Your Set of Shiny Flat Gem Icons Is Completed!
Congratulations, you have just finished creating the whole set of sparkling gem icons in a popular flat style! Hope you've enjoyed the process and found some useful tips and tricks in this tutorial.


.webp)

