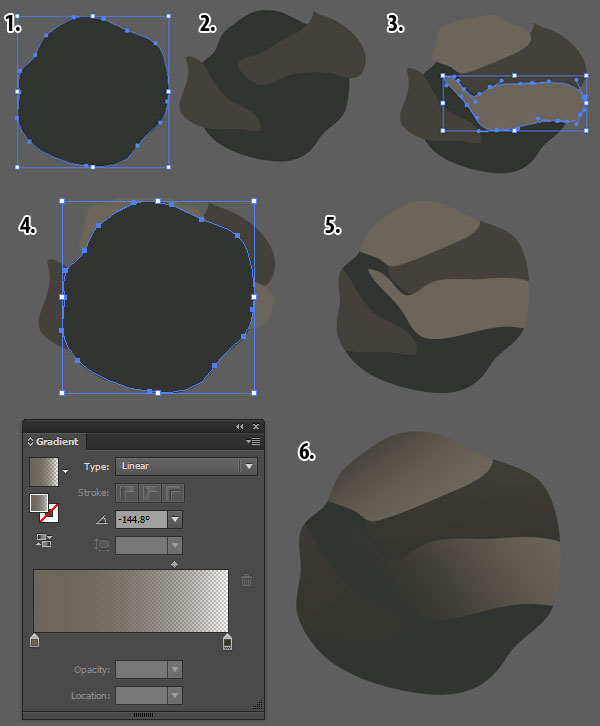
1. Create the Template
Step 1
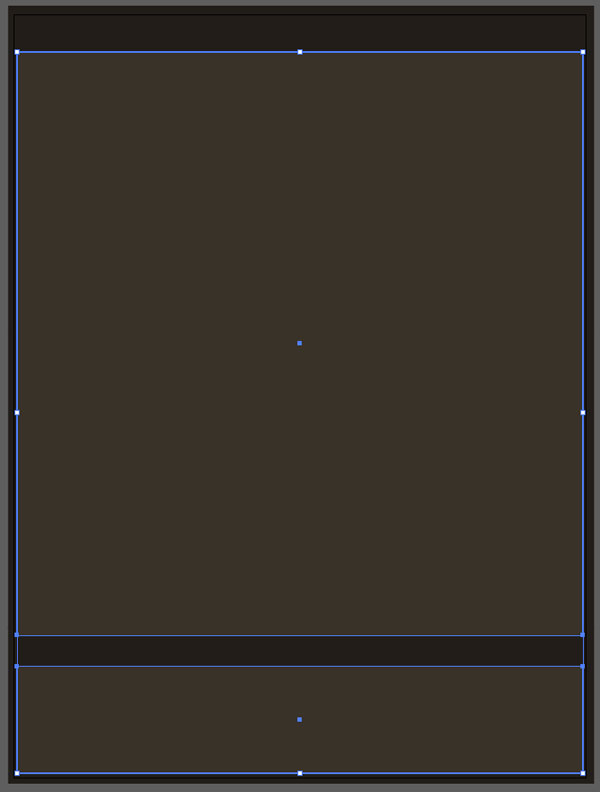
Let's start with a New Document approximately 4.75" x 6.8". With the Rectangle Tool (M), draw a large rectangle that's larger than the artboard and with the fill color set to a dark warm gray (R33 G29 B25).Draw two additional rectangles, one taking up most of the artboard, and a smaller, thinner one on the bottom (see below). The fill color will be changed to a gradient in Step 3.
Step 2
Use the Direct Selection Tool (A) to select the two smaller rectangles and pull their Live Corners inward in order to round both rectangles' corners to the same radius and at the same time.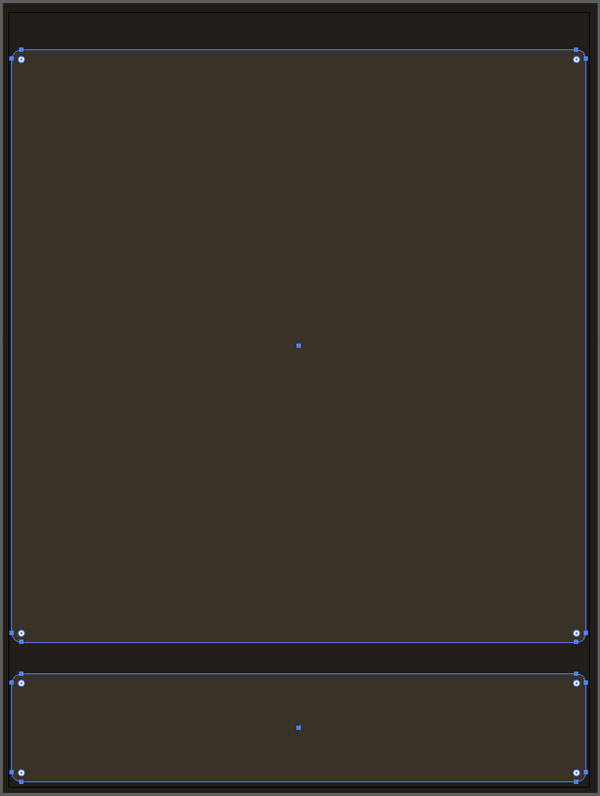
Step 3
Set both rounded rectangles as a Linear Gradient using the Gradient Tool (G). In the Gradient panel, use the following colors: warm gray (R57 G50 B40), light warm gray (R115 G104 B94), lighter warm gray (R184 G174 B159), light warm gray, and warm gray.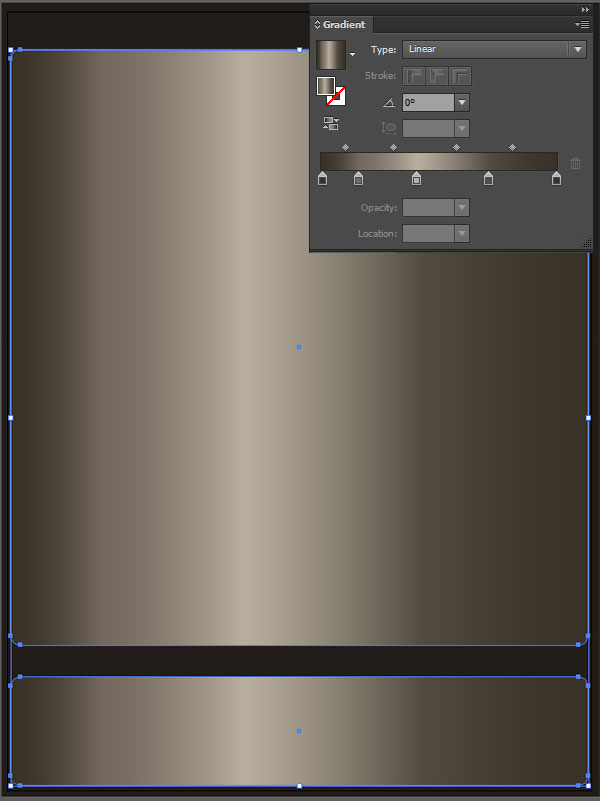
Step 4
Keep the rounded rectangles selected and go to Object > Path > Offset Path. for the Offset, enter -6px. Set the fill color of the new shape to the dark warm gray of Step 1.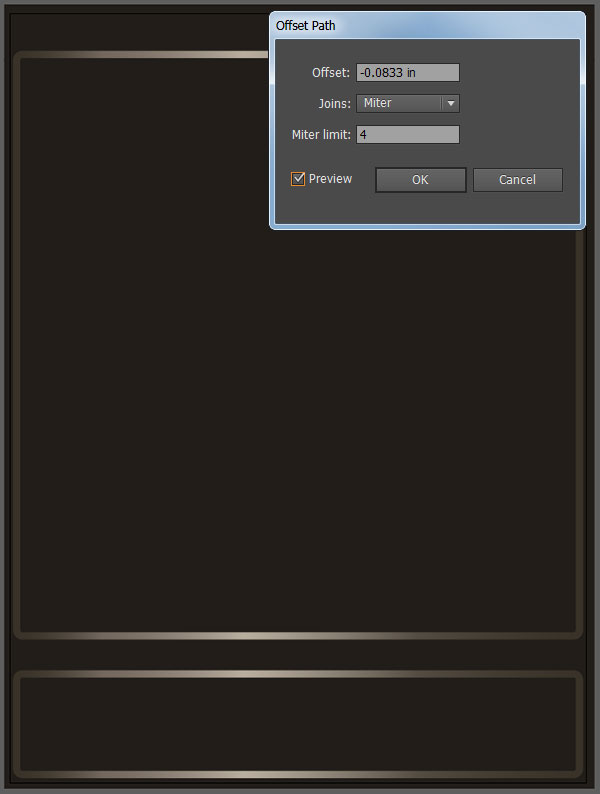
2. Create the Quilted Background
Step 1
Let's start by using the Rectangular Grid Tool (you'll find it under the Line Segment Tool (\) in the Toolbar). for Horizontal and Vertical Dividers, enter 8 into the Rectangular Grid Tool's Options. Drag the tool across the main rectangle of the game template (the offset shape made in Section 1, Step 4).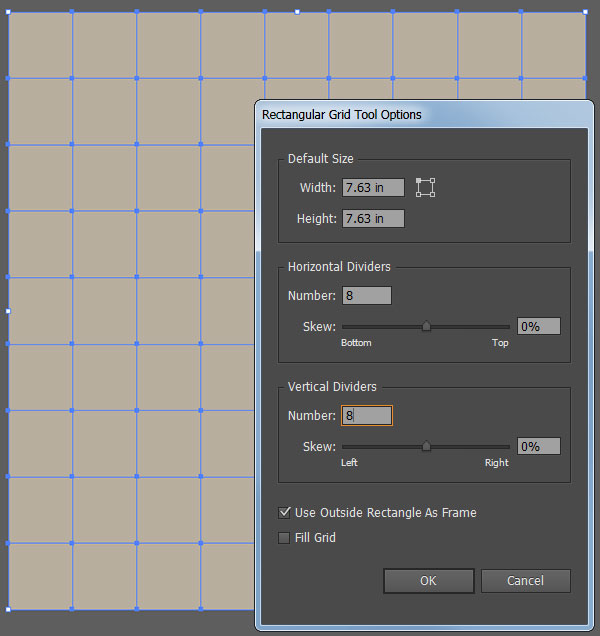
Step 2
Select the grid and set the fill color to a bright Linear Gradient in the Gradient panel. In this case, I chose hot pink (R238 G42 B123) to dark magenta (R164 G19 B86). Set the gradient's angle to 45°. You can choose whatever color scheme you find most appealing.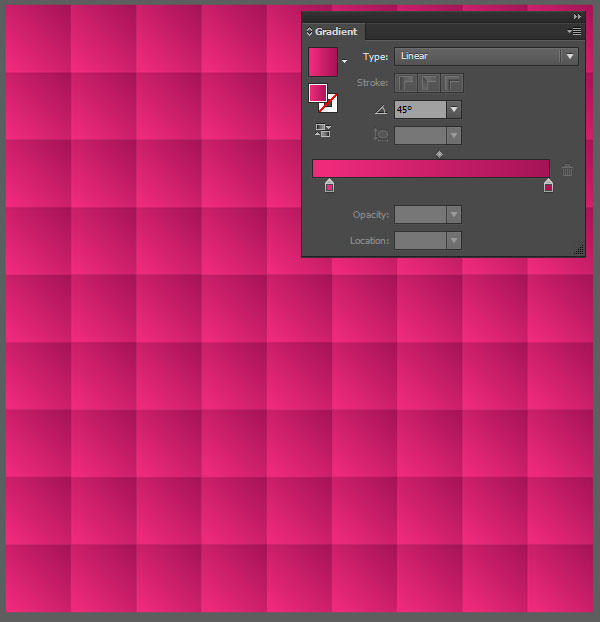
Step 3
Copy (Control-C) and Paste (Control-V) the grid and Rotate it 45°. Do this three times and move each group so they're edges slightly overlap (see the first image below). Group (Control-G) together your set of four grids and place it over the game template. Select the Offset rounded rectangle (see below), copy, paste, and Align it to its original.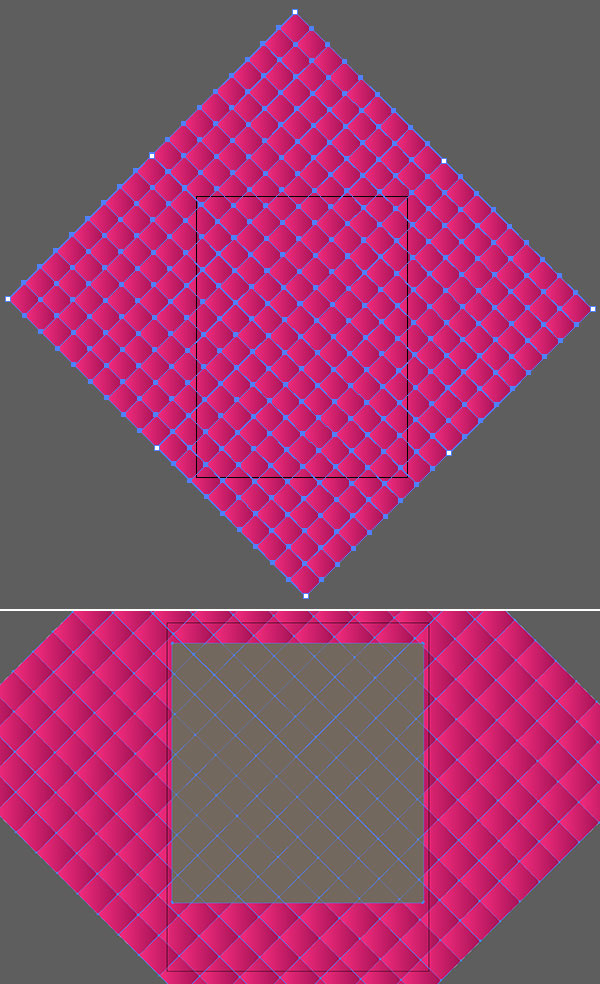
Step 4
Select the newly copied rectangle and the grid group (with the rectangle on top) and Make a Clipping Mask (Control-7). Copy and Paste the inner rectangle again and set the fill color to null and the stroke to black and 1pt weight. Create outlines for the other rectangles in the same manner. Add a layer of dashed lines by copying and pasting the Clipping Mask group and setting the fill color (of the grid group within) to yellow, 1pt stroked lines with a 4pt Dash and 4pt Gap (or whatever you feel works best) in the Stroke panel. Reduce the dashed line group's Opacity to 30% in the Transparency panel.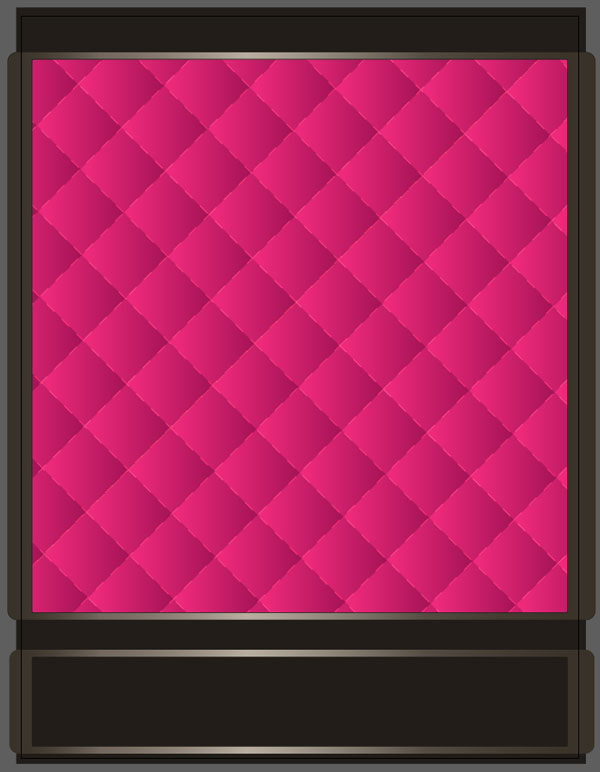
3. Create the Time Bar and Buttons
Step 1
Draw a thin rectangle between the two created in Section 1, Step 2 and apply the same gradient from Section 1, Step 3. Pull the Live Corners inward to round it out. Offset the rounded rectangle by -4px. Select both shapes and hit Minus Front in the Pathfinder panel. Copy and paste this new shape and set the fill color to null and the stroke to black with a 1pt weight.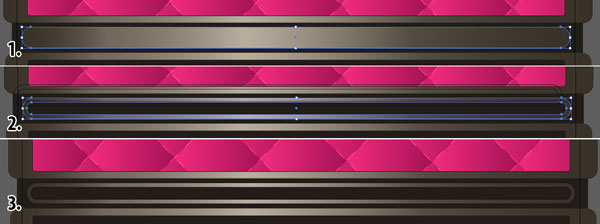
Step 2
Draw a short rounded rectangle within the little frame created in the previous step. Set the fill color to a Linear Gradient going from dark warm gray to something bright that contrasts well with your quilted background color. In this case I chose turquoise (R8 G255 B249).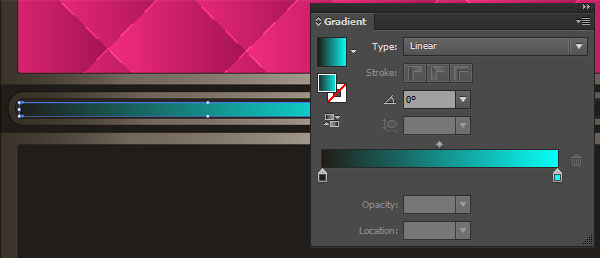
Step 3
Draw two rounded rectangles (either with the Rounded Rectangle Tool or manipulating the Live Corners of a Rectangle) on either side of the bottom rectangular frame. Apply the same gradient used previously (Section 1, Step 3).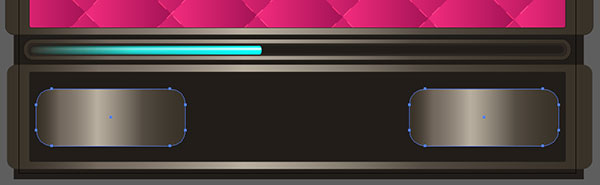
Step 4
Once again, Offset the path by -4px. Set the fill color of the inner shape to dark warm gray.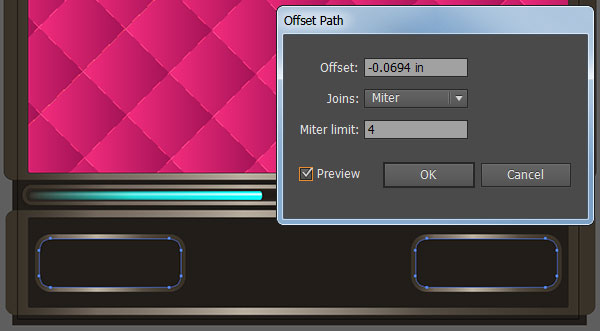
Step 5
Select both of the inner shapes made in the previous step and apply both instances of Drop Shadows by going to Effect > Stylize > Drop Shadow as seen below. The first Drop Shadow should be dark warm gray, set to Multiply, Opacity at 75%, X Offset to 0in, Y Offset to -0.03in, and Blur set to 0. The second Drop Shadow should be lighter warm gray, set to Screen, Opacity at 75%, X Offset at 0in, Y Offset at 0.03in, and Blur set to 0.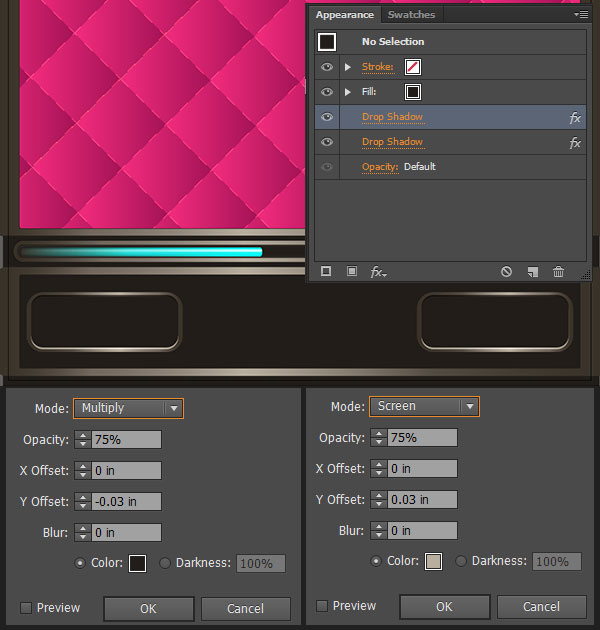
Step 6
To complete the buttons I've used Leckerli One with the fill color set to R221 G213 B202. When satisfied with the placement of my text, "Moves 15", on the first button, I Expanded the text in Object > Expand, Copied and Pasted the text and set the fill and stroke color to black and the stroke weight to 2pts in the Stroke panel. Align the copied text behind the original word. This gives it a clean outline that keeps the text readable. Repeat on the other buttons.Finally, copy and paste each button's inner shape and set the fill gradient to R184 G174 B159 at 0%, 100%, and 0% opacity (three instances of the color) in the Gradient panel. Place these shapes beneath the text and reduce the Opacity of the shape to 40% and the Blend Mode to Screen in the Transparency panel. Keep your Layers panel organized by Grouping your buttons and their components together.

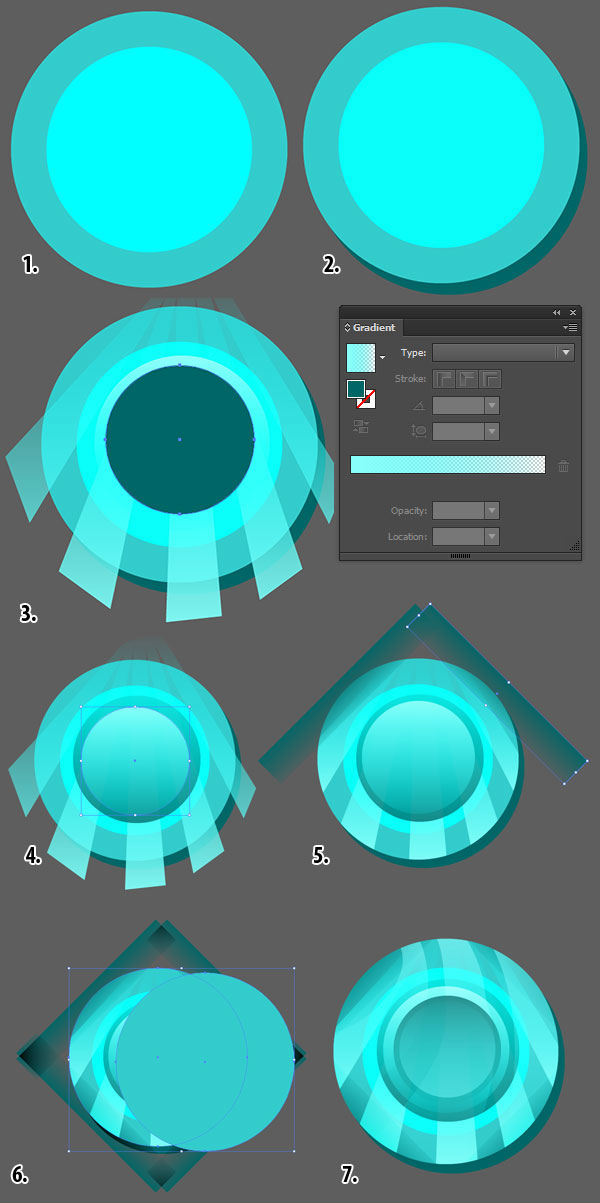
4. Create a Quick Wood-like Texture
Step 1
Copy and paste the background rectangle from the button bar in Section 3 and apply a Linear Gradient going from R107 G89 B80 to R57 G50 B40 at a -90° angle. Use the Pencil Tool (N) with a brown a few shades darker than the one used in the gradient to doodle some squiggly lines around the rectangle.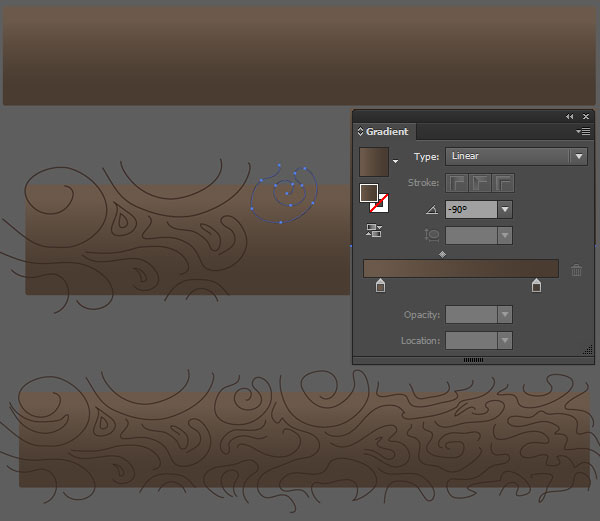
Step 2
Group together the squiggles and set them to Screen at 54% Opacity in the Transparency panel. Copy and paste the group and set these squiggles to Multiply. Place the lighter group behind the darker one down and to the right and Group both groups and the rectangle together.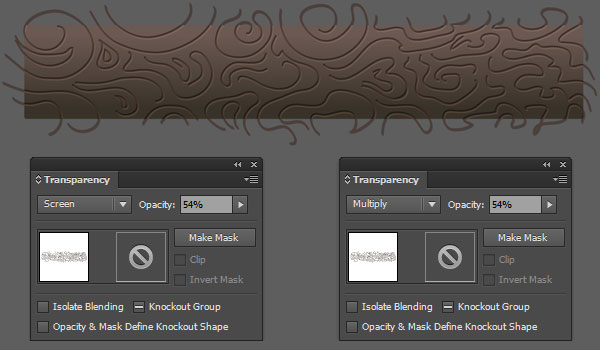
Step 3
Copy and paste the gradient rectangle over top the wood texture group. Make a Clipping Mask (Control-7) and place it beneath the buttons in the template design.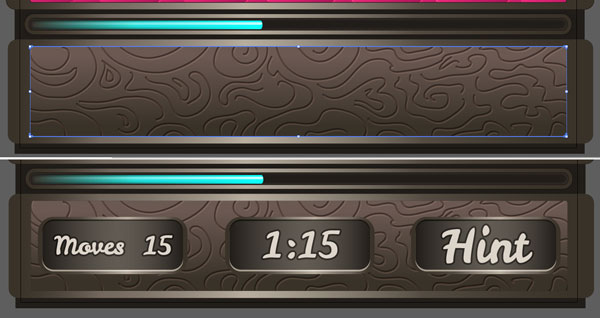
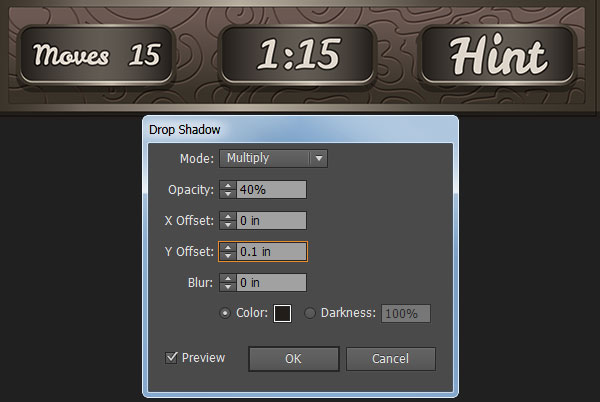
Step 4
Select the button group and apply a Drop Shadow as follows:- Mode: Multiply
- Opacity: 40%
- X Offset: 0in
- Y Offset: 0.1in
- Blur: 0in
Step 5
Copy and paste the wood texture from the button bar to the top of the template. The artboard will crop out the undesirable portions of the group so masking isn't necessary in this step.
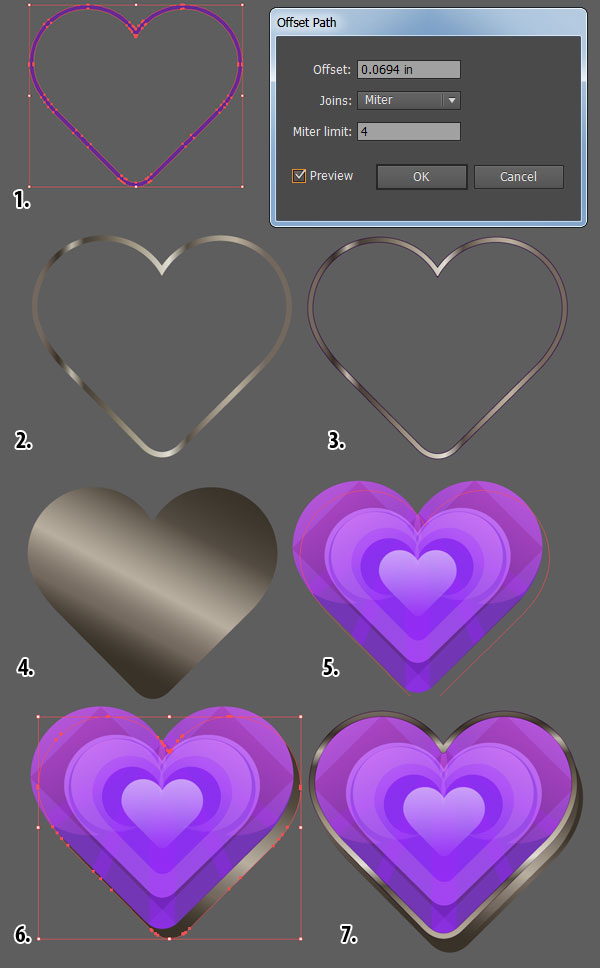
5. Draw the Purple Heart Charm
Step 1
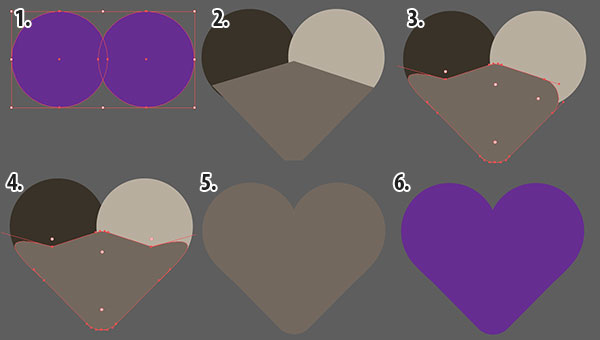
In order to draw a simple rounded heart, use the Ellipse Tool (L) to draw two circles overlapping slightly.With the Pen Tool (P), draw a five sided shape to create the rest of the heart. Pull the Live Corners inward to round out the bottom edge and manipulate the handles of the side anchor points with the Direct Selection Tool in order to bring the sides up to the circles for a smooth heart shape.
Zoom in when manipulating anchor points so you can easily see the edges of your shapes. Unite all three shapes in the Pathfinder panel. Set the fill color to a bright purple (or a bright color of your choosing).
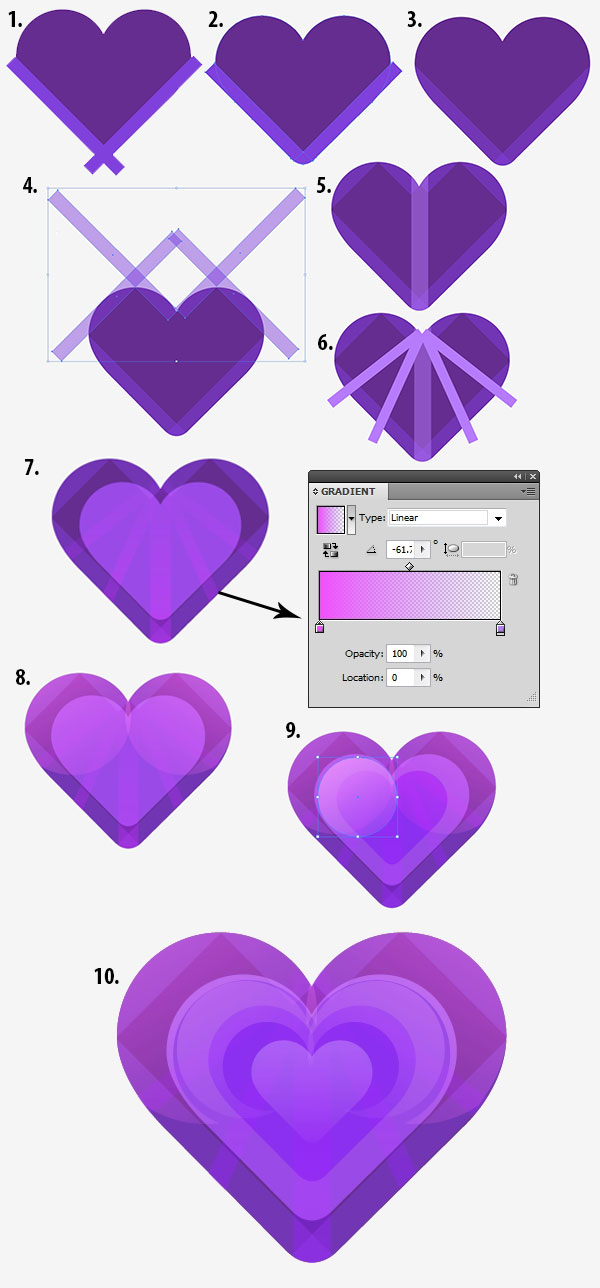
Step 2
Rendering a faceted piece of jewelry is all about layering shapes and playing with the opacity and blend mode of those shapes. The colors I used may differ from those you use if your heart's base color is different. The steps I took with the purple heart are as follows:- Draw two long rectangles on either side of the bottom edge of the heart.
- I used the Shape Builder Tool (Shift-M) to delete non-intersecting components of those rectangles. I did this by selecting all three shapes and, with the Shape Builder Tool, selecting the parts of the rectangles that did not overlap the heart. I then deselected and deleted these components.
- Reduce the Opacity of the stripes to 50%, or so, in the Transparency panel.
- Draw four crossing rectangles on the tops of the heart's curves. You can delete this with the Shape Builder Tool or wait until the end of this section and Mask the heart.
- Draw a rectangle going down the center of the heart.
- Create four thin rectangles, each Rotated outward on the sides of the heart. Unite all five of these rectangles in the Pathfinder panel.
- Copy and paste the base heart and Scale it down. Change the fill color to light purple and Reduce its Opacity to 40%. Set the stripes beneath it to a Linear Gradient fill going from bright fuscia at 100% Opacity to light purple at 0% Opacity. In the Transparency panel, I set the stripes' Blend Mode to Overlay.
- Draw two circles on the round halves of the heart with the fill color set at light purple and its Opacity Reduced to 40% and its Blend Mode set to Color Dodge.
- Paste another scaled down heart, this one with the fill color set to purple and the Opacity reduced to 40% or less. Draw two small circles on the middle-sized heart in the charm.
- Finally, I added another small heart in the center. The entire design is a matter of building up circles, rectangles, and hearts in various shapes of purple and with various levels of opacity.
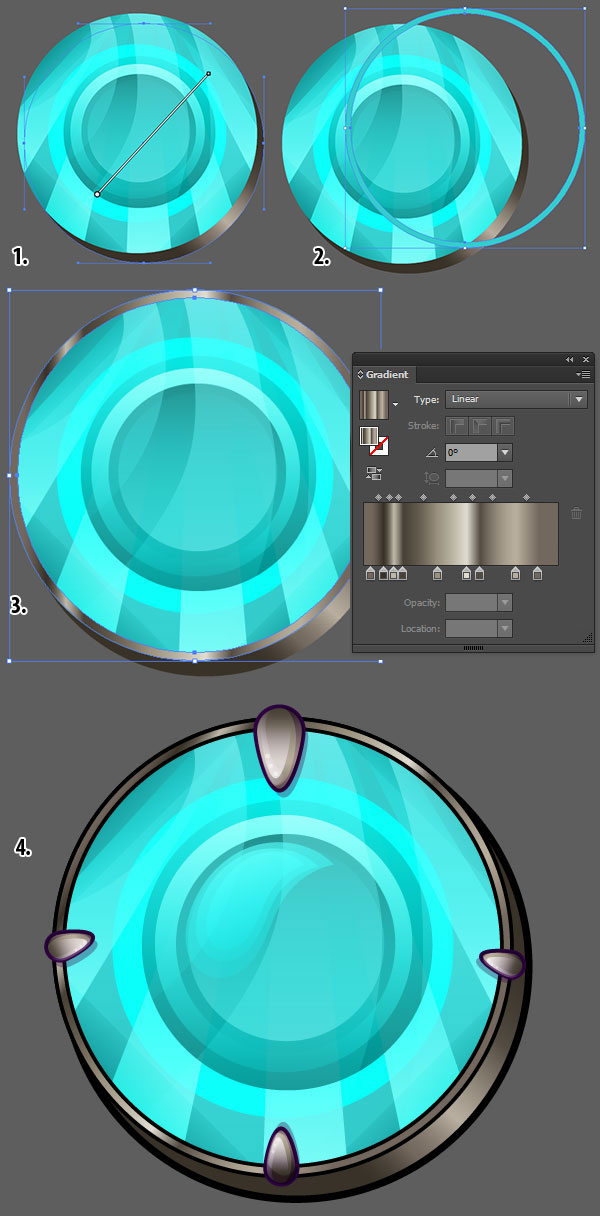
Step 3
Let's create a frame for the heart. In case you haven't already, Group together everything created in the previous step. Begin this step by copying and pasting the base heart and continuing on with the following:- Offset the heart by 6px. Select both shapes Intersect in the Pathfinder panel.
- Set the frame shape to a Linear Gradient that's a variation on the one from Section 1, Step 3. In this case, I added a couple instances of lighter and darker grays so it's a shinier metal.
- Copy and paste the frame, setting the fill color to null and the stroke color to dark purple (or black) at 0.5pt weight.
- Paste the base heart again and set the Linear Gradient to the same one from Section 1, Step 3 at a 45° angle.
- Place it off center from the faceted heart.
- Place it behind the heart in the Layers panel.
- Align the frame shapes on top of the faceted heart.
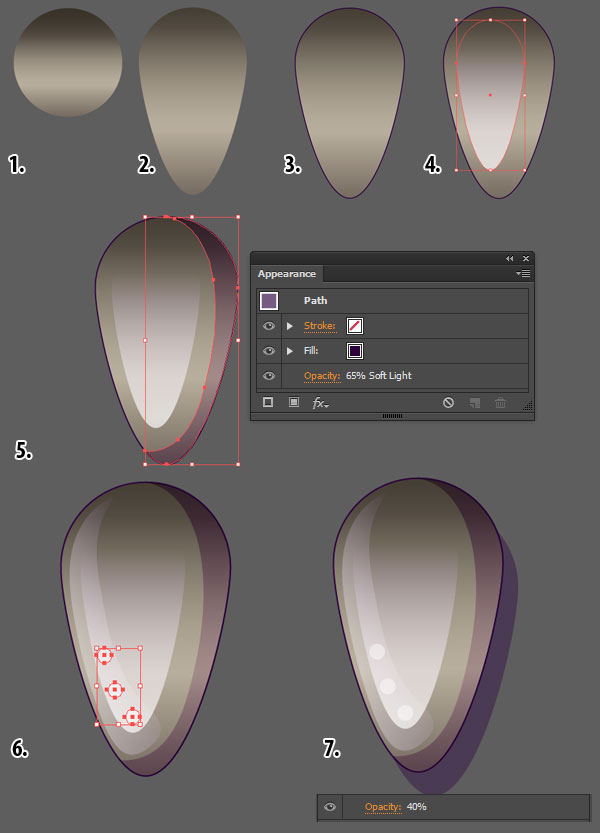
Step 4
For the claw shapes on the heart charm I created the teardrop object seen below:- Draw a circle and fill it with the same Linear Gradient used throughout this tutorial for metallic objects (Section 1, Step 3).
- Use the Direct Selection Tool to pull the lower anchor point downward, creating the teardrop shape.
- Copy and paste the teardrop and set the fill color to null and the stroke (at 0.75pt weight) to dark purple (or black).
- Paste the teardrop again and set the fill to a Linear Gradient going from white at 100% Opacity to white at 0% Opacity. Concentrate the opaque white at the bottom of the shape. Scale it down to 60% and place in the center of the metallic teardrop.
- Use the Pen Tool to draw a shadow shape curving around the right edge of the teardrop. Either create a Clipping Mask or use the Shape Builder Tool to delete any non-overlapping portions of the shadow shape from the main teardrop. Set the shape's opacity to 65% and the Blend Mode to Soft Light in the Transparency panel (or Appearance panel as seen below).
- Use the Ellipse Tool to draw three small circles, in white, on the bottom of the teardrop. Draw a transparent white highlight shape for the left side of the teardrop.
- Finally, paste the main teardrop shape again and set the fill color to dark purple and the Opacity to 40%. Place this shadow shape below the teardrop and slightly to the right and downward. Group all of this together.
Step 5
The heart has some additional jewels on it. A few of them are just gray circles, meant to be metallic. Six of them, however, are flat-backed crystals with an Aurora Borealis (AB) finish to them. In order to make a crystal object like these I did the following:- Draw a circle with the Ellipse Tool. The color does not matter at this time.
- Copy and paste the circle and Align to the center of the first. Select the second circle and apply a Zig Zag effect (Effect > Distort & Transform > Zig Zag) with the following attributes: Size is 0.56in, Absolute selected, 7 Ridges, and Points are marked as Corner.
- Expand the Zig Zagged circle under Object.
- Select both shapes and hit Divide in the Pathfinder panel. Ungroup the divided shape and select the components of the Zig Zagged circle.
- Delete the shapes outside of the circle.
- Go ahead and delete the darker shapes inside of the circle (see below), as they are unnecessary.

Step 6
Select half of the circle's sections and apply a Linear Gradient going from a cool gray to white. With the Gradient Tool, concentrate the white towards the center for each shape. For the rest of the sections you'll want each to have a linear gradient whose colors blend into each other. Each section will carry two colors. For instance: light blur to medium blue with the next section being medium blue to violet, and the next section violet to bright purple. The aim is to create a spectrum. How many colors and their exact hues and shades depend on the color scheme of your mobile game design.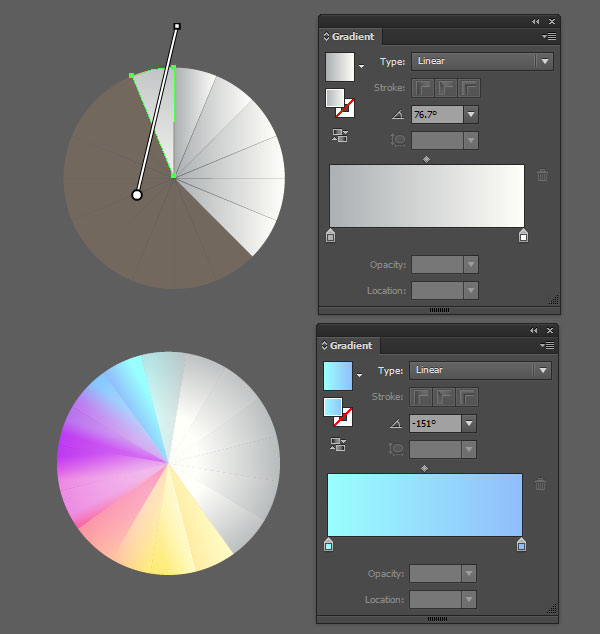
Step 7
Group together the divided sections. Copy and paste them. Draw a smaller circle in the center of the copied group and set the fill color to null and the stroke to 1pt weight black with Soft Light as the Blend Mode. Group these together and Align them to the center of the gradient-filled circle.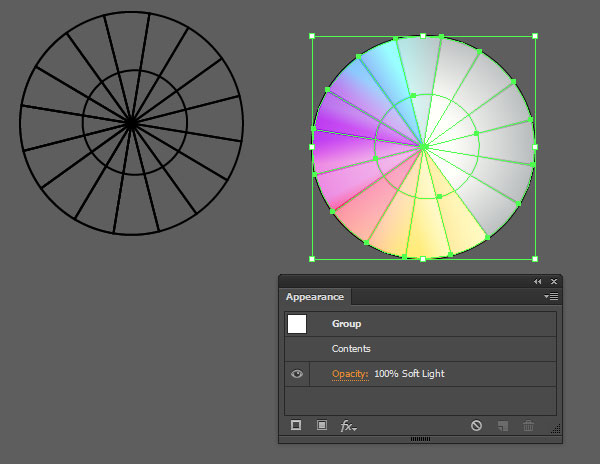
Step 7
Draw a larger circle and apply the same metallic gradient from Section 5, Step 3. Copy and paste the circle and set the fill and stroke to black with 2pt weight. Place both of these behind the colorful circles. Draw a small white circle and Align everything from this section to the center of the crystal object. Group all of this together. You can use these as gems in the game design.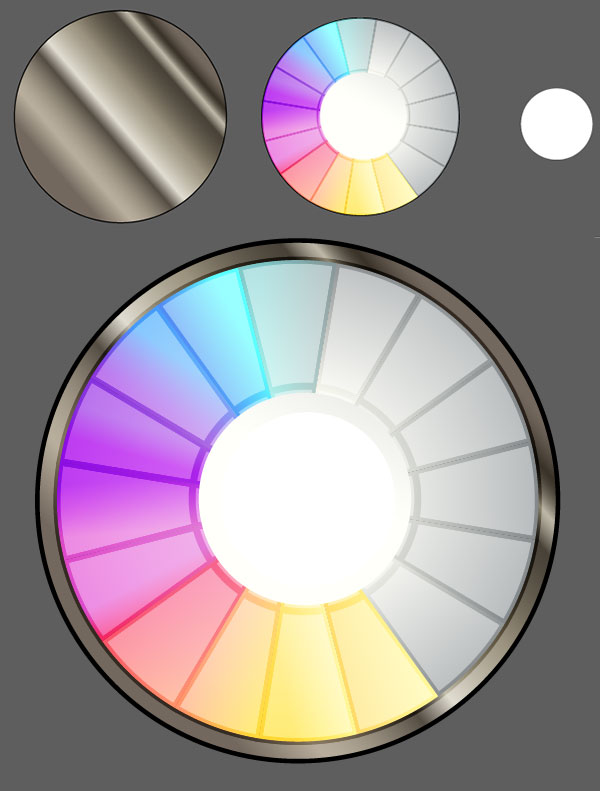
Step 8
Copy and Paste several of the AB crystals around the heart. Add additional metallic shapes. Group everything together. Create a dark outline for the charm by Selecting the purple heart base, the metallic heart, and each teardrop base, copying, pasting, and Grouping them together. Set the stroke color to black and the weight to 1-2pts. Align this group behind the rest of the charm. Group everything together and scale down, for the game UI.
6. Additional Gems and Charms
Step 1
The next charm design I drew was circular in nature and similar to the design of the heart. The color scheme is turquoise, but yours can be whatever color works best with your design's colors.- Draw two circles with the Ellipse Tool and Align to their centers. The smaller circle should be a lighter color than the larger.
- Copy and paste the larger and choose a darker shade of the hue you've chosen for the gem. Place it behind the first two circles and move it down and to the right.
- Draw five radiating striped shapes with the Pen Tool and apply a gradient going from a light color (in this case light blue) at 100% Opacity to the same color at 0% Opacity. Draw another circle, smaller than the others and the same color as the shadow circle from #2.
- Draw a fifth circle with the same gradient you used for the stripes, in the center of the other circles.
- Using the Rectangle Tool, draw four long, thin rectangles the create a diamond, overlapping the edges of the circles. Set the fill gradient to a dark shade of the hue you're using (in this case, turquoise) going from 100% Opacity to 0% Opacity with the transparent color near the center. Set the Blend Mode to Color Burn on each rectangle.
- Continue adding layers of circles, stripes, and other shapes. Group together this charm's components (except for the shadow shape from #2).
- Copy and paste the base circle and create a Clipping Mask. Group everything together.
Step 2
If you fancy making your gem into a charm like the purple heart, follow similar steps below:- Change the fill color on the dark turquoise circle to the metallic gradient from Section 1, Step 3.
- Copy and paste the base circle and Offset it by 4px.
- Apply the metallic gradient from Section 5, Step 3 (which is just more instances of grays in the Gradient panel).
- Copy and Paste the teardrops from Section 5, Step 4 around the circle and Outline the design with the same process from Section 5, Step 8.
Step 3
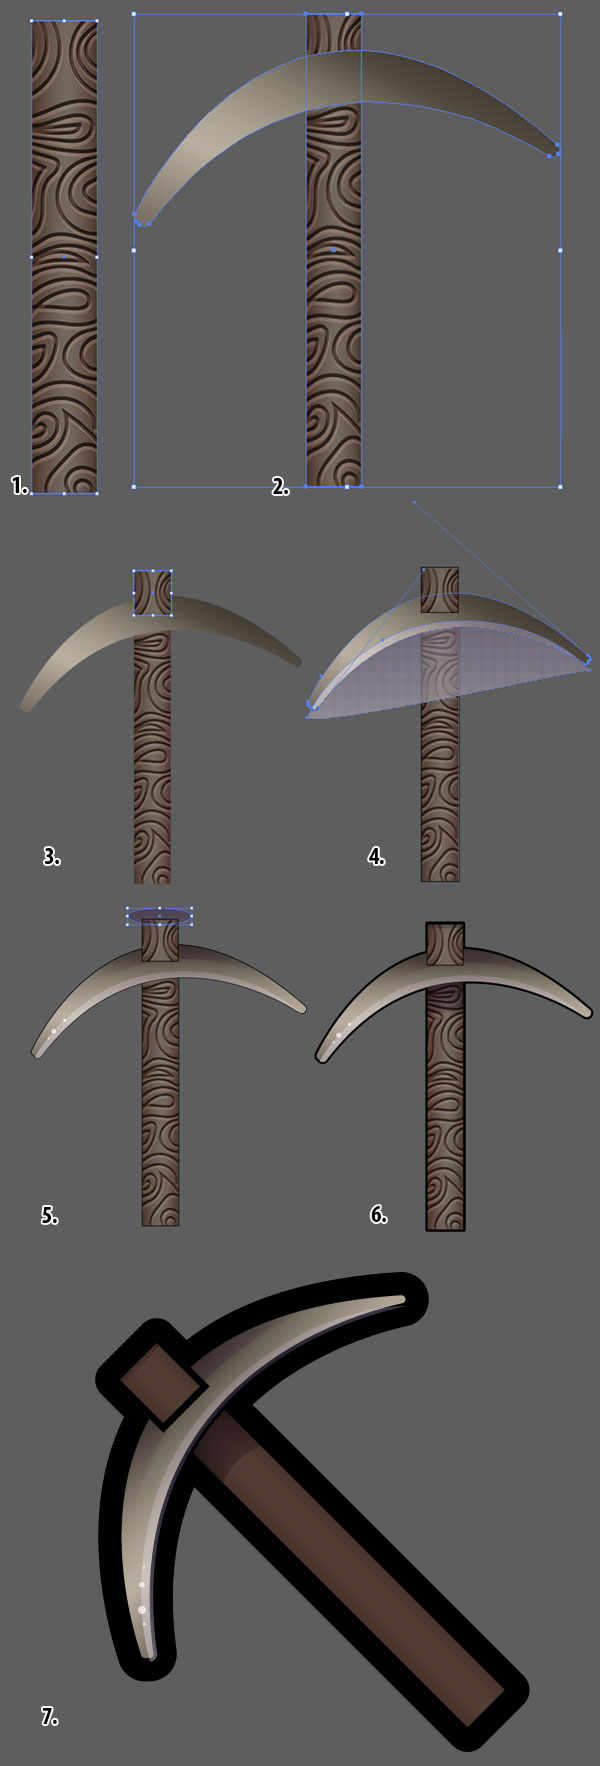
For the little pickaxes on the top of the design I did the following:- Draw a narrow rectangle and repeat the wood-like texture from Section 4, Steps 1-3.
- With the Pen Tool, draw a rounded crescent shape (you can manipulate Live Corners to get rounded edges) and apply a simple metallic gradient of grays.
- Copy and paste the wood texture and Make a Clipping Mask for the top, small rectangle.
- Much like the process from Section 5 where we used the Shape Builder Tool to delete objects from each other, you'll have to do that twice for the shadow and highlight shapes on the pickaxe.
- Draw a small circle with a shadow gradient (this one goes from dark purple at 100%- 0% Opacity) at the top of the axe's wooden handle. Place this shape beneath the Clipping Mask of #3.
- Draw additional shadow shapes and place them in their respective shape's Clipping Mask. Create outlines by copying and pasting the base of the wooden handle and the base of the axe's head, placing it behind the design and applying a stroke weight of 1pt.
- If you scale it down to fit the game design, you'll lose the wood texture detail. To combat this, make sure you Expanded the doodled stroked lines from #1. I like the simple ax, and left this version in my design.
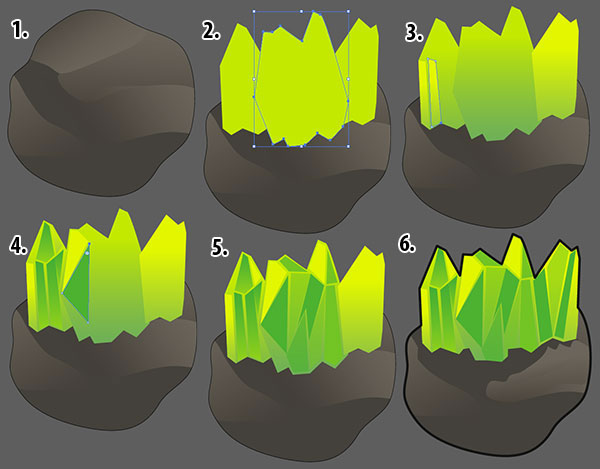
Step 4
The next gem design involves crystal formations poking out of rocks. My rock drawing process is as follows:- Use the Pencil Tool (with Fidelity set to Accurate) to draw a lumpy circle.
- Draw gray shapes that follow the contour of the rock and define the planes of the rock.
- Continue the previous step with a lighter color and Group these shapes together.
- Copy and paste the base rock form and Align it to the center of the initial lumpy circle.
- Select the group and the new lumpy circle shape and Make a Clipping Mask.
- Set the shapes created in #2-3 and apply linear gradients to each that go from gray at 100% Opacity to dark gray at 0% Opacity.
Step 5
This step looks long, but I just wanted to break down the steps to illustrate the rather simple process.- Use the Pen Tool to draw crystal-like shapes popping out of the rock.
- I like the look of three or more shapes, each at different heights and angles.
- Set each of the fill colors to something bright. In this case I chose purple again. The Linear Gradient goes from bright purple to dark purple. Vary the each gradient's angle so the shapes don't blend into each other.
- With the Pen Tool, draw shapes on top of the crystals that define its planes (see below).
- Continue doing so for each crystal shape.
- Set some of the shapes added in #4-5 as different Blend Modes: Screen, Color Burn, and Color Dodge.
- Draw outlines for the rock and the crystals.
- With the Pencil Tool, draw lines that show the rock cracking. Group everything together.

Step 6
The green crystal formation is pretty much the same process as the purple one.- Change the colors on the rock to lighter grays.
- Draw new crystals for this one. I decided to have larger pieces with more peaks and valleys.
- Apply gradients to the main crystals again and start drawing shapes to define each crystal's planes.
- Switch it up between adding flat filled color and gradient shapes.
- Once again feel free to play with the Blend Mode on these shapes.
- Finally, Group everything together and make sure it has a thick outline and lines indicating cracks.
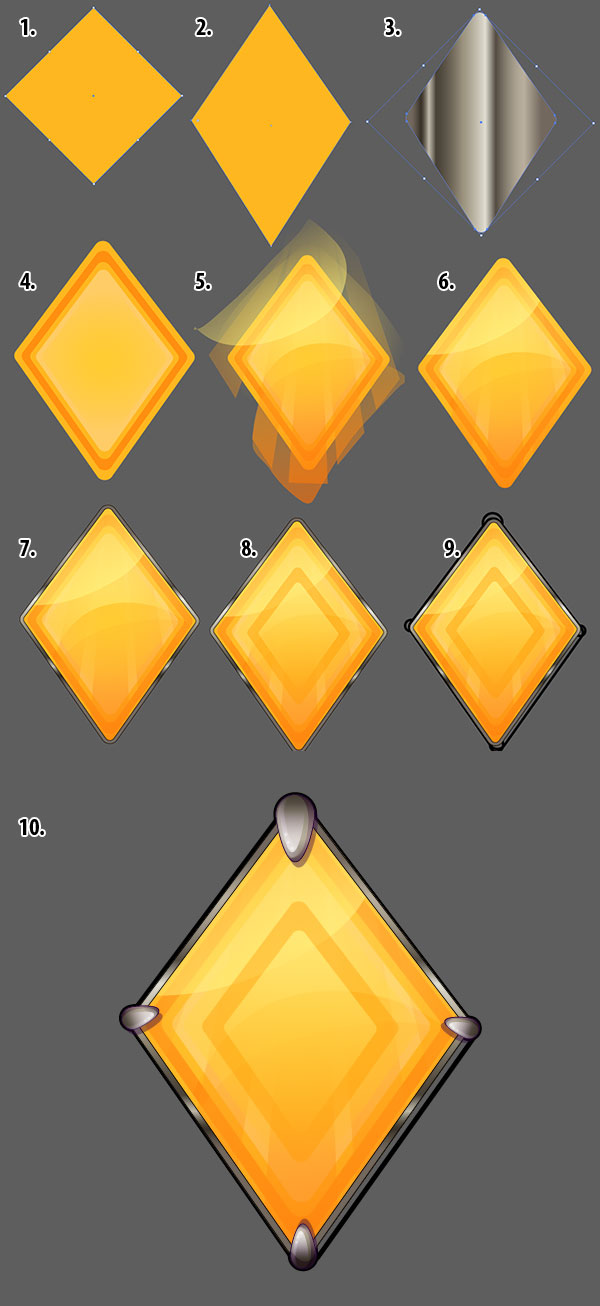
Step 7
I decided my next gem charm should be a diamond shape. Since I haven't used orange yet, I figured it'd be a good contrast to the other colors.- Use the Rectangle Tool to draw a square. Rotate it so it's resting on a point.
- Use the Selection Tool (V) to squish the square inward and upward into a diamond shape.
- Pull the Live Corners inward to round the corners. Copy and paste the diamond and apply the metallic gradient used in the other charm designs in previous sections. We'll be offsetting this shape by 4px again to create a frame. Hide this in the Layers panel for now.
- Layer different sizes of the rounded diamond on top of each other. Change the colors to different hues of orange and yellow-orange (similar to the heart and circle gems designs). Group these together.
- Draw various gradient shapes and transparent shapes with the Pen Tool or Pencil Tool to create stripes, shiny highlights and shadows in the gem design.
- Make a Clipping Mask.
- Unhide the metallic frame. Add outlines to the frame.
- Paste additional diamonds in the center of the design. Apply a Radial Gradient going from light orange at 100%-0% Opacity to the center diamond.
- Create a thick outline for the charm design and don't forget the teardrop claws used on the corners.
- This is the final orange diamond charm design.
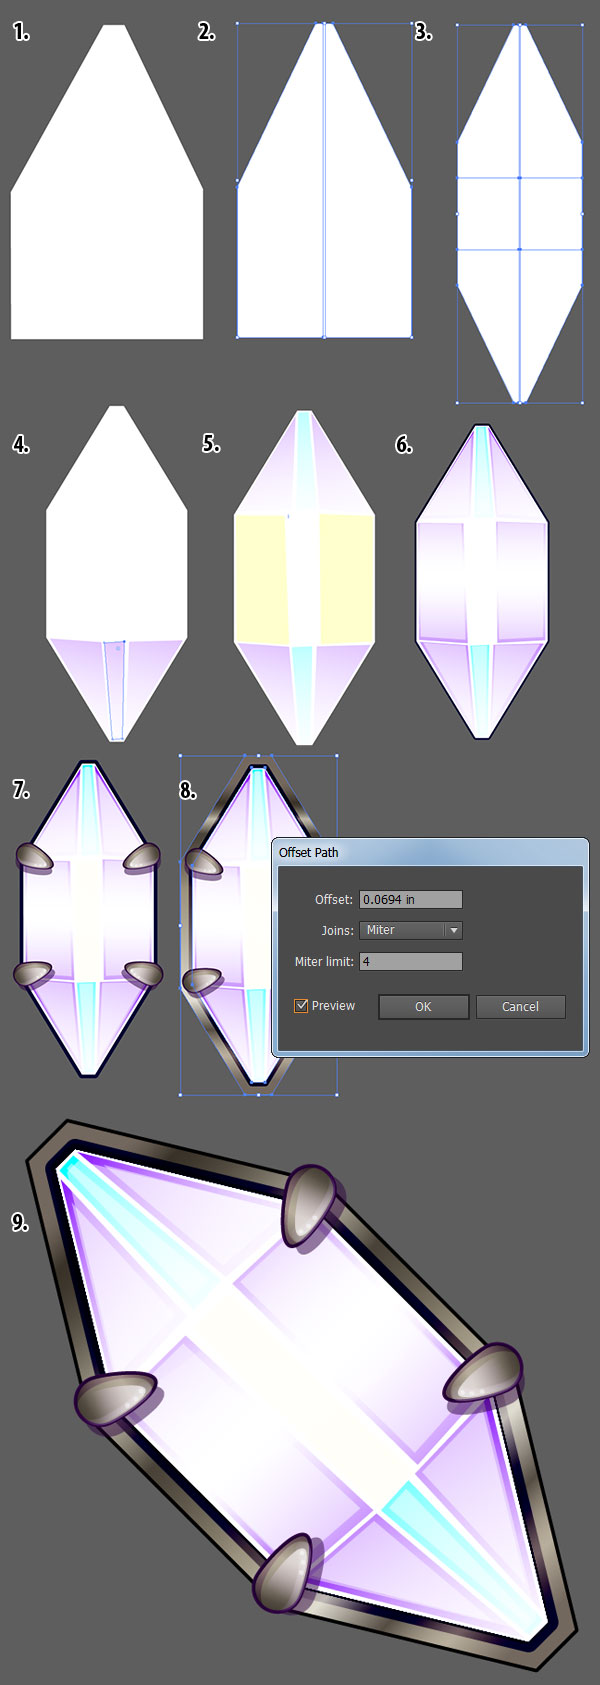
Step 8
The final design is a white crystal charm. My process for this design was as follows:- Using the Pen Tool I drew a six-sided shape that would serve as the top half of the crystal.
- I bisected the shape with a rectangle and hit Minus Front in Pathfinder. this gave my 1/4 of the design. Copy and paste that quarter and Reflect it over a Vertical Axis.
- Copy and paste the newly created top half and Reflect it over a Horizontal Axis. Unite all four shapes in Pathfinder.
- With the Pen Tool I drew shapes on the crystal that helped define its facets. There's nine shapes in total.
- I wasn't sure about the colors initially. I think, when creating white crystals and gems, its best to stick to pastels unless you're going for an AB finish like the one from Section 5.
- The colors chosen are Linear Gradients going from light purple to white and light blue to white.
- Group the design together and copy and paste the crystal. Set the fill color to null, the stroke to black and 1pt weight, and the Blending Mode to Overlay. Paste four metallic teardrops from Section 5 on four corners of the crystal.
- Copy and paste the base crystal shape and place it behind the crystal group. Offset it by 4px and apply the metallic gradient used throughout this tutorial.
- Don't forget a final outline on the crystal before Grouping it all together.
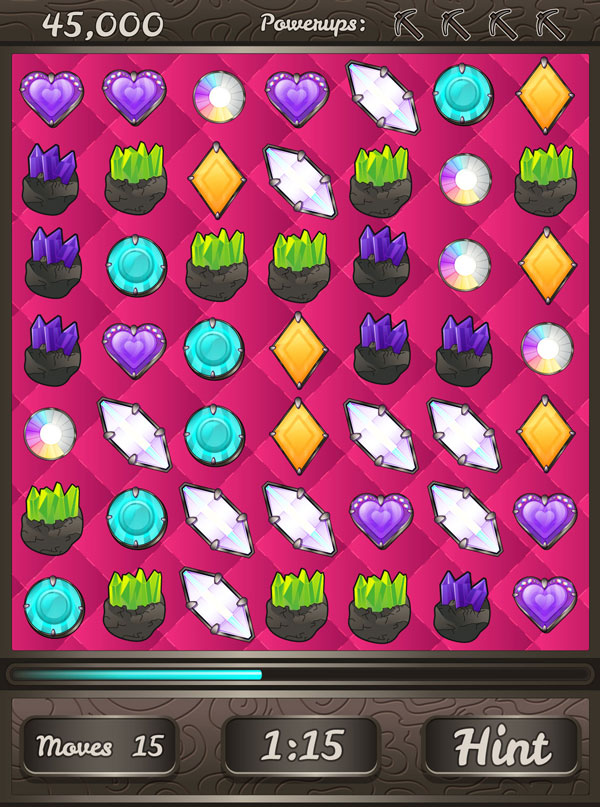
Let's Put it all Together!
Place your gems and charms around the game board. Make sure to Group them together when you're satisfied (using the Rectangular Grid Tool helps in their placement). for final touches, add a score at the top and line up the little axes as "powerups". Push your design further by creating special, sparkling gems or additional game screens with various level backgrounds and template frames.


.webp)

