An Introduction to Henna
Henna, for those who are not familiar with it, is a natural plant-based dye, mostly used to dye hair, skin, and natural fabrics. Commonly used in the hot regions of the world, like the Middle East, Africa and Southern Asia, this dye was also a mode of cooling the body, as well as a way to decorate the hands and feet with non-permanent body art.This naturally light brown to dark chocolate or reddish-brown dye color is often used in weddings, holiday and love celebrations. Over the years, however, it has gained appreciation in other countries as a beautiful art form to be applied for fun and not necessarily for any occasion. Henna art tattoos are a very safe and an absolute fun way of designing painless body art without the commitment!
Henna art designs are generally made up of intricate floral patterns, combined with leaves, birds, paisley patterns along with and not limited to basic shapes like circles, triangles, tear drops, fine lines and dots.
In part of this tutorial, we will learn to create freehand brush strokes, to create a henna art inspired poster. We will learn to trace the artwork by introducing the new tools and enhancements in Adobe Illustrator CC, like the new Pencil Tool, Live Corner Widgets, as well as integrating in the more traditional tools to create a natural hand-drawn effect, to the poster.

1. Sketch and File Setup
Step 1
To start with our poster, we need to sketch out a design.Take an A4 paper, and run a line through the center to divide the art space. We just need to sketch on half of the paper, because we will mirror the final image to fit the poster layout.
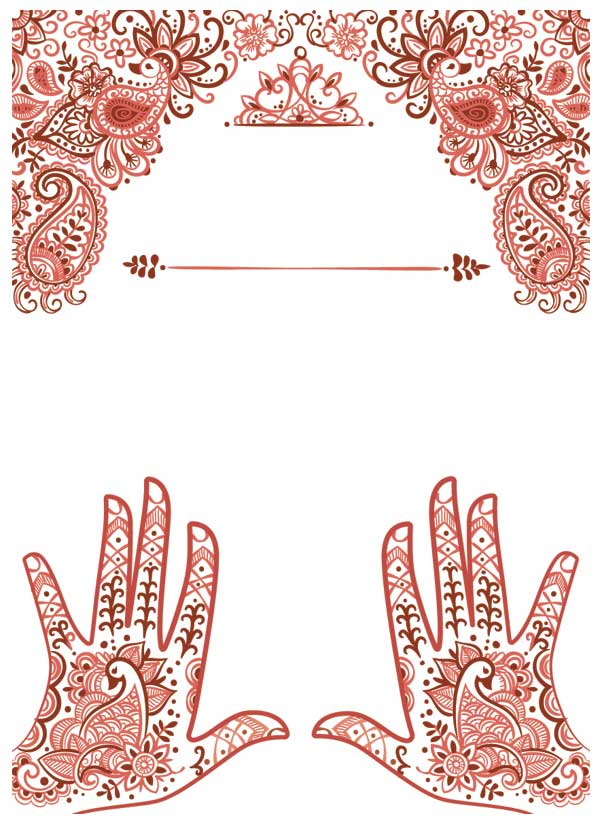
We will be sketching the upper half of the header area and on the lower half, I have decided to trace my left hand to represent henna hand art. The wonderful thing about Henna art is you don’t need to be a skilled artist, to come up with a beautiful design!
The key is to start with one main element, as I did with the peacocks in my sketch, and work your way around that element to fill in the desired area. A rule of thumb about Henna is repetition and lacy intricate design, so when sketching your piece, make sure you keep it delicate with paisleys, fine lines, and flowing patterns. In addition, you could add the more basic elements like circles, swirls, dots, and tear drops.
Once you are done, scan, save and move onto Illustrator CC.

Step 2
Open Illustrator CC (17.1) version, and create a new file File > New (Command-N).Fill in the Name, as “Henna_Art_Poster”. Select, Print, Size to be A3, for poster fitting size, and OK. Place in your sketch, with the new Place shortcut (Command-Shift-P), scale and position it on your artboard properly.
In the Layers panel, name the primary layer “Sketch”. Click the submenu of the Layers panel, and select Options for Sketch and check the Dim Images to: 50%, and OK. Then Create New Layer, on top of the Sketch layer, and name it “Henna Art”.
Now that our file is imported, save: File > Save (Command-S).

2. Tool Set Up
Step 1
Before we start tracing the sketch, we need to create a couple of freehand style art brushes. To do so, we need to learn a bit about the Pencil Tool (N) to create those art brushes. Illustrator’s Pencil Tool (N), is ideal for sketching out freeform designs, and gives that great hand-drawn effect to shapes and paths; a useful alternative to using the Pen Tool (P). The Pencil Tool (N), allows you to draw straight lines, smooth and fine detailed lines, reshapes lines, and also auto-close paths! If you didn’t use it much before, you will love the Pencil Tool right now!Let’s Test it.
- a. Select the Pencil Tool (N), and try to draw a
free hand line. The tool will be presented with an asterix (*) next to it.
- b. To draw a straight-line:
Option invokes a straight line, presented by the pencil icon with a
dash (__). Now if you Option-Shift key, it will
constraint the straight line to 0°, 45°, 90°.
- c. If you double-click
the tool it will open Pencil Tool Options
dialog box, where will find the Fidelity slider. Fidelity allows you to create smoother lines. The higher the
fidelity, the less anchor points and smoother the line.
- d. You can simply
close an active path with the Pencil
Tool (N), by moving your cursor back to the starting endpoint.
A small circle (°)
will appear next to the pencil
icon to indicate it, and automatically it closes path. If you choose to close
the endpoints of a path, at a specific number of pixels between the other, then
you can place in a predefined number of pixels, in the Pencil Tool Options dialog box > Within field.
- e. You also have the
ability to continue drawing an active path by drawing over the end points, or
merge paths by continuing the path to the other endpoint - presented by the
pencil icon with a slash (/).

Step 2
Once you get the hang of the Pencil Tool (N), start to render organic, hand drawn shapes, to create the Henna brush strokes.Henna is a liquid paste, so you would need to create a fluid-like art brush or circular shape to present the form. Keep in mind not to add many anchor points to the art brush created, to maintain fluidity when we trace over the sketch.

Step 3
With the Brushes panel (F5) or Window > Brushes, open. Drop and drag the first created art brush onto the Brushes panel, and a New Brush dialog box will pop up. Select Art Brush, and OK. Art Brush Options dialog box appear. Name your first stroke, according to it’s features: mine is “Double Round Thin”, select “Stretch to Fit Stroke Length”, with a “Fixed” Width, and Colorization Method of Tints, so we can give a color hue to the strokes at a later stage. The first brush is created.
3. Trace Your Sketch
Step 1
To start tracing, we need to start with the larger parts of the sketch before adding in the intricate detail. So using the Pen Tool (P), with a black Stroke of 1.5 pt, and Fill to none, apply the “Rounded” Art Brush from Brushes panel, and trace over the hand outline.There’s a new cool function within Illustrator CC (updated 17.1), in which you can easily now edit the corners of shapes and paths in your artwork. With the Direct Selection Tool (A), select one or more of the corner anchor points and you will see some new control elements appear, which are called the Live Corner Widgets (presented by a circle and a point in the center). Select any of these Live Corner Widgets to change the shape of the corner, by double clicking on it. A Corners dialog window will pop up, where you can choose from three corner types - round, inverted round, or chamber, and you could set an exact value to the rounding radius for selected angles, from the Corners dialog window or Control panel.
Also you have the choice to drag the Live Corner Widgets to adjust the corners. However they cannot be rounded further than the end of the path or the neighboring point. The highest possible point of the rounding will be highlighted in red.
For short cuts, Up and Down Arrow Keys while dragging a Live Corners Widget changes corner styles (Round, Inverted Round and Chamfer). Option + selecting the Live Corners Widgets, also changes the corner styles.


Step 2
Once the larger detail is placed in, use the Paintbrush Tool (B) to trace the detailed line-work. Don’t use the Pen tool (P) because you will lose the free-hand render effect. While tracing, you might need to adjust the stroke weight, from the Stroke panel, in case the selected art brush features are large for the stroke or shape.When you are done, smooth out your strokes using the Smooth Tool. The Smooth tool helps you smooth out and modify a selected path, by drawing over it. Access the Smooth Tool by clicking on it in the Tools panel. Hold Command to temporarily access the Selection Tool (V). Click to select that path, release Command, and then smooth away!
You artwork should begin to pop out at this stage.

Step 3
You will notice I left out the dots, and some leaf-like forms that is because I want to turn these elements into shapes and not paths. For that reason, to create the dots in the design, use the Blob Brush Tool (Shift-B). It is similar to a felt-tip marker: fun, quick and helps in creating solid shapes. Just select a black color swatch, with no Stroke, and Fill in the art selections you want filled.In conjunction with the Blob Brush Tool (Shift-B), the Eraser tool (Shift E), is used to carve out shapes from your blob. To manage your blob brush size, hold left square bracket key ( [ ), to shrink the brushes size and the right square bracket ( ] ), to enlarge.

Step 4
For the leaf-like forms and teardrops, use the Pen Tool (P), because they have pointy ends. Once you are done, select the Sketch layer from your Layers panel, and drag it to the trash, so you can visually see the design better. Now you can use the tools we used for tracing, to fill in the empty spaces, correct the design and smooth out the movement to the artwork. Alter your stroke widths to achieve the look you are satisfied with. Once you are done, we are ready to color.
Step 5
Applying color, in Illustrator CC, has gotten cooler with Kuler. The cloud-based app, available on iTunes, is helpful in generating color themes from our surroundings, using the iPhone's camera. Download the app, sign in with your Adobe ID and simply point the cam to extract colors from your environment. For Henna colors I took snapshots of my skin, my Doberman’s fur, and tree stumps from the garden, to capture the brownish-reddish hues. Kuler automatically generates and saves the color themes and syncs them to your account.Access the Kuler panel from either the Swatches panel by clicking the Kuler icon or Window > Kuler, and start applying color to your strokes and fills. You may have to re-arrange the order of some paths and objects, in front or behind other elements for aesthetical reasons. Play with your design and test out what colors work more for you to achieve the result you want.

4. Mirror and Save
Step 1
The next step is to mirror the artwork to make it symmetrical. With the Lasso Tool (Q), select the upper left artwork and hand Henna artwork. Select the Reflect Tool (O) (hidden under the Rotate Tool (R)) and set up the center reference point in the middle of the canvas; Option-Shift-Drag and release when the object is properly mirrored into position. (This shortcut not only clones the reflected object, but also snaps it to 45°angles.)Step 2
Our final step is to save the file into an Illustrator EPS format, so we can move it onto Photoshop, with a transparent background, to continue to add the other elements of our poster. File > Save As. Name your file “Henna_Poster_Artwork”, make sure Use Artboards, is unchecked so your image is not cropped at the borders, and save it in the Version that fits the Photoshop version you have. I saved it in CS6 format for Grace Fussell to complete the second half of the poster tutorial.Congratulation! You are Done!
The new features in Illustrator CC (17.1), with the Pencil Tool (N), Live Corner Widgets, shortcuts and enhancements, makes it a fantastic program to work faster, edit your design, and work with ease. I hope you enjoyed the tutorial, and have learned to render organic, hand drawn shapes and edit your work with simplicity.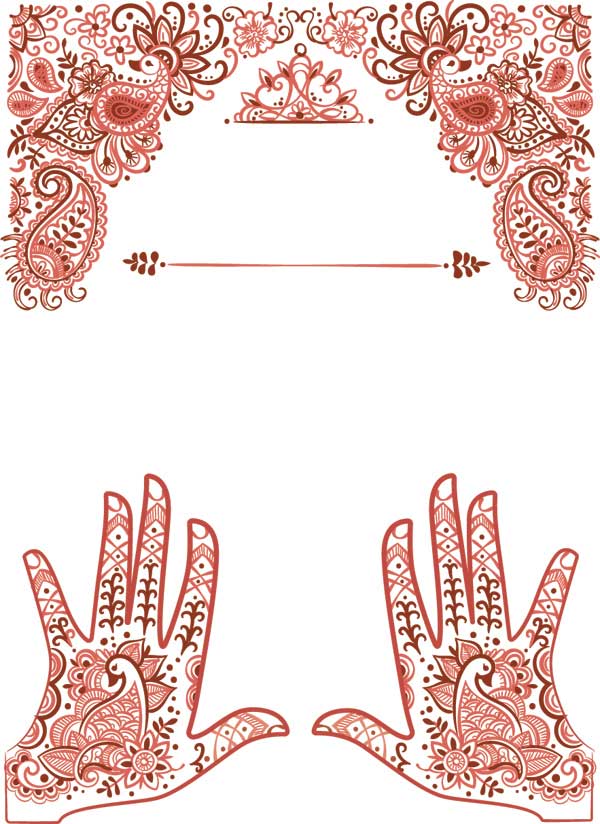


.webp)

