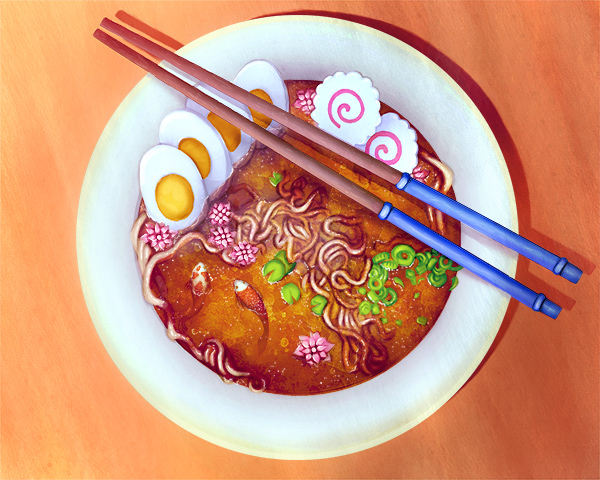
On a global scale, ramen is internationally known as a delicious dish that is quick, easy, and very cheap to make. In today's tutorial, you'll learn how to illustrate a bowl of ramen, turning it from your everyday budget friendly meal into a surrealistic digital painting. I'll be using Adobe Photoshop CS6 and a pen tablet to achieve this, focusing on watercolor-like textures and the Ambient Occlusion painting technique. Let's get started!
Tutorial Assets
The following assets were used in the production of this tutorial:
The Brainstorm
I love Korean dramas. And after a binge marathon of the popular show, "Let's Eat", I had a huge list of new foods I wanted to try. It was also one of the first times I saw people enjoying ramen way beyond the traditional just-boil-it-in-a-pot method.
See, at the core of your basic ramen is noodles, seasoning, and a delicious broth. The dish originates from Japan and can come with a variety of toppings, some you'll even get to know today. So during the brainstorming process I made sure to thoroughly research ramen, scanning dozens of food blogs and Pinterest posts for inspiration.
Adding the Surrealistic Touch
Since painting ideas usually come to me in words, I make lots of graphs to flesh out the scene in my head. These bits of word association help me stay organized by mentally keeping track of all the little details and unique components I'd like to achieve. I fill the graph with as many concise explanations as possible then move on to constructing my faux recipe.
Back to the Recipe
Today's recipe is similar to a miso ramen dish, served with hard boiled eggs, scallions, and narutomaki, a beautiful fish paste cake featuring a salmon spiral middle. You see, whenever you're building a food illustration it's important to get familiar with the ingredients, not only for their history and significance to the dish but for their aesthetic qualities as well.
1. Thumbnail Sketches
I start by sketching several thumbnails in Photoshop. My main mission here is to make sure that both the ingredients and the koi fish are clearly visible to the viewers.

After eight thumbnails, I set my eyes on these two.

At first I thought an interesting angle would work, but later I ran into problems during the painting process. When this first attempt didn't work out so well, I came back to my thumbnails and settled on the right one for my final sketch.
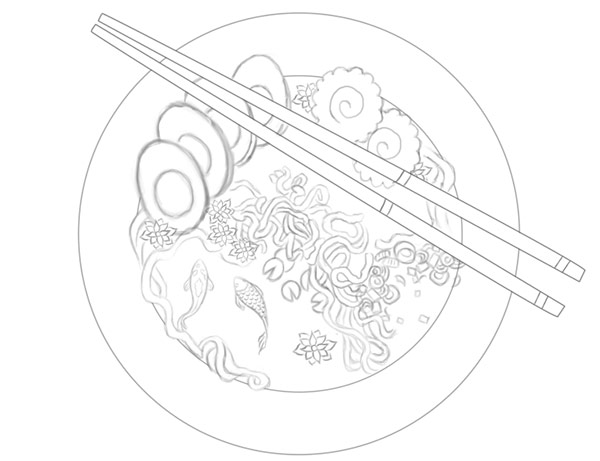
2. The Line Art: Bowl and Chopsticks
Step 1
Next, create a New Document in Photoshop with the following settings:
- Image Size set to 3000 x 2400 pixels
- Resolution set 300 dpi
Step 2
To avoid problems with perspective, simply trace the bowl and chopsticks from aPhotodune reference. Rotate the original reference with the Free Transform Tool (Control-T) for a unique trace. With the Ellipse Tool (U) selected, trace two circles to represent the edge of the bowl and its center. Set the Fill to No Color and the Stroketo black with a size of 3 pt.

Step 3
To keep this sketch clean we'll use the Pen Tool (P) for the chopsticks. First, set theBrush Tool (B) to a size of 3 pixels and 100% Hardness. Next, trace one of the chopsticks and right-click to set the Stroke to Brush.

Step 4
Right-click to duplicate the chopstick layer. With the duplicated layer selected, go toEdit > Transform > Flip Horizontal and adjust into place.

3. The Line Art: Draw the Ingredients
Step 1
Now it's time to Draw the ingredients. Set your Brush Tool (B) to the following settings:
- Brush Color set to Black
- Size set to 6 pixels
- Hardness set to 100%
- Transfer with Opacity Jitter Control set to Pen Pressure
Draw each ingredient, paying special attention to how they're positioned in the bowl.

Step 2
Below is the completed line art. Adjust both the Opacity of the bowl and the chopsticks to match the color of the sketched ingredients. Once you're finished, make sure toMerge the completed sketch layers together.
4. Create the Grayscale Base
Step 1
Painting in grayscale is a favorite technique amongst digital artists to help establish the lighting scenario more quickly. Create a New Layer (Control-Shift-N) underneath the sketch layer. Use a Hard Round Brush to paint a solid gray color as the base for our grayscale painting.

Step 2
Lock Transparent Pixels. Locking the transparency will allow you to paint without having to worry about going pass the edges of your grayscale base. Duplicate this layer, setting the duplicate to Multiply. Next, set to the Default Foreground and Background Colors of black and white to begin Erasing the extra gray that was applied from the duplicate.

5. Ambient Occlusion: The Bowl
Step 1
Ambient Occlusion is a shading technique we most often see in 3D renderings. In digital painting, however, it allows us to set up the lighting by concentrating on painting shadows in the creases, cracks, and intersections of details. To start using this technique, select the Elliptical Marquee Tool (M) and draw a circle. Right-click and select Transform Selection to adjust the circle so that it fits the center of the bowl perfectly.

Step 2
Since we want to paint the outside of the bowl first we have to inverse the selection.Right-click and select Inverse. Set your Brush Tool (B) to the color black with aHardness of 0%, bringing down the brush's Opacity to 20%. Begin painting shadows on the bowl by running a large brush along the edge of the selection. The selection will keep the brush from bleeding into the center of the bowl, so use long, fluid strokes to complete your shading.

Erase any parts of the shading that might overlap the ingredients.

Step 3
Reverse the selection to paint the shadow for the broth. Right-click and select Inverse. Just like in our previous step, we want to paint large, fluid strokes of shadow towards the edge of the selection. Pick and choose which ingredients should look submerged in the broth, and Erase any that shouldn't be overlapped. The finished bowl should look like this.

6. Ambient Occlusion: The Chopsticks
Step 1
Let's continue this technique with the chopsticks. Use the Pen Tool (P) to trace just one of them. Right-click to Make a Selection and begin painting shadow so that the center is left illuminated.

Step 2
Duplicate this layer. Go to Edit > Transform > Flip Horizontal so that you have a shadow that perfectly reflects the first chopstick. Rotate into place using the Free Transform Tool (Control-T).

7. Ambient Occlusion: Painting the Ingredients
Step 1
Starting to get the hang of this technique yet?
Now it's time to move on to the food! Just like in our previous steps, we're going to make a selection on each ingredient to paint in more shadows. The only difference this time is that I'll be using the Polygonal Lasso Tool (L) to make the selections. First, I shade the eggs.

Step 2
Next, I move on to the other ingredients including the narutomaki, scallions, and any remaining broth.

Step 3
I also begin shading the surreal elements like the flowers, lily pads, and koi fish.

8. Ambient Occlusion: Freehand the Noodles
Step 1
You might have noticed that I haven't covered the noodles yet. This is because we're going to use this step to further the impact of the overall technique, only this time we'llFreehand the rest of the shading. Still using the Brush Tool (B), lightly shade the sides of the noodles in order to achieve an instantly realistic effect.

Step 2
Continue shading the noodles until you're finished with them all.

9. Final Shading Details in Grayscale
Step 1
Shading with the Ambient Occlusion technique is a pretty tedious process, but I urge you to push these steps as far as you can before moving onto color. Toggle theVisibility of the original Sketch Layer on and off to see how far along you've come with your shading. Once you're able to see your painting pop out without the sketch, you know you're done.

Step 2
Let's not forget the shadows underneath the chopsticks! Use the Lasso Tool (L) to make selections around both chopsticks and Fill them with the color black.

Free Transform (Control-T) to Warp the shadow so that it bends along the bowl. Bring down the Opacity to 20% and go to Filter > Blur > Gaussian Blur, setting the radius to 17 pixels.

Step 3
The last step in our grayscale painting is to add a background. Use the Gradient Tool (G), setting it to Foreground to Transparent for the gradient blend. Bring down the Opacity to 20% and drag your marker in the directions where the shadows would hit.

Remember the base we created in the beginning? Duplicate the base layer and go toImage > Adjustments > Hue/Saturation. Set the Lightness to -100 and position it according to the overall lighting scenario. Bring down the Opacity of the layer to 55%and lightly Erase the edges for a more natural look.

Bring down the Opacity of the original sketch layer to 30% in order to prep it for color. The final grayscale painting will look something like this:

10. Adding Color: The Ingredients
Step 1
Finally, let's color this painting! On a New Layer (Control-Shift-N) begin painting solid colors for all your ingredients with the Brush Tool (B) set to 100% Hardness.

Step 2
Set the Layer Blend Mode to Linear Burn. Feel free to keep all the solid colors on one layer or to separate them for each detail.

11. Adding Color: Ramen Bowl & Background
Step 1
Next, follow the same steps as before to color the ramen bowl and background. I opted for neutral tones against a bright pop of orange, but feel free to experiment with the color choices here.

Step 2
For better contrast against the bowl, Erase the color off any details you don't want affected by the bowl's color.

Once you've painted in all your colors, set the layer to Linear Burn.

12. Adding Color: The Broth
Step 1
We need to take special care in painting the broth because it is far more complex in texture and color than the other elements in this painting. Use the Elliptical Marquee Tool (M) to create a circle for the broth and Fill this circle with a deep tan color.

Step 2
Set the Blend Mode to Linear Burn and begin erasing away the broth. Pay special attention to details that are submerged in broth versus details that aren't.

Vary the Opacity on your Eraser Tool (E) to gradually take away broth that is overlapping the ramen noodles. Experiment with what works best for the painting

13. Adding Texture to the Broth
The broth to this delicious meal wouldn't be complete without a little texture! To mimic the oily quality of ramen broth, we're going to use the Watercolor Textures found inMary Winkler's recent Watercolor Brush Tutorial.

Create a New Layer (Control-Shift-N) above the Broth Layer, and right-click to set it as a Clipping Mask. Using the two textures above, paint a dark gray texture all over the broth, erasing any excess with the Eraser Tool (E). When you're finished, set the layer to Divide.

14. Adding More Light With Blend Modes
The beauty of working so hard on the grayscale portion of this painting is that once we apply the initial colors, we won't need to develop the colors too much further. However, it's always interesting to experiment and see what other tweaks you can bring to the table, especially with Blend Modes.

In this case, I decided to Fill a New Layer with a bright baby blue color. I Erased the middle where the bowl sits, set the Blend Mode to Divide, and brought down theOpacity to 70%. Not only does this change make the background pop, but it also allows the chopsticks to be affected by color from their environment.

15. Using Adjustment Layers
Step 1
Adjustment Layers play an essential role in correcting your overall color scheme. First up, Color Balance. Go to Layer > New Adjustment Layer > Color Balance. Adjust only the Highlights by moving the sliders over to the Blue and Cyan colors. Since I only want this to affect the bowl's highlights, I select the Layer Mask Thumbnail and paint black all along the background.

Step 2
Next I create a New Adjustment Layer for Selective Color. I adjust the colors under the Reds, Blues, Yellows, Greens, and Whites in order to tone down the intense orange colors.

Step 3
My last New Adjustment Layer is for Color Balance, ![]() making sure to move the slider over to the Blue side under Midtones.
making sure to move the slider over to the Blue side under Midtones.

16. Cleaning Things Up
It's at this stage of the painting when I know that, for the most part, I'm settling on this particular color scheme. With all the previous adjustments made, I can now focus on cleaning up the details. To do this I use a Hard Round Brush (B) to paint over any outlines created by the sketch.

Line art flattens paintings, so any time you paint over the line art you add greater realism into your piece. Try to keep the Opacity of your brush in the 50–100% range for the best effect with this step.

17.More Blend Mode Adjustments
Step 1
Currently the handles of the chopsticks seem too muted for such a vibrant overall color scheme. To change their color, I create a New Layer (Control-Shift-N) and begin painting a solid blue on top of each handle. Afterwards, I set the layer to Color.

Step 2
Next, I Fill another New Layer with a light green color and set it to Divide. Now all the colors really work well together!

Step 3
Since I'm still working with Blend Modes, I decided to add texture to the background for a more uniform look. Using the Watercolor Brushes from earlier, I paint a dark gray texture on top of the background and set the layer to Overlay.

18. Adding in Highlights
Step 1
Although this painting already has great shading and color, now we need the highlights! Use a Hard Round Brush (B) to begin painting highlights on each component of our meal—yes, literally. Personally, I like to select colors in the painting with theEyedropper Tool (E), then use the slider on the Color Picker to choose the highlight color I need.

Step 2
Continue painting in the highlights until you're happy with the result. Sometimes a crisp white line is all the highlight you need. Be sure to Zoom in and out of your painting often to understand what the viewer sees in order to paint accordingly.

19. Finishing Details: Shiny Broth
I couldn't wait to get to this last step! Not because it's the final stage of the painting but because the painting really transforms once you add shine to the broth. Use a Hard Round Brush (B) to begin painting white squiggly lines to represent the shine and places where food breaks the broth's surface.

Create strokes that follow the natural direction of your ramen, and paint dots scattered about for a more realistic effect. It's really that simple! As always, use the Eraser Tool (E) to soften any edges.

All Done! Let's Eat!
I really hope you've enjoyed creating and learning more about this tasty meal today. The journey of a great digital painting can seem like a long and tedious one, but I assure you that combining smart techniques proves to save much time and energy in the long run. Now reward yourself with a great bowl of ramen! Yum!


.webp)

