
What is "Hamsa"? You most probably have seen the Hamsa hand, without really knowing what it's called or the meaning behind it. The word Hamsa means "5" and is a powerful number that represents defense, power and fortune. It's illustrated in the popular hand-shaped symbol, with three extended fingers and a curved thumb and pinky finger. The symbol is believed, in the Jewish and Middle Eastern communities, to protect one from the "evil eye": an "envious stare" that casts bad luck, misfortune or evil on the person at whom it is directed.
The Hamsa is called in different religions "Hand of Mariam", "Fatima's Hand", "Khamsa", or "Hamesh". It is also a powerful talisman for good luck and one of the most popular amulets in the world used for protection. You would generally see it hung in homes and offices, on key-chains, inside cars, in baby carriages, or worn as jewellery, to ward off bad luck and bring happiness to its owners.
Because the hand protects against the evil eye, you will notice that some designs have an eye illustrated in the palm of the design. Other symbols that can appear on theHamsa are fish, which are thought to be immune to the evil eye; they are regarded to be shielded from the evil-eye stare because they live underwater, and are therefore a symbol of good luck. You will also see plenty of decorative motifs, florals, patterns, spirals, and organic forms.
In this tutorial, we will be illustrating our very own Hamsa protection symbol to showcase on T-shirts, using Adobe Illustrator CC to trace the artwork. Let's start!
1. Sketch & Set Up
Step 1
We will begin by sketching out our Hamsa. I took a regular blue ballpoint pen and an A4 paper and sketched half the hand symbol with:
- a fish with surrounding bubbles (for good luck)
- a decorative eye (to banish evil)
- organic shapes, flowers, seaweed and some lace patterns for decoration

Scan the illustration. Open Adobe Photoshop (any version will do fine), and File > Place your scan file.
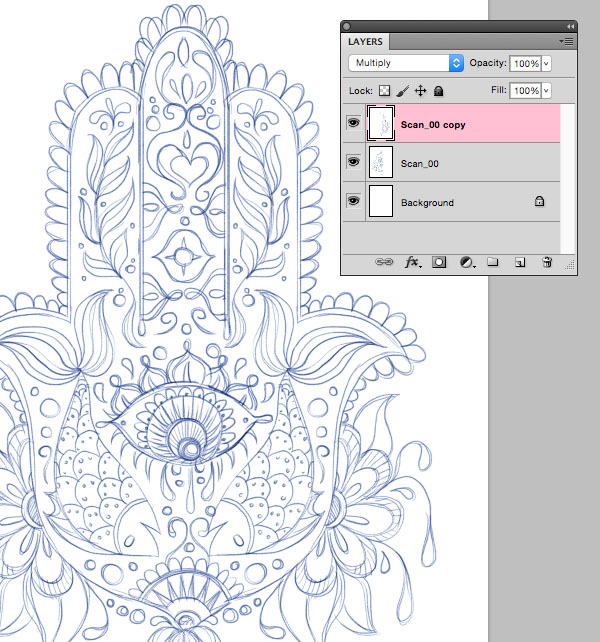
Select the "Scan" layer, and drag it to the Create a New Layer icon to create a duplicate layer. We need to mirror our duplicate layer to create a symmetrical design, so Image > Image Rotation > Flip Canvas Horizontal and set the layer transparency from the Layers panel to Multiply. Move the layer to align with the rest of the artwork. Use the Eraser Tool (E) to remove the excess marks.
Once you are satisfied, File > Save As, name your file
Hamsa_Sketch, and save it inJPEG format with default settings.
Then move on to Illustrator CC, and create a new file: File > New (Command-N).
Name it
Hamsa_Design; Size is A4, Orientation is Portrait, and click OK. 
Next place in the
Hamsa_sketch.jpg, with the new Place shortcut (Command-Shift-P). Click onto the upper left corner to center your image on the artboard. Open theLayers panel, Window > Layers.
In the Layers panel, name your scan layer
Sketch. For layer options, double-click the layer or click on the sub-menu of the Layers panel, and select Options for 'Sketch'.Check the Dim Images to: 20%, check Lock and OK. 
Then on top of the Sketch layer, Create New Layer, and name it
Hamsa Design.
File > Save (Command-S), and save your illustrator file as
Hamsa_Design.2. Basic Trace & Art Brushes
Step 1
Let's start tracing the main Hamsa hand shape, with a black Stroke, and Fill to None.
Select the Rounded Rectangle Tool, which you can find under Rectangle Tool (M) in the Tools panel. Don't worry about the corner radius while you click and drag, because you can change it using a simple shortcut: press the Up Arrow (for rounder) or Down Arrow (for edgy corners). When you get the right radius for your corners, release the key.

Then select the Scissors Tool (C) to split the path at the anchor points. To find theScissors Tool (C), click and hold the Eraser Tool (E) to see the drop-down menu. With the Scissors Tool (C) click on the bottom anchor points of the rounded rectangle to cut off the bottom half, and then Delete the arc.

Now we will repeat similar steps to trace the index finger. Select the Rounded Rectangle Tool, and draw in the index finger, but this time use the Scissors Tool to cut the base arc up to the top arc anchor. Delete the excess.

With the shape selected, take the Pen Tool (P) and click + to add a point to the existing path. Click the end of the path and continue tracing the left part of the Hamsa. We only need to draw half because we will mirror the rest.

Now select the shape, so that we can mirror it. Take the Reflect Tool (O) and set the center reference point at the end of the path; Option-Shift-Drag and release when the line segment is properly mirrored into position. (This shortcut not only clones, but also snaps the object at 45°angles.)

If you notice that the middle finger shape is a tad disconnected to the right mirrored shape, just select it and scale it up a bit or expand it till it connects to the mirrored path.
Select both path endpoints with the Direct Selection Tool (A) and then connect the paths using Object > Path > Join (Command-J).

Now both ends will be one path. Also select the middle finger path, and then Object > Path > Offset Path, which will make the Offset Path Options panel appear. Set it at: Offset: 0.07 cm, Joins: Round and Miter Limit: 4, and click OK.

You can now select and delete the middle paths segments, since we no longer need them. Then open the Pathfinder window, Window > Pathfinder. Select the new offset shapes, and in the the Pathfinder panel, click Shape Modes: Unite, to create a compound shape.
Once again Offset the shape (Object > Path > Offset Path), with the previous settings, and voilà, we have completed the main Hamsa hand shape. Now we move on to the more intricate parts.

Step 2
Next we will trace all the ellipse shapes on the left side of our design. We will mirror it later to complete the entire hand design. So take the Ellipse Tool (L), and trace in the bubble-like forms, for the fish. Shift-drag to constrain the ellipse, to form perfect circles. Then to create the impression of a bubble, draw a circle within the ellipse, and from thePathfinder panel, Shape Modes: Minus Front, so we create a void inside the bubble.

For the fish's decorative "scale dots", make your Fill black and set Stroke to None, and with the Ellipse Tool (L), Shift-drag to constrain the ellipse to make your perfect small circles. Group (G) the three dots together, and then to copy, hold down the Alt key and drag. Repeat. For the smaller bits, you can just scale them down, holding the Shiftkey to constrain the proportions. And for the excess dots beyond the fish, just select them with the Direct Selection Tool (A) and delete.

For any arcs in the designs, draw using the Ellipse Tool (L) and then use the Scissors Tool (C) to cut them to the right size. Don't worry about making everything perfect. Our aim is to create a sense of life in the Hamsa, and not to make it a perfect symmetrical shape with a robotic look. Let it breathe with non-symmetrical elements.

Step 3
When you are done with your non-organic elements, move on to creating art brushes. Select the Pen Tool (P) and draw in shapes that might resemble the line of work that was sketched. Here are some sample shapes I created for my artbrushes.

Open Window > Brushes, so we can save our art brush samples. Drag and drop each shape into the Brushes panel. A New Brush dialog box will pop up. Select Art Brush, and OK. Then an Art Brush Options dialog box will appear. Select Stretch to Fit Stroke Length, with a Rotation Width, and click OK. The first brush is created. Now repeat for the other brush shapes, until they are all placed into our Brushes panel.

Select the brush shapes and hide them in case we need them later. Object > Hide > Selection (Command-3). Now we can trace the rest of the artwork. Open the Strokepanel, and just have the Stroke Weight set at 1 pt for now. Select the Paintbrush Tool (B) and any one of the brushes we uploaded into the Brushes panel, and start tracing the artwork on your design. It's a trial and error process—you need to test out which ones work out best on the design.

Step 4
The next step is to fill in the black to create a bold appearance to the Hamsa. So select the shapes you want in black fill, and swap Fill/Stroke using the Shift-X shortcut. Then take the Pen Tool (P) and trace with Stroke to None and black Fill any elements you wish to fill in black.

A good tip after this stage would be to convert the Stroke Weight for the brushes, to add a "pop" to the artwork. Delete the Sketch layer to help you see better. Tweak, scale, add and delete shapes, and alter the art brushes as you go along, until the hamsa looks harmonious in pattern. I like to Group (Command-G) elements of the same appearance together, in case I need to alter them back and forth.

Better looking! Now let's mirror the artwork. Select All (Command-A) and with theSelection Tool (V) deselect the elements we don't wish to reflect. Then select theReflect Tool (O) and set the center reference point at the middle of the Hamsa. Use the shortcut Option-Shift-Drag to snap to 45°angles, and release when the artwork is properly aligned.

Move around any elements that might be misplaced and make sure everything is aligned properly. Once you are done, Select All (Command-A) and Object > Expand Appearance. The expansion will turn all your brush strokes into filled shapes, so we can resize the illustration to any size without losing quality.
For the black strokes, select the strokes and Object > Expand. In the Expanddialogue box, be sure Stroke is checked. Click OK. Expand all strokes—this eliminates mishaps that can occur with scaling and color changes.
Lock the Hamsa Design layer.
3. Color & Print
Step 1
Adding color is the next step, but we have to keep in mind that we need to prepare the file for print, so we need to divide our colors. This is the process of taking the artwork and splitting the colors to facilitate the individual printing plates in the printing process. It's important to choose a low number of colors when printing, to keep in mind printing costs. I chose five colors.
The most popular method of printing is screen printing. Like most printing methods, screen printing prints one color at a time. However the printing itself gets expensive the more colors you use, so keep it to a maximum of five colors. I recommend using Adobe Color CC when choosing your colors.

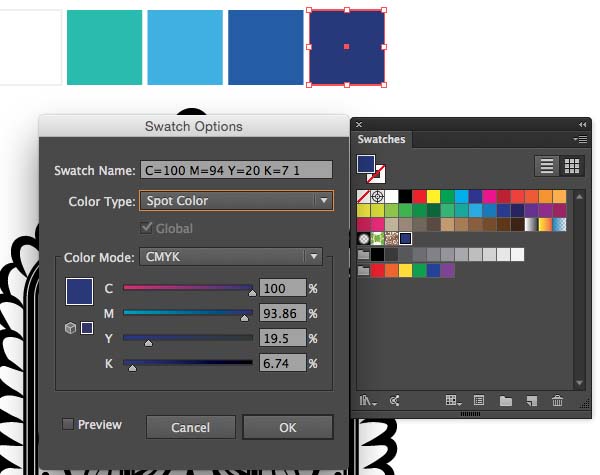
At this stage, it's best to create color swatches of a specific CMYK value so that specific color can be applied quickly, again and again. So convert your swatches to spot colors prior to submitting a file for print. If you aren't doing the screen printing yourself, it's best to let the actual screen printer handle the separations, but it helps to divide the colors either way.
Step 2
To convert swatches into spot colors, open Window > Swatches. Select each color, and drag the fill into the Swatches panel. Double-click the swatch color to open theSwatch Options dialogue box.
Select Spot Color from the Color Type drop-down menu, and click OK.
Step 3
Create four new layers below your Hamsa Design. Name each layer according to your choice of colors: Dark Blue, Ocean Blue, Light Blue, Green, and White. Then here's the tricky part: use a combination of the Paintbrush Tool (B) to fill in the color and the Pen Tool (P) for larger areas. Fill in the colors within their respective layer. And use thePathfinder panel to minus out shapes.

Then for each layer repeat the following steps. First make sure all layers are locked except for the one you need. Select All (Command-A). Then from the Pathfinderpanel choose Shape Modes: Unite to keep the colors joined. To give you an idea of how your separations will look like, take a look at this snapshot.

Step 4
We are almost done. Select All (Command-A) and convert the fill of all the black elements to your "Dark Blue" spot color. As you may have noticed, we didn't unite the elements in the Hamsa Design layer. This is because we will color some of these elements with some of our spot colors. So select the elements you wish to color and and from the Layers panel, click on the little colored box icon that Indicates Selected Art to drag them to the color's respective layer. Here's a before and after snapshot.


Then when you are done, Lock all the layers except Dark Blue. Select All (Command-A). Unlock the Hamsa Design layer, and from the Layers panel, click on the little colored box icon that Indicates Selected Art, and move them onto the Hamsa Design layer. Delete the Dark Blue layer and rename Hamsa Design as
Dark Blue Outline. That's it!
Congratulations! We Are Ready to Print
You can create a mock-up of your design to imagine how it's going to look.

You have created a cost-effective, print-ready version of your Hamsa artwork, and have now learned the process of layering your colors for print, creating art brushes, manipulating artwork with strokes, and using the handy Reflect Tool and Adobe Color CC. You've also learned some elementary shortcuts to help you speed up the workflow. In any case, don't hesitate to contact your local screen printer to ask how to set up your file for their printers.
The Hamsa is a lovely gesture to design for a family member or close friend to wish them good luck in what they do. A Hamsa T-shirt would be an ideal gift for friends and family, to bring them happiness, luck, health, and good fortune!
Thanks for trying out this tutorial. I encourage you to leave any comments or criticisms, and post your version of the work. Good luck!


.webp)

