
In this tutorial you'll use the Blob Brush Tool in Adobe Illustrator to create small portions of designs that are copied, pasted, and rotated to form complete, ornate frames. By combining connecting elements with flourishes, basic shapes, vine and floral elements and more, you'll have vector pieces ready for all of your elegant design needs.
1. Creating the Frame Components
Step 1
I find this tutorial is best when working with a graphic tablet (since it's all hand drawn, versus creating shapes with shape tools). Create a New Document of 800 pixelssquare or so (this is up to you, by the way).
Using the Blob Brush Tool (Shift-B), hit Enter to access the tool's options. Set the size of the brush to 3 pt or so, making sure Pressure is enabled. Set the Fidelity to the fourth tick mark to the right (almost Smooth, but not quite).
Finally, make sure Keep Selected is unchecked and Merge Only with Selection is checked. This way, anything you draw will be easily edited (unless you want everything to merge together from the get-go).

Step 2
Now that we have our tool ready, let's start our frame design. I like to start with a central shape and a flourish or swirl on one side. In this case, I drew a heart, a smaller heart inside it, and a flourish on the left side. Diamonds, ovals, and floral shapes work really well for this step too.

Step 3
Hold down the Alt key and use the Selection Tool (V) to drag the flourish to the right. You'll find you've instantly copied and pasted that particular shape. Right-click and go to Transform > Reflect to flip the shape over a Vertical Axis. Place the flipped copy on the right side of the heart (see below).

Step 4
Consider the shape your're making as a corner of a polygon. Swirls and flourishes should weave into the center of your design as well as being something that can connect to the next "corner" of the final shape. I find that little flower-like or crown-like shapes at the top work well, along with arcs connecting swirls to the central heart.

Step 5
Finally, extend some shapes to the lower center portion of your design. I chose hard‑edged V-shapes and additional, smaller swirls on either side. If you really dig symmetrical designs, Copy, Paste, and Reflect design elements. Group (Control-G)together all of your design elements, and now let's create the rest of the frame.

2. Rotating the Design Components
Step 1
Copy and Paste your design group. Use the Rotate Tool (R) to rotate the copied group 45°. Place the newly rotated group to the left of the original copy.

Step 2
Copy, Paste, and Rotate your design components and arrange them in a circular or octagonal shape. Use the Align panel to make sure that the top and bottom center shapes align to their vertical centers.

Step 3
The size, spacing, and overall shape your design creates depends on its placement as well as the elements you created. In this case, my design consists of long, horizontal shapes with built-up points in the center of each side. Because I rotated each element 45°, I have an eight-sided figure. Group your components together once you're finished with their placement. Your first elegant frame has been completed.

3. An Alternate Frame Style
Step 1
An alternate design style rotates each component by 90° so that there are only four corners of the design. I found it easiest to Copy, Paste, and Rotate the first copy -90°.

Step 2
Then, I Copied and Pasted both components and Rotated the group 180° so they were more likely to align perfectly. While this can sometimes create a very square or boxy frame style, if you add elements in a new group between the initial frame design, you can round out the "corners" of the frame. Additionally, you can add elements to the center or sides, and keep layering frame components to increase its complexity.

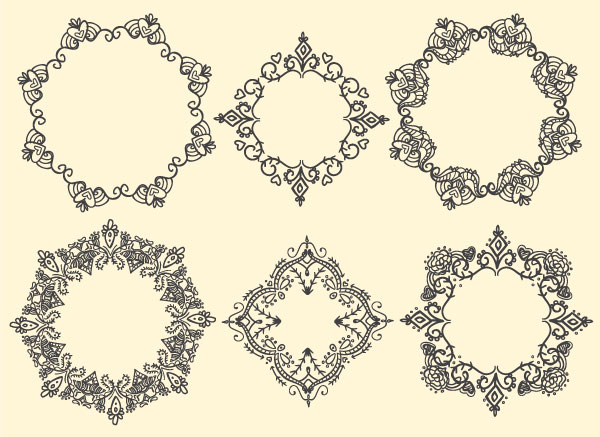
Great Job, You're Done!
Note how some of the pieces below have four, six, and eight sides respectively and range from simple to complex in the amount of elements added to the frame design. What other components not explored in this tutorial can you add to create original, ornate frames? Share your various hand-drawn frame designs in the comment section below.


.webp)

