Save For Web is a nifty feature of later editions of Adobe Photoshop that allows us to compromise in a better way with size and quality in order to retain a decent lookingJPEG, PNG or GIF. It does this by reducing the quality and stripping out unnecessary metadata. This tutorial concentrates specifically on JPEG and will help you understand how Save For Web works so that you can get the best result for your needs.
1. Save For Web Basics
Start with your picture. The great thing about Save For Web is that you’re not making any changes to your original, this will save as a new file; you don’t need to have it at the correct size yet either.

Hit File > Save For Web (Control-Alt-Shift-S)

This is what you should see. We’re going to look at two things: the format and then the size. Whatever you change this to, it won’t change your original so don’t worry about that. I’m going to change this to 1000px just so we can still see what we’re doing. You may be working with much smaller sizes for web, and that’s okay. If you click 2-Up at the top, you’ll be able to see your original on the left and what will be your smaller Save For Web file, on the right.

You can already see a difference in the blue sky, and, speaking of colours, if you ticksRGB then you’ll know your colours are being displayed accurately as how they’ll be seen on the net.
You’ll notice that there is a section for Quality which is set to Bicubic by default. This is generally the best selection as it samples more pixels than the others, but you’ll notice there are three options to this: Bicubic, Bicubic Sharper and Bicubic Smoother. According to Adobe, Bicubic Sharper gives you better results when reducing image size but if you’re unsure, Bicubic will be fine.
Under Preview, again there are several options and Monitor is the default. That’s basically as you see it, with no compensations or adjustments to the gamma. You can flick through the others to see how people with other monitors might see your picture and make adjustments accordingly.
2. Balance JPEG Quality and File Size
You’ll have noticed that next to 2-Up is 4-Up. This can really help us compare quality samples

This shows the original in the top left (1.83MB), Maximum Quality in the top right (696.3kb), High Quality in the bottom left (150.1kb) and Medium Quality in the bottom right (101.2kb). Having Optimized ticked will reduce the file size a little too.
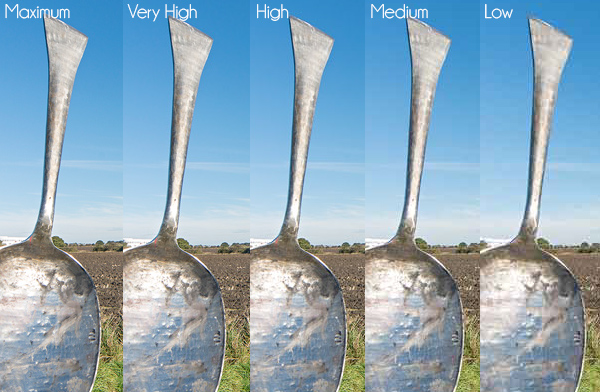
It can be difficult to make out differences at this size so here’s a breakdown of each major stage of quality:

Even from High you can start to see some minor compression artefact issues around the edge of the spoon, although it’s not too bad. By the time you get toMedium however, you can see it really starts to lose the quality. It’s worth noting that you can go down in smaller stages than the presets by changing the number to the right ofQuality. Doing this means you can get as close to your required file-size as needed whilst keeping an eye on the distortion of your image.
3. Preview in a Browser and Save

Once you’re happy, you can hit Preview in the bottom left corner and it’ll open it into a web browser for you to see how it looks. When you’re all done, click Save and it will give you the option to rename your file, also putting handy dashes in the spaces for you too.
Conclusion
Saving images for web is a compromise. You want your image to load quickly, not take up too much space (this is particularly a consideration for third party websites like Facebook and Twitter who simply don’t allow large sizes) and still look great. WithSave For Web you’re able to fine tune an image for web much more accurately than before, carefully balancing that compromise between compression/size and quality. Get it right, and you’re a step ahead of the game for all those still throwing full size images into their websites, profiles and portfolios and letting the software take best guess.


.webp)
