In
this tutorial, I'll continue my work to shoot an iconic portrait. When I
began, I wanted two distinct yet consistent styles or outcomes from
each session. In the first session,
I created a look that was intimate, yet polished. In this final
session, I wanted to have more editorial distance, and a more raw and
real feeling.
Instrument Time
You may be wondering why I decided to shoot the bassist aspect of Brad as an entire separate session.
Honestly, I have a tendency to think that musician-with-instrument
pictures tend to be a little cheesy and overdone, more along the lines
of local editorial than portraiture. As far as I'm aware, the commercial
music industry tends to think along these lines as well.
Speaking of mediocre photography...
However, there are always exceptions. I've seen beautiful portraits
of iconic musicians with their instruments, like Clarence Clemons with
his sax and Carlos Santana with his guitar. In some instances, the
instrument itself might be iconic, if it's unusual, custom or vintage
model.
So while there may be an overall aim, don't be closed to the
possibility of subverting cliché or running with random ideas. Given the
possibility of these exceptions, I wanted to at least give it a try,
and hence a second session.
Pre-Planning
Since I'd already attempted the iconic portrait in the first session,
but wanted that same iconic feeling to permeate the entire project, I
had to determine how I was going to approach this second session to
create a consistent outcome.
Initially my plan was to do the same general idea as the first
session, but simply include the instrument this time. However, in my
head, the slick, "lit" feel of the first go round didn't necessarily
jive so much with my perception of live music. I needed something more
raw, but with a degree of professional polish, since my style really
isn't scenester polaroids.
I never saved the original, just used it during the session, but it looked something like this.
With this in mind, I decided a more editorial style of photography
would make sense. I came up with three poses that I thought I could hang
the session around. I asked Brad to bring a practice amp too. I also
asked if he could bring a stack-and-head rig, just on the off-chance,
but he'd just sold all his big heavy gear.
With the general thematic intent more or less solidified and a rough
plan outlined, I could now start to figure out how I was going to do the
lighting.
Lighting
What was different this time around? Actually, very little. The
lighting itself was technically almost the same, if you look at the
results of each session, but because I was now shooting more of Brad
than just his head and shoulders, my gear had to change accordingly. My
subject now covered a much larger area, so I need a larger light source.
In the first session, I had a 22" beauty dish a couple of feet away
from Brad's face. I was relatively close, maybe two or three feet away,
shooting mainly at around 50mm. This session, however, to get the
framing I was looking for, I had to move back to anywhere from four feet
to around maybe nine feet. If I left the beauty dish in there at a
couple feet from Brad, not only would it be in the middle of the shot,
but it would only be lighting part of the scene.
Trignometry says the light quality of a two-foot source
located two feet from the subject is the same as a five-foot source
located five feet from the subject.
To get the same lighting look, I need the same size light source
relative to Brad's position, but I need it at least five feet away from
him so I can see around it. If I used a two-foot modifier at two feet
away, then I now need five-foot light source to place it five feet away.
Handily, I have a five-foot octa that did the trick.
For the rim light, I replaced the edgy spots with something a little
softer to the left, a 1x4 strip that could be a seamless light, rim and
fill all at once. I now had a more naturalistic setup, but still with
just a hint of style.
Nice simple lighting setup with a tileboard floor to kill full-body shadows.
This was the studio setup, at least. When we ventured outside for me
to get my "garage musician" shots, I primarily used natural light,
sometimes with a bare speedlight mixed in at camera right for a little
pop.
Collaborate!
If the person you're shooting is creative, then collaborate! Even if
they aren't a visual artist, it's unlikely that they have zero sense of
aesthetic. I've usually found that any form of creativity has a tendency
to bleed into non-related media. Even if it's simply images they've
seen and liked the look of, they may have any ideas about the overall
presentation, or even particular styles of visual art that inspire them.
In other words, don't let ego waste opportunities. Harnessing your
combined abilities may lead to places neither one of you might have come
up with alone. The same goes for chaperones with children or makeup and
hair stylists on a fashion shoot. You never know who might have a good
idea.
Keeping the atmosphere positive and experimental as much as
possible has made a night and day difference on the end results every
time I've made a conscious effort to ensure it.
The Shoot
I decided to start with some basic editorial portraiture to form a
natural bridge from the second session. This was visually simple "man
and guitar" type stuff. We had some fun here, then moved on to the wider
shots that I'd been planning for this session on the same set. We
weren't really feeling it quite so much here, until Brad decided to jump
up on the amp for this fun shot:
A subject with an outgoing personality makes your job SO easy.
Next, we headed out to the garage, which I'd already brought up at
the beginning of the session that I wanted to try. After doing a fun
little "traveling man" type shot using the doorway and falling snow as a
huge softbox, a nod to his nationwide bookings, Brad just got to jam
out while I figured out my angle and lighting, which is usually
predictably beautiful in the garage.
When I felt like I'd gotten what I needed here, we headed back inside
where I had a sudden visual flash into my mind that I had to try, and
it came out perfectly! I can't explain the visual or where it came from,
it just popped into my head after the travelling themed outdoor shots.
If I had to guess, it bubbled up from my much-travelled past where a lot
of time was spent sitting against walls and pillars in bus stations,
train stations and airports.
First shot of the sequence. Definitely promising.
Then I went for the final image that I wanted of the session, which
after lots of setup and messing about with optical slave sensors, just
wasn't happening.
I think I'm happier with the shot that popped
out of nowhere than the other attempts anyway, since it's less about
cool-factor and more about telling some kind of story related to Brad's
profession. Just like you should run with a good idea even if you didn't
come up with it, you can't be afraid to kill an idea that isn't
working.
Image Shortlist
This was Brad's idea, from somewhere he'd found something similar. I killed the colour and added the wide-angle cartooniness. An unexpected squinch, which I'd been trying to pull out more in the previous session! Travellin' man. Jamming in the garage Post-RAW-adjustment version of final image
Advertisement
Post-processing
Final Image
Ok, that's it for this shoot from me. I hope this has been as
interesting and enjoyable an experience for you as it has been for me.
Any questions or thoughts? Hit up the comments below!
The
new look and feel of the iOS 7 user interface relies heavily on subtle
animations to help give users a stronger sense of direct manipulation.
In this tutorial, I'll give you an overview of the UIKit Dynamics
classes and how they work together.
1. Introduction
If you tap the camera icon on the lock screen, you'll see the screen
slide up slightly to reveal the camera interface before falling back
into place with a gentle bump. This interaction is a subtle hint that
you can slide the lock screen up to access the camera. At the same time,
it reassures you that if it accidentally slides a short distance, for
example, while your phone is in your pocket or bag, you won't end up
with a Camera Roll full of useless photos. Tapping the camera icon causes the lock screen to slide up, revealing that the camera is hidden behind it.
With the help of UIKit Dynamics, you can add animations to your own
apps without needing to code everything from scratch. There are hundreds
of versions of the Hamburger Menu on GitHub.
Each one allows you to slide the screen to the side to reveal a hidden
menu and many have a bounce animation on opening and closing.
However, the bounce effect has been implemented differently by each
developer. Apple have made it easier for developers to add these
finishing touches by providing a framework for the physical interactions
of elements on the screen. With UIKit Dynamics, you only need to
specify how the elements interact, not code the physics of each
interaction.
There are several new classes you will need to become familiar with.
Let me walk you through them in this article. In the next tutorial, I
will show you how to use them in your own projects.
2. Dynamic Items
Any class you want to animate needs to conform to the UIDynamicItem protocol, which basically means that it needs to expose its bounds, center, and transform properties. UIView and UICollectionViewLayoutAttributes,
and their subclasses, already conform to the protocol by default. If
you just want to add animations to your existing interface, you probably
won't need to interfere with the components' classes at all. If you're
using something more exotic and have lots of custom classes, you need to
do some extra work before you can start using UIKit Dynamics.
3. Dynamic Behavior
The way to let your application know how you want your dynamic items
to interact, is to create a dynamic behavior and let it know about the
dynamic items. The UIDynamicBehavior class is readily available, but it provides little functionality on it's own. You can subclass UIDynamicBehavior
to tell the application how the dynamic items should interact, but you
probably want to use one of the predefined subclasses which cause the
dynamic items to interact in different ways.
UIAttachmentBehavior
An attachment behavior relates dynamic items to each other or to an
anchor point as though they were connected by springs. When a dynamic
item or the anchor point moves, the attached dynamic item also moves.
The attachment behavior has several properties, which can be configured
to control the behavior of the the virtual spring that connect the
dynamic items.
Damping: Defines how quickly the spring stops bouncing after one of the items moves.
Frequency: Defines how quickly the spring bounces when one of the items moves.
Length: Defines how long the spring is once it stops bouncing.
Notice
how the messages space out and bunch up together in the Messages
application in iOS? The gap at 1 increases and the gap at 2 closes as
the message moves down the screen.
UICollisionBehavior
A collision behavior allows its dynamic items to collide with each
other or with a bounding box that you specify. A dynamic item won't
collide with a dynamic item that isn't part of the same collision
behavior. The collision behavior allows you to set whether the dynamics
items collide with just other items, just the bounding box, or other
items and the bounding box.
UIGravityBehavior
A gravity behavior causes its dynamic items to fall in the direction
in which gravity is acting. By default, gravity acts downwards, but you
are able to set any angle you choose by changing the angle property. You
can change the gravity behavior's magnitude property to cause items to
fall faster or slower.
UIPushBehavior
A push behavior applies a force to its dynamic items causing them to
move in the direction of the force. You have more control over a push
behavior than you do over a gravity behavior as the force applied can be
continuous or instantaneous. Tapping the lock screen camera icon prompts UIPushBehavior at 1, before UIGravityBehavior takes over at 2 and then UICollisionBehavior causes the bounces at 3 and 4.
UISnapBehavior
A snap behavior causes its dynamic item to move to a specified point
as though it were connected to it by a spring. Like the attachment
behavior, a snap behavior will cause the dynamic item to overshoot the
final point before springing back to it. You can set the damping
property of the behavior to define how quickly the oscillations die
down.
UIDynamicItemBehavior
You should use UIDynamicItemBehavior if you want to
control how each dynamic item moves. You can independently add rotation
or movement, and set properties to control the motion. It requires more
development than the predefined behaviors, but will allow you to model
much more physical scenarios if you have a specific behavior in mind.
Advertisement
4. Dynamic Animator
Once you've created some dynamic behaviors, you will need a dynamic
animator to provide the context and calculations for the dynamic items
you want to animate. The dynamic animator will update your dynamic
items' position and rotation according to the dynamic behaviors. Create UIDynamicAnimator with initWithReferenceView: if you're going to animate individual views, or with initWithCollectionViewLayout: if you plan on animating a collection view.
Conclusion
There are new mechanisms in iOS 7 to help you implement subtle
animations without requiring lots of extra work. The views you want to
animate must be dynamic items, that is, they need to conform to the UIDyamicItem protocol.
You can then create one or more dynamic behaviors, instances of UIDynamicBehavior
or any of its subclasses, to represent the interactions you wish to
simulate. Finally, you pass the behaviors to a dynamic animator, which
is responsible for updating the position and rotation of your dynamic
items according to the behaviors you specified. In the next tutorial,
I'll show you a concrete example of these UIKit Dynamics in action.
You
already know how to add animations to objects in PowerPoint, but what
if you want more control over the individual animation timing and
arrangement? That's where the Animation Pane and Advanced Timeline in
PowerPoint come in. These are especially useful tools when you have a
lot of objects moving around and you want
to sync their timing.
The Animation Pane lists of the objects on a slide that
have animation applied. You can use it to reorder the animation sequence and
choose options for the animations. When objects have different durations and
get triggered automatically, their bars on the timeline indicate it with
different lengths. The timeline vaguely resembles what you might see in a
multimedia program like Adobe Flash, though it isn’t as extensive—but then, it doesn't need to be for what PowerPoint does.
In this tutorial, I'll show you how you can use the Animation Pane in PowerPoint to apply entrance, emphasis and
exit effects to text, tables, shapes, images, video clips and any other objects
on a slide that you can select.
Screencast
You
can follow along with this tutorial using your own PowerPoint
presentation if you'd like. Or if you prefer, download the zip file
included for this tutorial, which contains a sample presentation called timeline.pptx.
The presentation has 4 slides and no animations or
transitions applied. Play the presentation just to see how it looks. Either
click the Slide Show button on the bottom of the screen (right side in Windows,
left side on the Mac) or use the shortcut: F5 (Windows) or Ctrl-F5 (Mac). Then
just click through or press Enter to go through the slides.
Three Stages of Animation
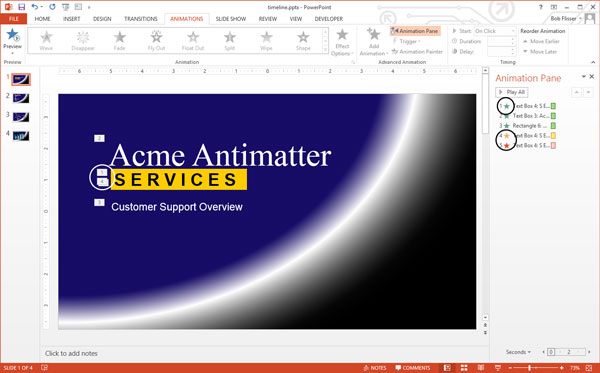
After you finish the slide show, go to slide 1. There are
three items to animate: company name, text in the yellow box, and subtitle
below the yellow box.
There are 3 available times of an object’s animation.
Entrance:
how the object first appears
Emphasis:
what the object does once it’s on the slide
Exit:
how the object leaves the slide
These timings can be exclusive, if you want. For example,
you can have an object that has an animated exit, but not an animated entrance.
Applying Entrance Animation
Let’s apply entrance effects to all three objects. Click
inside the company name (Acme Antimatter) and click the Animations tab on the ribbon. Apply animation in one of three ways,
as you can see in the screen capture, below:
Select an effect in the Animation section or
click the More button and select an
effect
Click the Add
Animation drop-down and select an animation
Click the Add
Animation drop-down, then click More
Entrance Effects, then choose one from the dialog box
Three ways of applying animation to an objectNotice the small “1” in the box next to it. Now apply entrance
effects to the other two objects the same way. The slide should now show a “2”
and a “3”, so it looks like this: Numbers attached to objects indicate the order of animation
Re-Ordering Animation in Windows
Since the yellow box text now comes in second, let’s change
it so it comes in first (the company name will then come in second).
In Windows, click the Animation Pane button on the ribbon.
That will display the pane on the right side, with the three objects listed. Object animation is listed in the Animation PaneEither drag the #2 item to the top, until you see a thin
horizontal bar at the top of the stack, OR select the #2 item and click the Up
Arrow on top of the stack. Re-order animation either by dragging list items in the Animation Pane or by using the Up and Down ArrowsOn the slide, the company name will now show a “2” box and the
yellow box text will show a “1” box. Run the slide again, and that will be the
order they appear.
Re-Ordering Animation on the Mac
The steps are similar on the Mac. Click the Reorder button, and that will display
the floating Custom Animation box, also with the three objects listed. On the Mac, use the Reorder button to change the order of animationEither drag the #2 item to the top (there won’t be any thin
bar to guide you), OR select the #2 item and click the Up Arrow below the stack
of objects.
Now it’s the same as in Windows: on the slide, the company
name will now show a “2” box, and the yellow box text will show a “1” box. Run
the slide again, and that will be the order they appear.
Applying Emphasis and Exit Animation
When you apply additional animation to the same object, the
timeline will display the object more than once. An object will be listed once
for each stage of animation.
Let’s add an emphasis to the yellow box text. Click anywhere
inside it, but if you’re using Windows, don’t just choose an animation from the
main part of the ribbon, or you’ll remove the box’s original animation. We want
to add an effect to the existing one,
so click the Add Animation drop-down
and select an emphasis animation from the list, or choose More Emphasis Effects
and choose one from the drop-down. To add additional animations, click the Add Animation button and choose from the listIf you’re using a Mac, you do select an emphasis effect from the list. Unlike the Windows
version, this will add an animation, and not
override the previous one.
Now use the same method to apply an exit effect.
The result is that the yellow box text has indicators on the
slide and in the timeline showing that it’s #1, 4 and 5 in the sequence. When an object has multiple animations, they're listed in the Animation PanePlay the presentation, and you see it comes in second, does
its emphasis, then exits before the company name and Customer Support text,
since they don’t have any exit effects. So two adjustments to make:
Make the emphasis last longer
Make all three items exit together
In the Animation Pane in the Windows version, put the mouse
pointer on the end of the #4 bar so that the mouse pointer becomes a 2-headed
arrow. Drag to the right, so the bar indicates that it’s now 2 or 3 seconds: Extend the duration of an animation by extending its bar on the timelineIf you’re using a Mac, the Animation Order box doesn’t have
timing bars. To increase the time of this effect, use the Duration box on the right side of the ribbon. (See screen capture,
below.)
Now click inside the Acme Antimatter text, then Shift-click inside the Customer Support
Overview text, so both text boxes become selected. The same way you did before,
add the same exit effect that you chose for the yellow box text.
If you run the presentation now, you’ll see that the yellow
box text still exits first. We want both #6 effects in the timeline to happen
concurrently with the #5 item. In Windows, either right-click it or click the drop-down
arrow and select Start With Previous. You can also choose With Previous from the Start drop down on the ribbon. Making an animation start when the previous event startsIf you’re using a Mac, select both #6 items in the Animation
Order box, click the Start drop-down,
then select With Previous. On the Mac, you can choose With Previous from the Start drop-down on the ribbonNow when you run the presentation, all 3 items will exit
simultaneously.
Controlling the Animation of Text
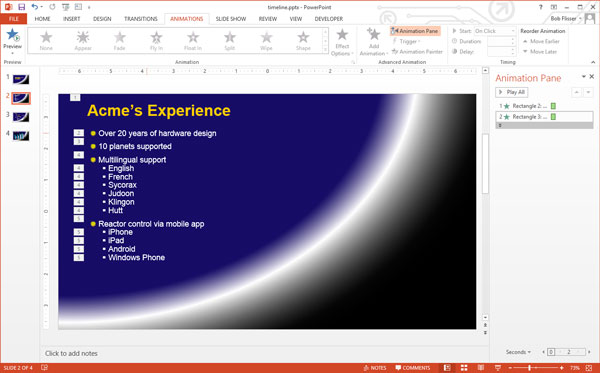
When you have a placeholder of bulleted text, you can
control how much of it comes in at once. Go to slide 2, which has a headline
and bullets on the first and second levels.
As before, select the headline and apply an entrance effect,
then do the same for the box of bulleted text. When you play the slide, you’ll
see that when there are second-level bullets, they enter all at once with the
first-level bullet above them. The numbering shows that will happen: By default, sub-bullets do their animation together with the bullets above themLet’s change that so each line comes in separately. In
Windows, click anywhere in the bullet text, then in the Animation Pane, either right-click
the second item or roll the mouse pointer over it and click the drop-down. From
the drop-down, choose either Effect
Options or Timing. Choose Effect Options or Timing from an object in the Animation Pane to change the sequencing of bulleted textA dialog box appears, and it has three tabs: Effect Options,
Timing, and Text Animation. Click the Text
Animation tab. Click the Group Text drop-down list and select By 2nd Level Paragraphs (or
a higher number). The Text Animation tab has a drop-down for "Group With" that determines how sub-bullets will be animatedClick OK, and you’ll get a preview of the animation running,
with each line of text coming in separately. Run the slide show to get a better
look.
This feature works mostly the same on the Mac. Instead of right-clicking
the item in the Animation Order box, you twirl open the Text Animations section. The choices are the same as in Windows. On the Mac, you control text animation timings using the Text Animation twirl-down section of the Custom Animation dialog
Controlling the Animation of a Chart
Chart animation is similar to text animation. Go to slide 3 of the presentation, which has
a simple column chart. Select the chart, then in the Animations tab of the ribbon, choose an entrance effect. You’ll see
a preview of the animation, which shows the whole chart entering at once. The
chart will be listed as one item in the Animation Pane. Charts get animated just like textYou can make the bars enter in various orders: each group
(year) entering at once, each series (set of 4 columns) entering at once, the
columns of each series entering one at a time, or each column entering one at a
time, from left to right.
In Windows, right-click the Chart 4 item in the Animation Pane, then select either Effect Options or Timing. In the dialog box that appears, click the Chart Animation tab. That tab has only
one thing in it: a drop-down list. Click it and make a choice, then click OK.
Try a few of them to see which one you like.
The Mac version also works like animating text. After
applying the animation, make the adjustments in the Chart Animations twirl-down section of the Custom Animation box or with the Effect Options button on the
ribbon. On the Mac, use the Chart Animations twirl-down section to control the timings of chart pieces
Synchronize Automatic Timings
The Animation Pane is especially helpful when object
animations run automatically, rather than with a mouse click. The main
difference between the Windows and Mac versions is that the Mac doesn’t display
an actual timeline, with horizontal bars. Otherwise, the capabilities of the
Custom Animation dialog box are the same.
Go to slide 4 of the timeline presentation. The horizontal
arrow is one object, and if you click one of the thumbnail images, you’ll see it’s
grouped with the description, arrow and month. We’ll apply animation to the horizontal
arrow, then to each of these groups. In
the included sample file, the month name, description, arrow and
thumbnail of each month's objects are grouped, so they will all get
animated together
Animating the Horizontal Arrow
Select the horizontal arrow, and from the Animations tab,
apply a Wipe transition. Click Effect Options and choose From Left. On the Mac, it’s the same
thing, and you’ll find the Effect Options section as a twirl-down in the Custom
Animation toolbox and also on the ribbon. After applying the Wipe effect to the main arrow, make it wipe from left to rightOn the right side of the ribbon, note the Timing group, which has settings for Start, Duration and Delay
options. For the horizontal bar, leave the default settings, which should be:
Start: On click
Duration: half second
Delay: none
On the Mac, these options are in the Timing twirl-down section of the Custom Animation toolbox.
Preview the slide, if you want.
Advertisement
Animating the Groups of Objects
Select the first group (“Acme Purchases Tablets”). It’s
easiest to select the group by clicking the image thumbnail. On the ribbon, choose
the Wipe effect, and make it wipe upwards, which should be the default
direction. Use these timings:
Start after previous
Duration: half second
Delay: 1 second
This means that 1 second after the horizontal bar finishes,
this group of objects will spend half a second wiping upwards.
A quick way of applying the same settings to the other two
groups of objects that are above the bar is to use the Animation Painter. Leave
the first group selected, then on the ribbon bar, double-click the Animation Painter. Now click the other
two thumbnails above the horizontal bar.
Since you’re done with the Animation Painter for a moment,
you need to exit it. Either press the Esc
key or click the Animation Painter. The mouse pointer will become normal,
again.
If you’re using the Mac, there is no Animation Painter. You
have to apply the animation to the other groups manually, as you just did with
the first group.
Now animate the two groups below the horizontal arrow. Select
the first group, apply the Wipe effect, and have it wipe downwards from the top.
Make sure it uses the same timings as the others:
Start after previous
Duration: half second
Delay: 1 second
In the Windows version, click the Animation Painter (only a
single-click, this time), then click the Stock Fluctuations group. In the Mac
version, manually apply the animation to the other groups.
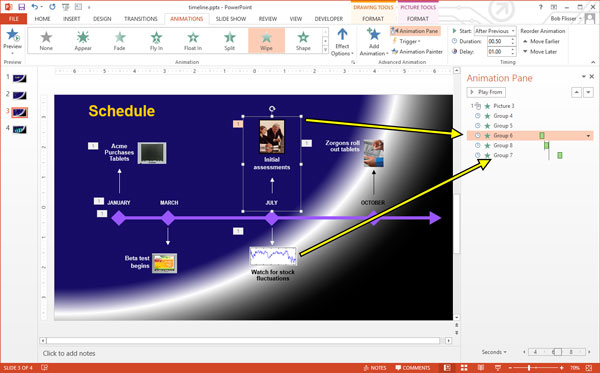
The slide should now look like the screen capture below,
with the timeline showing the progression of the animations. Note there is only
1 mouse icon in the Animation Pane: it shows that we have to click (or press
Enter) just once. That will make the horizontal arrow come in, and everything
else will follow automatically. After applying animation to all the groups, the timeline shows the sequencePreview the slide. It’s almost right, except the group below
July should wipe down simultaneously with the group above July wiping up.
Click the top July item, and notice that it’s Group 6, which
is 4th on the list. The bottom July item is Group 7, which is 6th
(last) on the list. When you select a group, you'll see its position in the Animation PaneBump Group 7 up in the Animation Pane one spot, so it’s just
below Group 6. Set the timings as follows:
Start: with previous
Duration: half second
Delay: 1 second
In the Windows version, that makes the green bars for Groups
6 and 7 run concurrently in the timeline. But now the last group needs to be
delayed for 1 second, so you can either drag its green bar to the right, or
select the group and set the delay to 1 second.
Also notice that below the timeline, there is a scale of
seconds. You can drag the box on this scale left or right to see all the timings. To
change animation timings, either use the Timing controls on the ribbon,
or drag and resize the horizontal bars in the timelinePreview the slide when you’re done.
Conclusion
PowerPoint’s Animation Pane and timeline are great features
that give you detailed control over object animations. Remember that to use it,
you apply an animation first, then choose an option in the Animation Pane or
toolbox on the Mac. And don’t forget that some of the most important features
are in the third tab of a pop-up dialog box from a right-click menu.
This
tutorial will examine some of the advanced features in QuickTime X.
We'll go over sharing, audio and video recording, screen recording and
more.
QuickTime
QuickTime has been the standard media player of the Mac operating
system for many years. It has gone through various iterations over the
past two decades, beginning with the release of Version 1 in 1991.
QuickTime X originally shipped with Mac OS X 10.6 (Snow Leopard).
Apple used to have two versions of the media player, a free, very basic
version and a paid, more robust version. I'll be honest - I've never
used the Pro version of QuickTime, so my usage up until this release was
just basic media playback.
The Pro version is gone, and some great new features have been added to the standard version that are available for everyone.
Many of us have been standard (free) users forever. But we couldn’t
justify the cost to purchase the "Pro" version, offering functionality
that was done better by other applications. Things have changed with
QuickTime X. The Pro version is gone, and some great new features have
been added to the standard version that are available for everyone.
Let’s take a look at some of them!
Share to YouTube
Sharing your movies to YouTube directly from the QuickTime interface
is now possible, and QuickTime X makes this process dead simple.
This probably goes without saying, but I'll say it anyway, you will need a YouTube account for this to actually work.
With the video you wish to upload to YouTube loaded, select the Share option from the menu bar and pick the YouTube
option (you’ll also see an iTunes and MobileMe Gallery as well). The
first time you use this feature, you'll be asked to enter in your
YouTube credentials. Check the option to store in the system keychain
and you won't have to do that again.
YouTube Share Dialog
Fill in the necessary information in the dialog box and click next to
start the process to upload the movie to YouTube. You'll see a message
box displaying the progress of the upload. That's it. You're done.
There’s no need to do any converting or anything like that. QuickTime
takes care of the whole process for you.
This integration is very helpful for those (like me) that have great
intentions of sharing a video to YouTube and end up not feeling like
taking the time to go through the extra few steps. I know it's not
difficult, but with this built directly into QuickTime, it's much more
likely that I'll upload a video to YouTube right after I save it to my
Mac.
Video and Audio Recording
QuickTime X has the ability to record audio and video. This was
previously only a Pro capability, but is now included as a basic feature
in Version X. It is very easy to complete a surprisingly professional
audio or video recording.
Audio
From the File menu, select New Audio Recording and off
you go. The audio recording controls will load. To kick off your audio
recording just click the record button. Whatever mic you have set as
your default system mic will be used to record the audio. You’ll know
you’re recording when you see the time start ticking away along with
jumping audio level indicators.
I actually used this recently to record a Google Voice call and it
worked beautifully. The simplicity of the audio recording is where this
really becomes useful. From loading QuickTime to starting an audio
recording takes all of 10 seconds, and about three clicks.
Some very minor editing is possible with QuickTime as well. From the Edit menu you'll see a Trim
option. This will allow you to trim from the beginning or end of your
recording. It's not much, but if you're just doing a basic recording
(which you more than likely are) it may be all you're looking to be able
to do. Again, the simplicity of this process makes this a really nice
little feature.
Audio Trim
Sharing an audio recording is, unfortunately, not possible through
the QuickTime interface. I could see it handy to be able to at least
share to iTunes or MobleMe, but that option isn't available with an
audio only recording. If you're a podcaster, more than likely you'll be
using some other more audio specific software to edit and produce your
audio so it probably isn't a big deal.
Like I mentioned, I think the audio recording will see it’s best use
for those instances when you need a quick, simple recording.
Video
A video recording takes the exact same process as does an audio recording with the obvious exception of selecting the New Movie Recording option from the File
menu. Your iSight/FaceTime camera will turn on, and you’ll see live
video with controls on the screen. Again, whatever camera is set to your
system default will be shown right away.
There’s a small drop-down arrow that will allow you to select any
other installed cameras to use as the video source along with option
change to other available microphones, change quality settings for the
video (medium, high or max) and also an option to choose save to location.
Audio Trim
As with the audio recording, simply click the record button to begin
the recording. You’ll see the time begin to tick and the audio
indicators will begin bouncing as well. Click the stop button when
you’re finished. Save it and/or share it.
It is also easy to trim a video. It’s basically the same process as trimming an audio recording. Select Trim from the Edit
menu. You’ll see a timeline at the bottom of the video and you’ll be
able to trim from either the beginning or end. As with the audio
trimming, if you’re looking to do some more in depth editing, you’ll be
looking to other software (something like iMovie), but it is certainly a
handy tool for a quick trim.
Movie Trim
Screen Recording
This is probably the most interesting and I think least-known use for
QuickTime X. This will essentially allow you to do a video recording of
what you’re doing on your screen. Whatever windows you open. Wherever
you click. Whatever you do will be recorded.
To start a screen recording select New Screen Recording from the File
menu. The screen recording control will appear. You’ll see a small drop
down arrow once again that will allow you to change some settings.
You’ll be able to change the quality of the recording, the save to
location and you’re also able to pick a microphone if you’d like to add
audio into your screen recording. Click the record button to begin
recording.
Screen Recording Stop
The recording controls disappear and you’ll then just see a small stop
control on the menu bar. That does just what it says, stops the
recording and your recording will open up for your review
(Command-Control-Esc will stop the recording as well). Trim, save, or
share as you’d like.
Conclusion
The common theme of this post is really that the new features of
QuickTime X are an excellent way to accomplish a few simple media tasks
very well. For former Pro users, these features don’t seem like that big
of a deal, but for those of us basic users, these are fantastic.
QuickTime has been around for a long time, and I think it has been
easy to cruise by the updates and just take for granted that it is going
to be another update to a standard media player (for the non-Pros).
This update changed a lot, and made QuickTime a tool that can be
useful to just about everyone. The functionality is so simple and quick
to use while still producing fantastic results it’s really a difficult
application to overlook.
Instrumental
in Apple's well-documented comeback from the brink of disaster was the
launch of OS X, an operating system which seemed to herald a new age for
Apple and since then, the Cupertino alumni have never looked back,
increasing sales each year and ultimately dominating the home computer
market.
But what about OS 9? Well, despite the public funeral
Jobs gave the venerable Mac OS 9 on a 2002 Keynote, it is still being
used and even developed for, with users attracted to its speed, unique
UI and, most importantly, the untold wealth of applications which have
never made the leap over to OS X.
If you've only become familiar with Apple computers since OS X like
myself, you may be forgiven for having no idea about this rich software
history which is just waiting to be explored, read on below to see how
you can get started!
Getting Bitten By The OS 9 Bug
I recently wrote a guide to setting up a beater Mac with
a G4 and OS X Tiger. While I still stand behind the article (and indeed
am using that same Mac to write this very piece), it was something of a
learning experience and I've since realized I was a little too hasty to
dismiss anything pre-Tiger as too old to be useful for users today. I
have come to realize that even the oldest of Macs can be useful and
attract talented enthusiasts hell-bent on keeping the machines capable
of productivity in a post-internet world. So why go so low as OS 9?
Well, beyond the fact that it's simply good geeky fun to have a play
with older systems and software, there's actually a lot of compelling
software available for OS 9. Aside from the myriad of Word Processing
applications, Graphics and Music software, Task Management and Number
Crunching tools, there is one particular area in which OS 9 excels which
may surprise you: retro-gaming, with countless titles to have fun with,
such as X-Plane 6, Caesar I, II & III, Another World, Descent and
more.
Tip: OS 9 is often referred to as Classic, though
I've kept away from this term to save confusion when I discuss Apple's
own emulation software which goes by the same name.
Then there's abandonware:
The legality of abandonware
is arguably dubious, but unlike popular 1980's console games, we're
talking about niche software which cannot really be bought in any
quantity, is no longer supported and cannot be run on any modern machine
without significant knowledge and time spent. This is software which
the developers have, quite literally, abandoned and so is generally
considered fair game. I'm not going to talk you through finding your own
abandonware here, but suffice to say it's a very simple matter to
discover titles to download - just make sure that the game or
application is not still for sale anywhere, as on occasion (such as Text Edit Plus), the developer will be actively selling it.
Before getting started, here's a disclaimer:
This guide is not aimed toward the complete novice. Rather, I hope to
appeal to the kind of people who like to tinker, who like to reminisce
and who enjoy doing cool things with their machines. If you want
everything to work in the flawless fashion we've come to expect from the
modern Apple experience, then turn away now!
Planning Your Route To OS 9: Vintage
The simplest and most direct way to run OS 9 applications is by
booting into the OS natively on an older Mac such as an iBook G3
Clamshell, which can be picked up very cheaply - as in the cost of a
night at the movies cheap. Be aware that if OS 9 is not already
installed, you will either need to install it yourself and pick up a
copy of OS 9, or stay in OS X and run OS 9 applications in Classic,
which I'll cover in more detail below.
Tip: This Wikipedia page highlights Mac OS 9 compatibility, though I found this guide on Every Mac a little easier to follow.
Planning Your Route To OS 9: Classic
If you already own a PowerPC Mac running any version of OS X up to
and including Tiger, you can employ Apple's own built-in emulation
software 'Classic' to run OS 9 applications and games. As with any
emulator, there is some software out there which may not run perfectly,
though everything I've been able to test has run flawlessly and so this
is my own favored method of using OS 9 software.
There's a lot of confusion on the internet when looking up how
Classic actually works, so I'm going to break it down below using a
method which I've tested on a G3 and G4 running both Tiger and Panther
with no issues - I understand that each earlier iteration of OS X should
work too.
First step, System Folder
Copying OS 9's System folder to OS X Tiger
This is probably the single biggest challenge of running Classic. If
you decide that Classic is for you, then you're going to need a working
System folder, which can come from the hard drive of an OS 9 running
Mac, or an install disc. It's a shame that Apple doesn't sell copies of
OS 9 or at least offer a download of the System folder because it drives
people to pirate copies for lack of availability. While I can't condone
breaking any copyright laws, if you are able to grab an OS 9 System
folder off an old Mac then you'll be in good shape, otherwise there's
always garage sales and online auctions.
In order to copy an OS 9 System folder, simply boot into the older
Mac in question, then make sure it's fully updated. If this is the case,
copy and paste into an external drive (I used an iPod) and put it
somewhere safe on your other, newer Mac. It doesn't need to be in the
root of your newer Mac's hard drive, so a suitable choice could be in
your User folder.
OS 9.2.2 isn't technically mandatory for Classic, though it is very
much recommended you use this updated version since it will likely save
installation headaches (I haven't managed to run Classic successfully on
earlier updates of OS 9, such as 9.0.4).
Second Step, Run Classic
Tiger's System Preferences should now contain the 'Classic' pane
Upon copying OS 9's System folder over to your newer Mac, navigate to
OS X's System Preferences. Within System Preferences, the 'Classic'
preference pane should appear (as shown in the screenshot above), from
which you can tweak options such as whether to automatically start
Classic on boot or not. Classic is relatively light on resources and
robust, in addition to providing a seamless experience, somewhat
comparable to using Windows on your Mac with the aid of VMWare - you
can even keep your OS 9 apps right in your dock as you would normally!
Tip: to use OS 9 software, you can simply drag and drop into your usual Applications folder
Why Not Intel?
There are two popular applications for running OS 9 on PPC Macs
running Leopard and Intel Macs running any version of OSX, these are
called Sheepshaver and Basilisk II - so why aren't I recommending you make use of them?
Well, after five days intensive testing of Sheepshaver and Basilisk
II on two Intel Macs running Snow Leopard and Lion, plus some time spent
using it on a PPC Mac running Leopard, I felt that it was not up to the
task of running OS 9 satisfactorily enough for me to potentially
encourage you to spend your time and money trying them out - that's not
to say it can't be done and indeed, many people use the applications and
love them, but I'm not going to recommend embarking upon something so
complex if it doesn't pay off with enough of a user experience.
In addition to this complexity and somewhat disappointing user
experience, setting these programs up often means breaking Apple's
copyright policies or taking a long route around to avoid doing so.
Ploughing Ahead
Having said all that, if you're really determined to give OS 9 a try
on an Intel Mac and feel savvy enough to delve right in, I'll briefly
list some tips to point you in the right direction:
The official installation guidelines for Sheepshaver are laid out here and you can download the latest version from here.
Sheepshaver has the best support for OS 9 but there is also a popular
method of installing old versions of Mac OS using Basilisk II (download
here)
detailed in a blog not affiliated with the Basilisk II developers - I'm
not going to link to this blog as it also contains ancient but
copyrighted Apple software, however a quick search for “redundant robot
sheepshaver” (without quotes) will get you there.
OS 9.0.4
Frustratingly, Sheepshaver needs a slightly earlier version of OS 9
(9.0.4) than is recommended for Classic and so adds yet another level of
complexity to those wishing to test both methods. Though specific
system installation discs can apparently be modified to work, it's best
to aim for a retail version of OS 9 if at all possible.
OS X Lion
OS X Lion does currently work with Sheepshaver but it has
issues entering fullscreen and seems overall a little more unstable.
There does appear to be an updated version in the works, however.
Using OS 9 Applications
So now all the hard work is done, what kind of OS 9 Applications
should you use? Well, there's really so many that they are worthy of a
whole article for themselves and a quick look around the internet should
point you in the direction of a thriving scene of OS 9 enthusiasts.
That said, here's a few quick picks which caught my attention:
Classilla Internet Browser
OS 9 web browser Classilla running within OS X Tiger via Classic
OS 9 can be used with an old version of Microsoft's Internet Explorer
but using it is not really much fun. Luckily for us, web browser
Classilla is available for free download and is still being developed.
When one considers the age of the operating system it is running
within, Classilla loads websites very quickly and renders most with
ease. Obviously Classilla is not as standards compliant as huge modern
projects like Google Chrome or Safari, but it is no hardship to use by
any means - give it a try and I think you'll be pleasantly surprised!
Click here to download Classilla.
AppleWorks 6
AppleWorks' wordprocessor is more than a little reminiscent of Pages
In use, AppleWorks
feels like a precursor to iWork and though it may not be as slick and
modern as iWork, it is still an impressively productive suite of tools
in its own right, more capable of being used for real work.
AppleWorks contains several applications, such as; a word processor,
painting program, drawing program, spreadsheet, database and a
presentation application.
Advertisement
Caesar II
Caesar II is one of many classic games which never made it to OS X
I'm a hopeless ancient history nerd so love games like Rome:Total War
and Caesar II is a classic of the genre which deserves to be ranked
among the best. With somewhat similar gameplay to Sid Meir's
Civilization, Caesar II tasks the user with creating a city and
province, then steering them to greatness, dealing with the usual
disasters which one would expect.
Conclusion
Unfortunately, it would be impossible to cover every aspect of OS 9
in one article, it's simply too vast! Nevertheless, I do hope that this
guide will serve to whet your appetite and highlight the incredible
potential buried in this comparatively ancient operating system.
If you've got any recommendations of OS 9 software which I haven't covered here, please let us know about them in the comments.
We've
all done it. We bring home our shiny new Mac and we fire up all of the
standard apps. We get our iChat account set up, link Mail.app with our
mail accounts, and start putting dates into iCal. We import our music
into iTunes and sync it up with our iPhones so that everything stays in
order. Once we're all set up, we launch Safari and we're off.
But tucked away in the Applications folder of every Mac is a
collection of gems that many users may never even notice are there: the
Utilities folder. There are several applications in the Utilities
folder, many of which likely won't appeal to you. Today, however, I've
selected a few of the most useful utilities with which to get
acquainted. So let's get started.
Airport Utility
After much deliberation, I've opted to discuss Airport Utility first.
After all, if you're like me, your computer turns into a shiny aluminum
brick if the Internet goes out.
Airport Utility got a iOS-esque interface redesign somewhat recently
Airport Utility, for most people, will run once you get the Internet
set up and will rarely (or never) get launched again. However, it's
important be aware of some of the power packed into Airport Utility in
case you ever need it. You'll want to visit this app any time you want
to set or change the password for your wireless network, change the name
of your wireless network, or add a device (such as an Airport Express
or a Time Capsule) to your network.
And of course, as with most apps on this list, Airport Utility packs a
whole host of features for the more network-inclined users.
System Information
Another utility that I deemed worthy of a spot near the top of the
list, System Information catalogues all the specifications for the
machine you're using. You'll want to be intimately familiar with this
information if you ever need to get over-the-phone technical support.
System Information catalogs the more technical information about your machine's hardware and software
Not only does System Information give you excruciatingly detailed
data on the hardware inside your machine, but if you scroll down in the
sidebar a bit further, you might be surprised at how much information
you can learn about your network or the software installed on your
computer as well. Do some exploring and see what you can find out about
your Mac!
Activity Monitor
Activity Monitor is one of my favorite apps in the Utilities folder,
as it can be extremely useful when trying to pinpoint a problem on your
Mac. If things are running sluggishly, or if your computer is exhibiting
some annoying behavior that is out of the ordinary, there is likely a
rogue process to blame. And Activity Monitor will help you find it.
Activity Monitor
In addition to listing all of the processes being executed (and being
able to sort them in various ways), Activity Monitor is also capable of
giving you detailed in formation on CPU usage, disk usage, memory
usage, and network behavior.
Keychain
Keychain is one of those apps that might only be useful to you once
in a very long while, but I promise you, if you think to use it, you
will be very relieved.
A repository for all of your secure data keys
Keychain is where your operating system stores of all of those
passwords and keys that you need to have, but don't necessarily need to
use every single time you use something. For example, your iChat login
credentials will be here, as will the password for your secure wifi
network.
The relief to which I'm referring above came to me like this: I had a
friend visit from out of town for the weekend and he brought his
laptop. After getting settled, he opened up his computer and asked me
"What's your network password?" I panicked. I knew that my password was a
complex alphanumeric key, but I hadn't the slightest idea of what it
was. My computer remembers it, so I rarely have to know it off the top
of my head. And of course, like a fool, I hadn't written it down
anywhere. I took to Keychain to find the password for my wifi network,
and the day was saved.
Grab
This little guy deserves a mention on this list, despite it's
downfalls, which I'll cover in a moment. First, the short version: Grab
is a screenshot utility.
Grab
Now, even the most un-savvy user is likely to be aware of our
shift-cmd-3. As Mac users, it's our Print Screen key. And we've even got
shift-cmd-4 for capturing a section of the screen as an image. Grab,
however, gives you some (but not much) more functionality when taking
screenshots (such as the ability to include a cursor).
I work with screenshots on a daily basis, so I've gone ahead and
invested in a decent set of tools for managing them. However, not all
users would find that a cost effective option, on the rare occasion that
they might need a bit of extra "oomph" in their screenshots. For those
users, knowing that Grab is there can definitely be very handy.
Terminal
Ah yes, Terminal. I'm no command-line ninja, so I won't be giving you
the ins and outs right here, but it's definitely worth noting that
Terminal will give you access to your system in ways that your graphical
interface can not.
Terminal is a powerful tool for those who know how to use it
We recently kicked off a series of posts detailing how to use Terminal, so check it out here if you're interested in learning more.
Advertisement
Migration Assistant
As the final entry on our list of Utilities you should know about, I
offer up Migration Assistant. Our PC-using friends will find this
utility especially helpful, as Migration Assistant will make it a breeze
to transfer data from their Windows machine to a Mac (or from Mac to
Mac!).
Of course, you can also transfer data from your old Mac to a new Mac
Basically, if you buy a new Mac and need to copy over any data from your old machine, this should be your first stop.
There You Have It
As I said before, these are only a handful of the apps in your
Utilities folder that I thought you might find useful. There are several
others that you might find right up your alley, so poke around* and see
what you find!
*Please exercise caution, as certain apps (like Terminal and Console)
have the capacity to make potentially dangerous changes to your machine
if you don't know what you're doing.
Medical Disclaimer
The information on this site is not intended or implied to be a substitute for professional medical advice, diagnosis or treatment. All content, including text, graphics, images and information, contained on or available through this web site is for general information purposes only. Krobknea makes no representation and assumes no responsibility for the accuracy of information contained on or available through this web site, and such information is subject to change without notice. You are encouraged to confirm any information obtained from or through this web site with other sources, and review all information regarding any medical condition or treatment with your physician. NEVER DISREGARD PROFESSIONAL MEDICAL ADVICE OR DELAY SEEKING MEDICAL TREATMENT BECAUSE OF SOMETHING YOU HAVE READ ON OR ACCESSED THROUGH THIS WEB SITE.


.webp)

