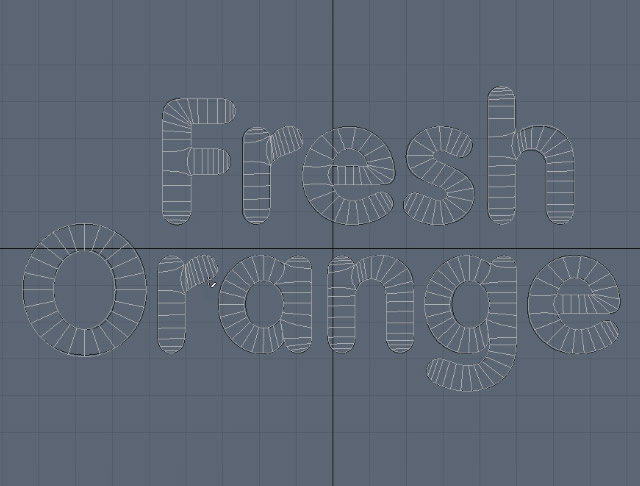
What You'll Be Creating3D
text is very popular in the advertising industry. 3D text effects are
often used in print or television campaigns, and are popular because
they literally stand out on the page or screen. Creating a realistic 3D
text effect can be quite challenging to create, and often make use of
several applications. In this tutorial, we will use a combination of
Modo, Photoshop, and Illustrator to create a fruit textured text effect
that resembles an orange. Let's get started!
Speed Art Video
Tutorial Assets
The following assets were used during the production of this
tutorial. Please download them before you begin. If they are not
available, or if you don't want pay for them, you may need to find
alternatives.
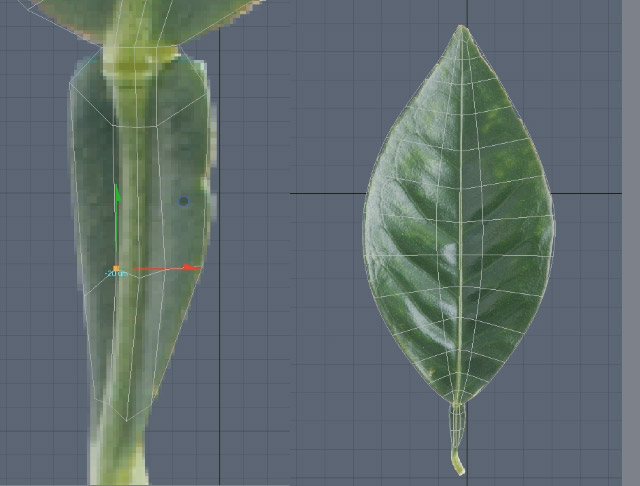
Open picture: photodune-536588-orange-leafs-m.jpg.
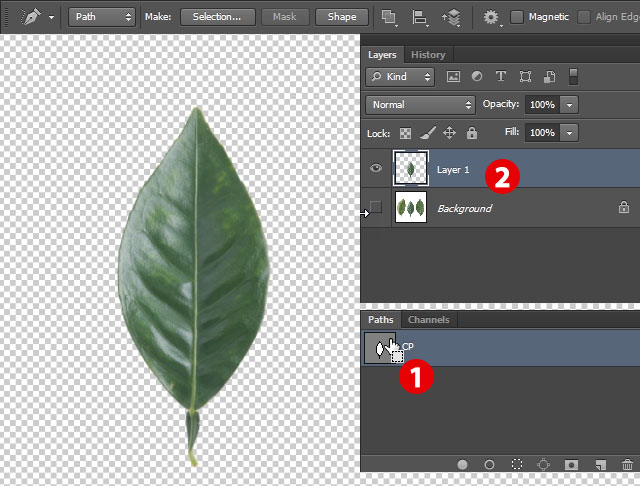
In Paths panel, create new path [1].
Change its name to CP.
Activate Pen Tool and draw path around center leaf.
Step 2
Create selection from path [1].
Press J to create new layer.
Step 3
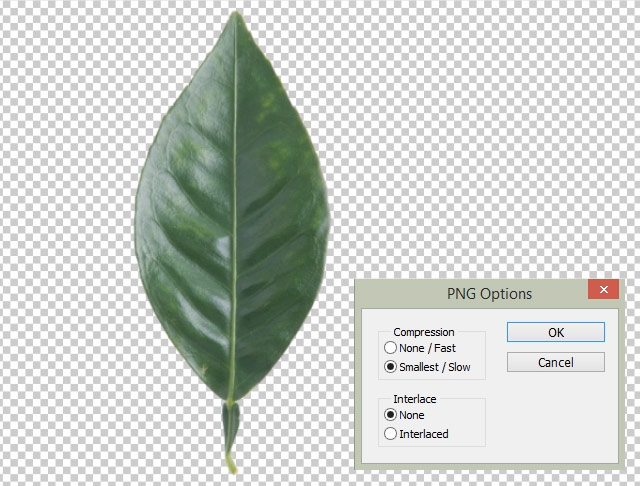
Turn off visibility of Background and save image as PNG file.
From PNG options choose like on the screen below.
2. Create Outline Text in Illustrator
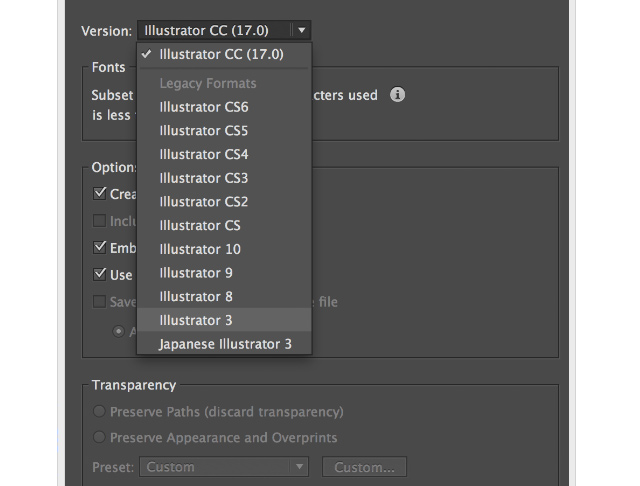
Step 1
Modo can read EPS files but only saved as
Illustrator 8 or 3 file. So to be able to import shapes to 3D
application, open Illustrator and do the following:
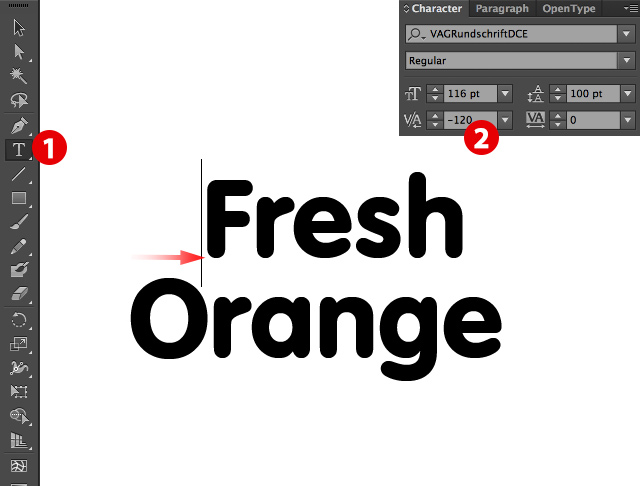
Create new A4 document.
Activate Text Tool (T) [1] and type Fresh Orange.
Change V/A settings to -120 to move Fresh word to a new position.
Step 2
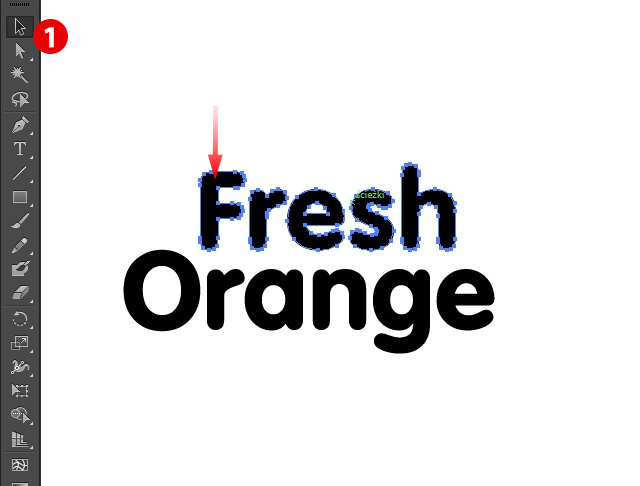
Press Command/Ctrl-Shift-O to create outlines from text.
Select [1] Fresh word and move it down like on screen grab.
Step 3
Save file as Illustrator 3 Fresh Orange.eps file.
3. Create Texture and Base for 3D Models
Step 1
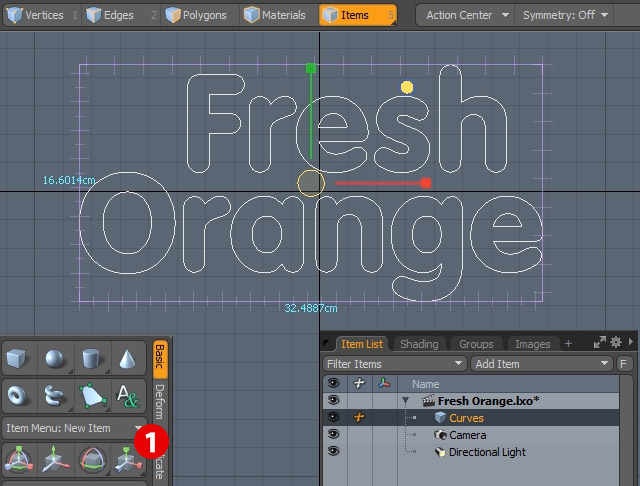
Now open Modo and import EPS file that you created.
Select Curves item in Item List.
Go to View > Dimensions Tool(This way Modo will display dimensions of the selected object)
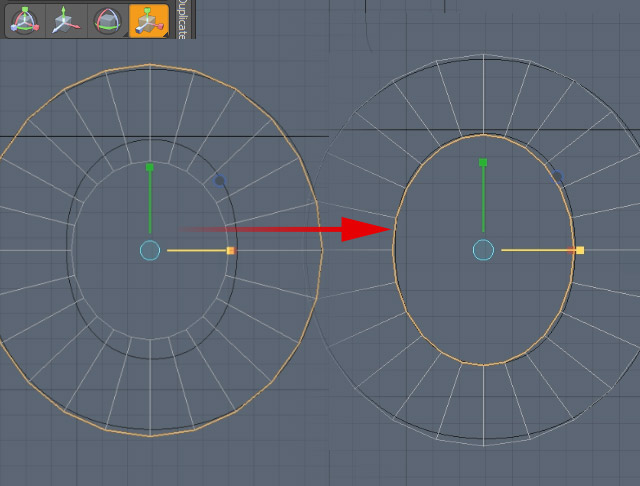
Press R to activate Scale Tool [1].
Scale shape to 32.5 cm on X and 16.6 cm on Y. (To scale both axis the same time press little circle in right corner in tool handles.)
Go to View > Dimensions Tool to turn off dimensions.
Step 2
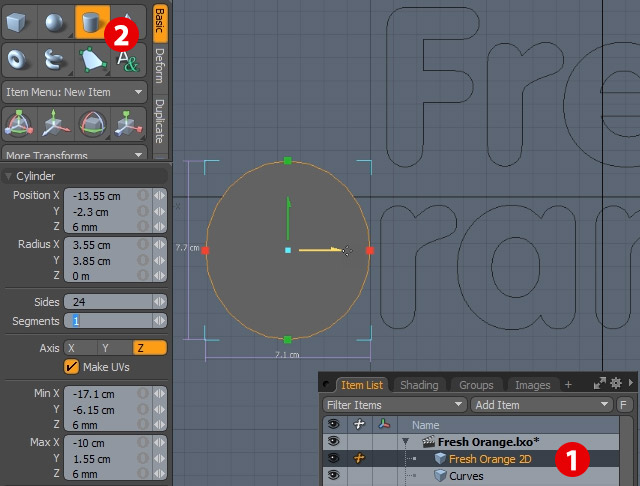
Press N to create new Mesh Item.
Change its name to: Fresh Orange 2D. [1]
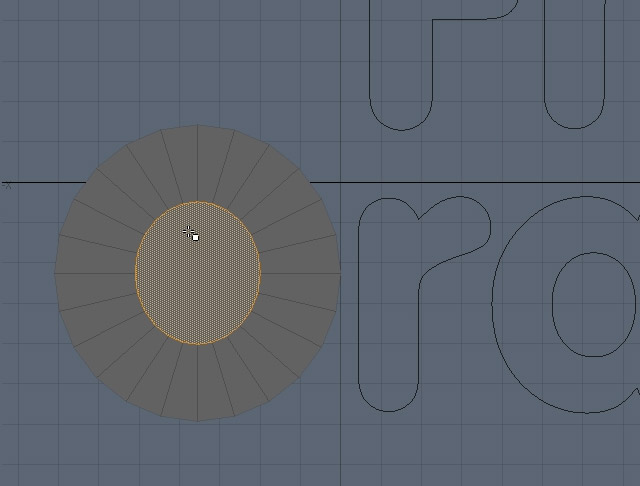
Activate Cylinder Tool [2].
Set Sides to 24.
Set Segments to 1.
Place circle like on screen below and press Space Bar to drop the tool.
Step 3
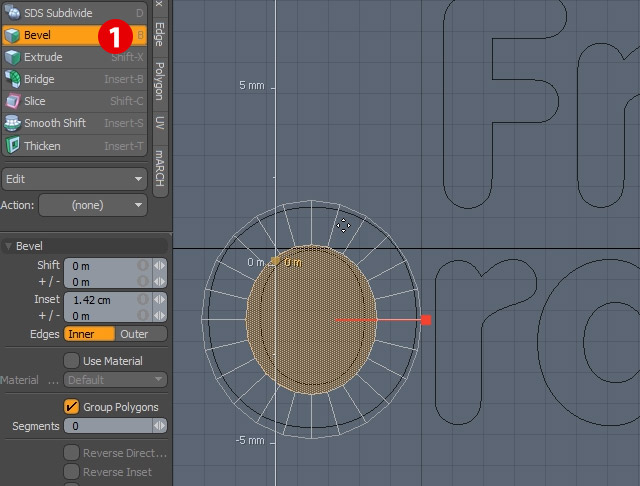
Press 7 on keyboard to see geometry in Wireframe mode.
In Polygon Mode select circle.
Press B to activate Bevel Tool [1] and inset it using red handle.
Step 4
Press 4 on keyboard to see geometry in Shaded mode.
Delete middle circle.
Step 5
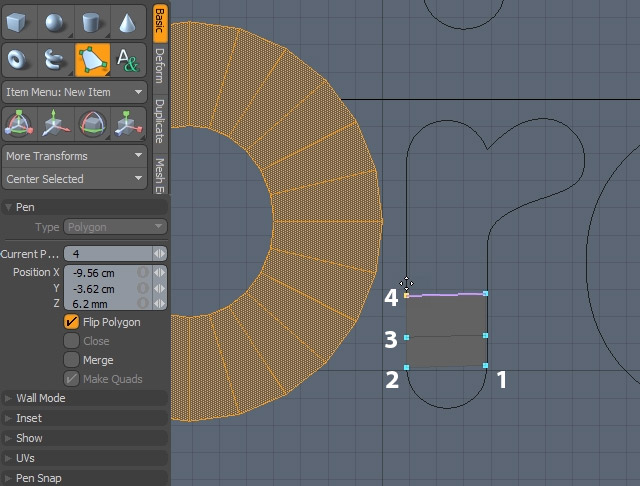
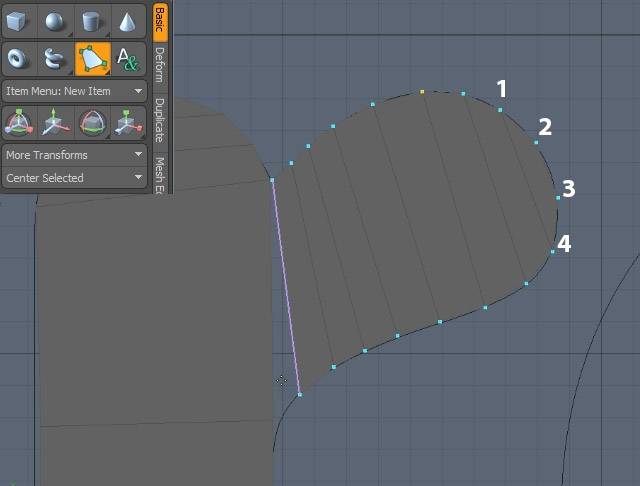
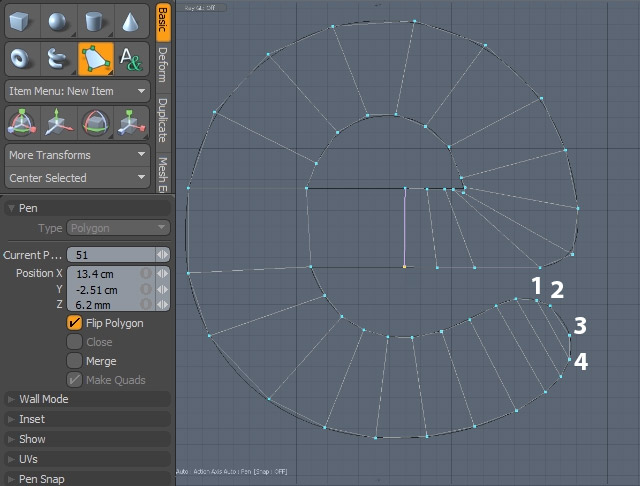
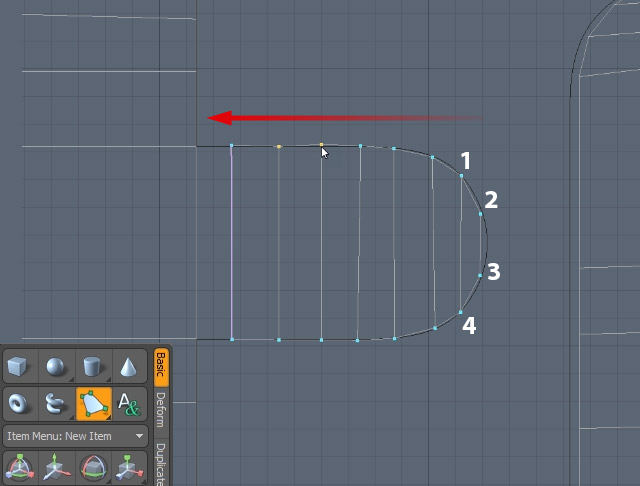
Now you will create rest of the letters. Using Modo's Pen Tool is fast and effective. You will have great topology straight away and your text will look perfect after extrusion.
Active Pen Tool in basic tools palette.
Make sure that Make Quads option is turn on in Tool properties.
Place vertices like on the screen. (Make sure that you place them in right order 1, 2, 3, 4 this way Modo will know where to place quads.)
Step 6
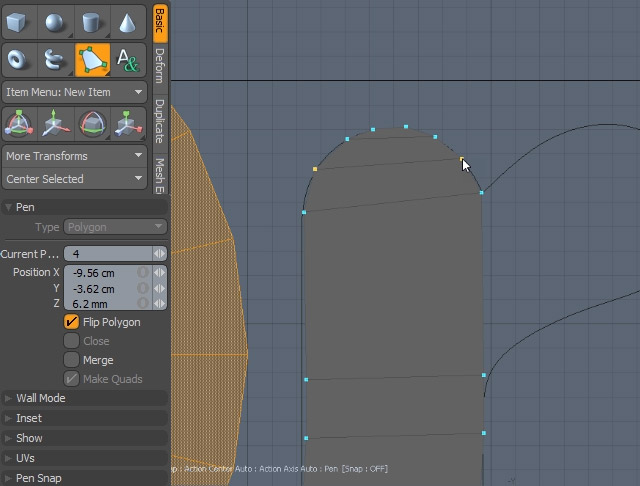
While the tool is active you can reposition each vertex to your
needs. You don't have to make dense geometry, just follow shape of the
letters. Press Space Bar to drop the tool.
Step 7
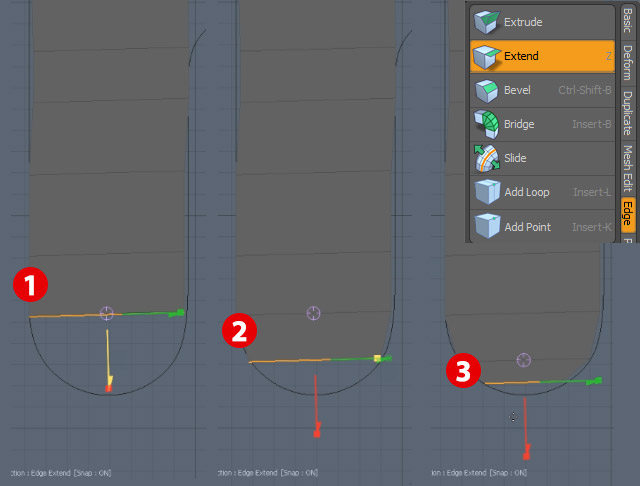
Once you drop the Pen Tool there is no way to draw vertices on bottom side of the letter. You can use different tool to start adding geometry there.
Press 2 to go to Edge Mode.
Select last edge on the bottom and press (Z) to activate Edge Extend Tool.
Pull down edge using red arrow of the Tool gizmo [1].
Then press Shift key and click on the screen to reactivate tool [2].
You can scale edge by selecting square end of green arrow.
Do it one more time [3].
Press Space Bar to drop the tool.
Step 8
Finish letter "r".
Activate Pen Tool again
Draw Vertices in 1, 2, 3, 4 order.
Add points until you reach previously created geometry.
Press Space Bar to drop the tool.
Step 9
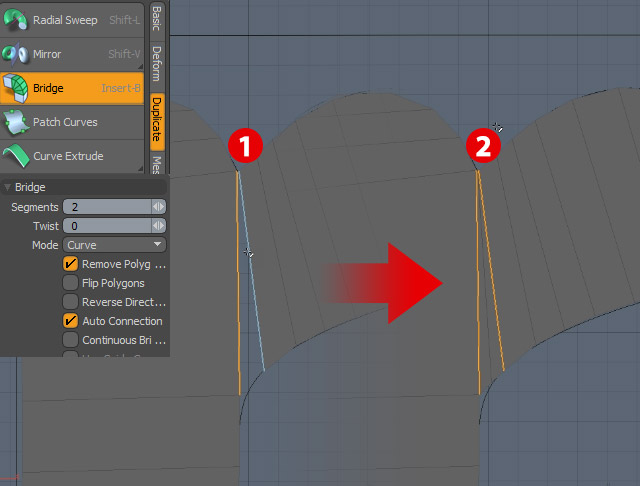
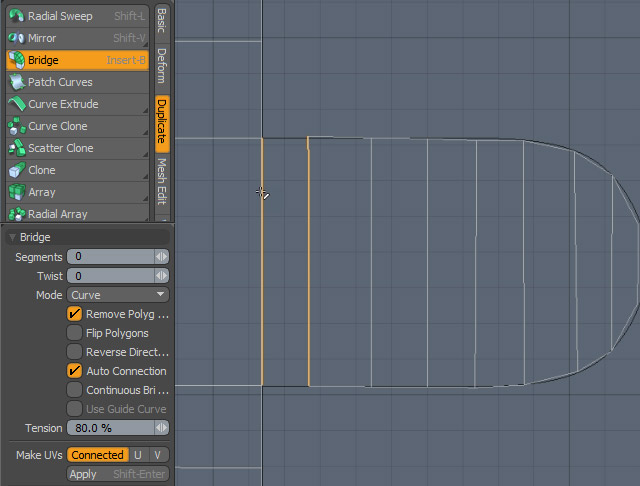
Now you will stitch both parts of geometry.
In Edge Mode (2) select edges that are opposite to each other.
In Modo tools go to Duplicate > Bridge and press on the screen.
Set Segments to 2.
Press Space Bar to drop the tool.
Step 10
To speed up modeling you can copy existing polygons to new positions.
In Polygon Mode (3) double click on letter O.
Press Command/Ctrl-C to copy polys and press Command/Ctrl-V to paste them.
Activate Move Tool (W) and move geometry over the letter a.
Step 11
Now adjust size to match background shape.
Activate Scale Tool (R).
Scale polygons accordingly.
Step 12
Now turn circle into letter "a".
Select polygons and delete them.
Activate Element Move Tool (T). (This tool is
special, so it will select Vertices, Edges or Polygons that will be
under cursor and you will be able to move them.)
Step 13
Now draw rest of the letter "a". Use Pen Tool for that. This time draw in 3D viewport set to Wireframe mode.
Step 14
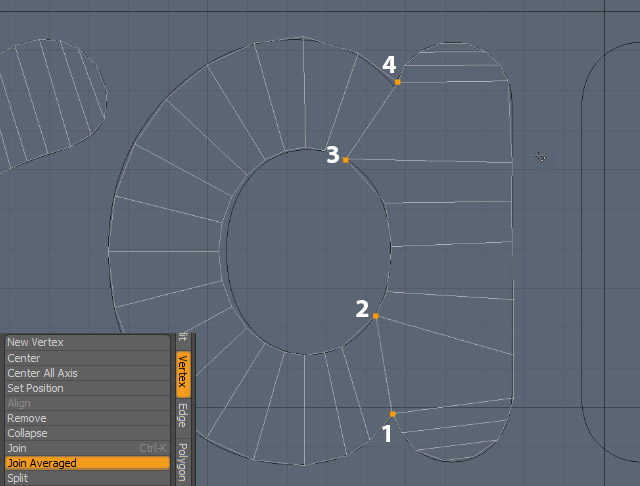
Now you need to stitch two pieces of geometry together.
Select vertices numbered 1 with Lasso Selection.(To activate it just press Right Mouse Button and draw on the screen over the desired Vertices.)
In Tools go to Vertex > Join Averaged.
Repeat those steps for Vertices 2, 3, and 4.
Step 15
Now draw over letter "n".
Active Pen Tool in basic tools palette.
Make sure that Make Quads option is turn on in Tool properties.
Place vertices like on the screen.
Place Vertices in 1, 2, 3, 4 order and move up with them over the Y axis.
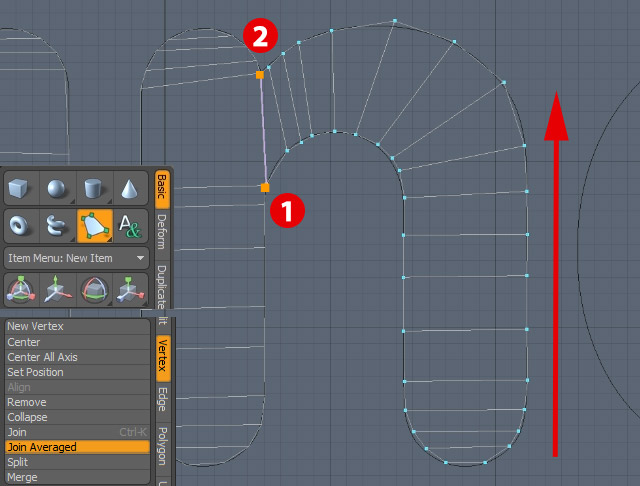
Step 16
Select vertices numbered 1 with Lasso Selection.(To activate it just press Right Mouse Button and draw on the screen over the desired Vertices.)
In Tools go to Vertex > Join Averaged.
Repeat those steps for Vertices numbered 2.
Step 17
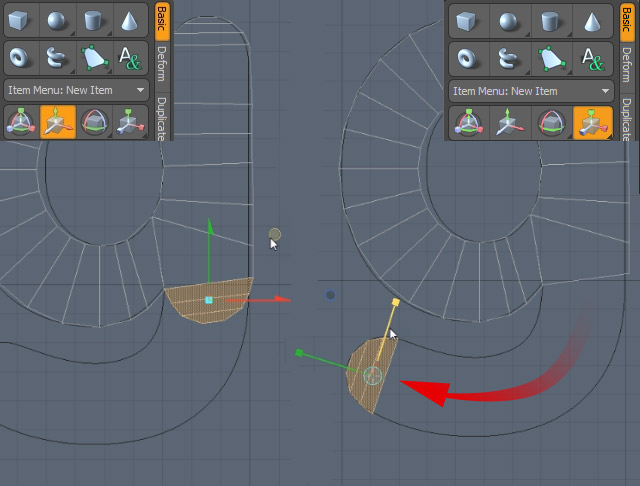
Copy polygons of letter "a" and place them over the "g" letter.
Step 18
Select only 3 polygons at the base of letter a.
Press (Command/Ctrl-C) than (Command/Ctrl-V) to disconnect them from rest of the letter.
Activate Move Tool (w) and move them as on the screen.
Activate Scale Tool (R) to adjust its size.
Active Pen Tool and draw quads between end and base shape of the letter.
Step 19
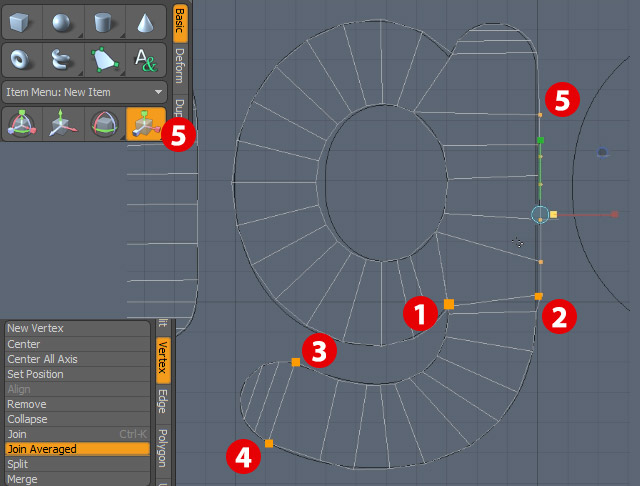
Now cleanup and stitch parts of geometry. Do the following:
Select vertices numbered 1 with Lasso Selection.
In Tools go to Vertex > Join Averaged.
Repeat those steps for Vertices 2, 3, and 4.
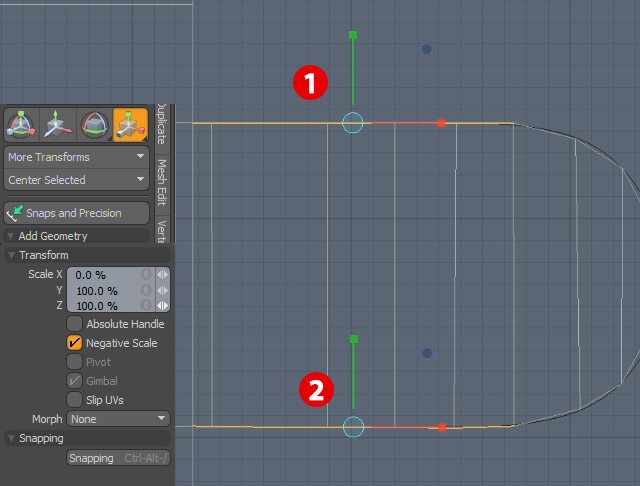
Now select vertices on the right side of letter "g".
Activate Scale Tool (R) and set scale on X axis to 0.
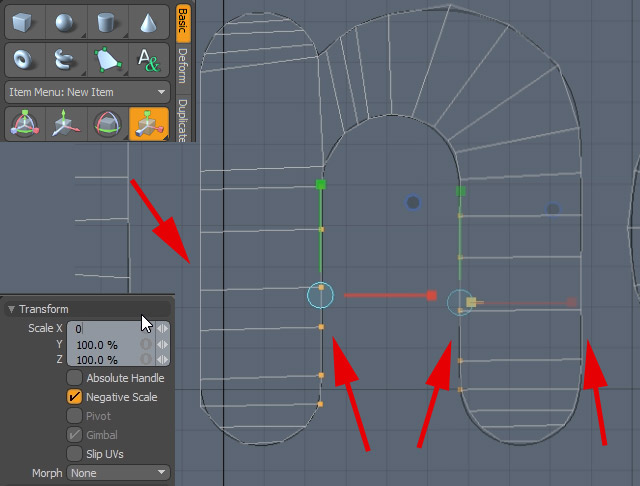
Step 20
Straighten all vertices on vertical parts of the letters like in previous step.
Step 21
Do the same for letter "a".
Step 22
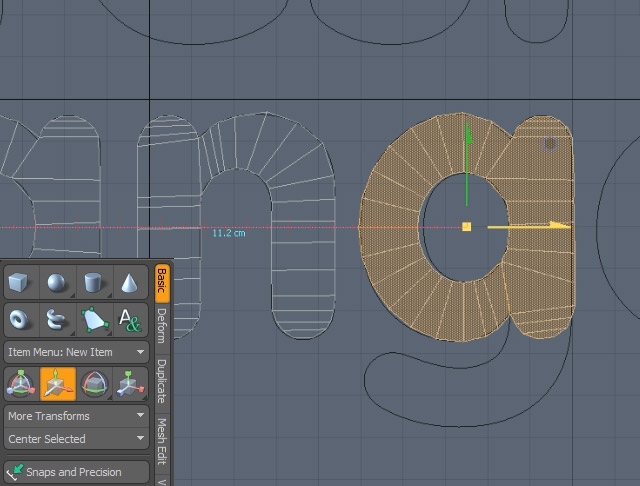
Now refine shape of letter "O".
In Edge Mode (2) select outer ring (Double Click on edges to select connected.)
Scale it to match background.
Do the same for the inner ring.
Step 23
Create letter "e".
Active Pen Tool in basic tools palette.
Make sure that Make Quads option is turn on in Tool properties.
Place vertices like on the screen. (Start with 1, 2, 3, 4 Vertices)
Step 24
With Lasso Selection select Vertices marked 1.
In Tools go to Vertex > Join Averaged.
Repeat those steps for Vertices marked 2.
Step 25
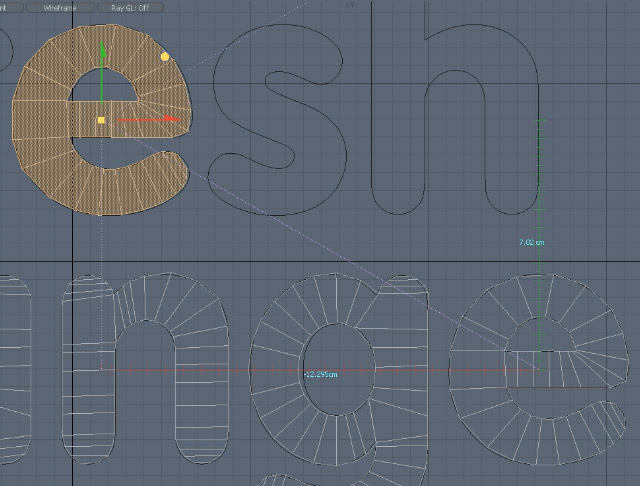
Copy letter "e" polygons to another location like on the screen.
Step 26
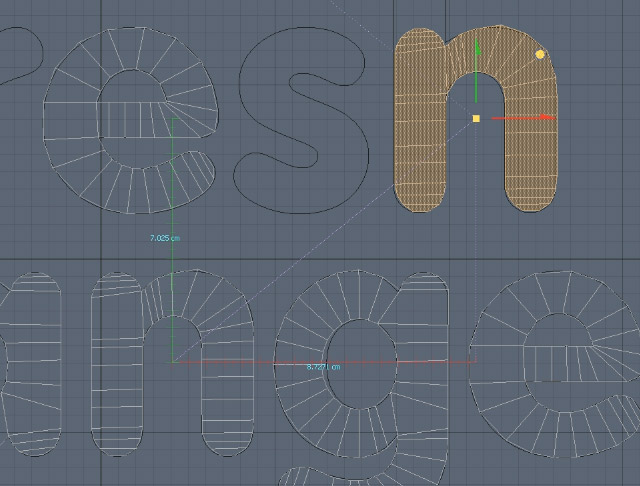
Now copy letter "n" polygons to another location like on the screen.
Step 27
Create letter H from copied letter "n".
Select only 4 polygons at the base of letter a.
Press (Command/Ctrl-C) than (Command/Ctrl-V) to disconnect them from rest of the letter.
Activate Move Tool (w) and move them as on the screen.
Step 28
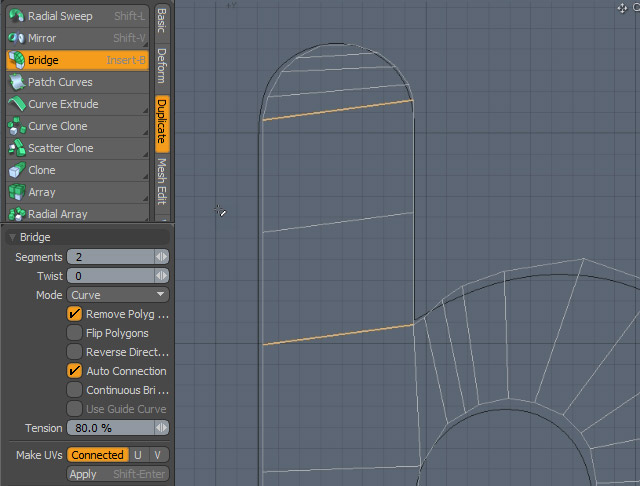
Connect polygon islands.
Select edges that are facing to each other.
Activate Bridge Tool.
Make sure that Segments is set to 2.
Step 29
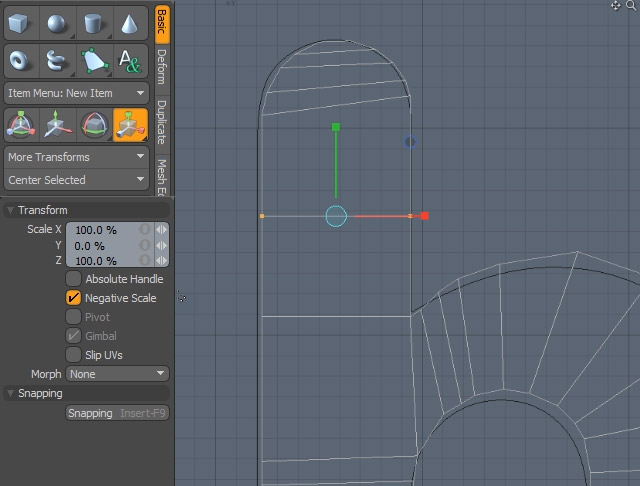
Now straighten edge on the top part of the "h" letter.
Select 2 vertices and Activate Scale Tool (R).
Then set Y scale to: 0.
Step 30
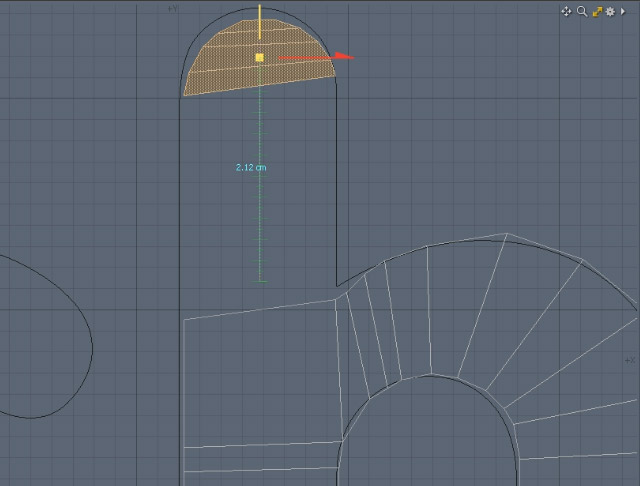
Refine shape of letter "h"
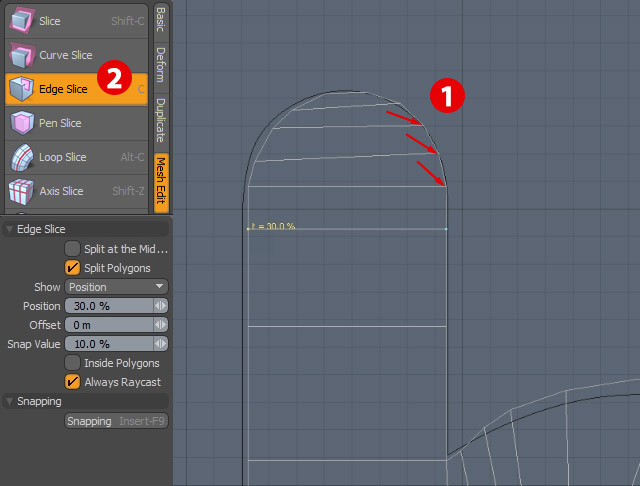
Activate Element Move Tool (T) and move Vertices as on the screen. [1]
Activate Edge Slice Tool (C) [2] and add one edge in 30% of existing polygon.
Step 31
Copy polygons of letter "r" to new position.
Step 32
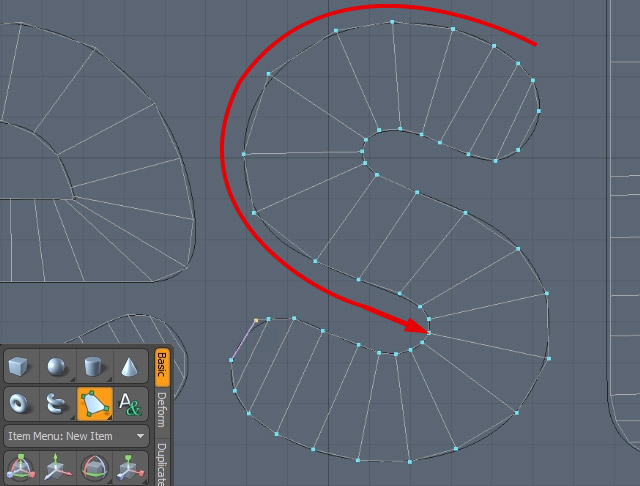
Create letter "s"
Active Pen Tool in basic tools palette.
Make sure that Make Quads option is turn on in Tool properties.
Place vertices like on the screen. (Start with 1, 2, 3, 4 Vertices)
Step 33
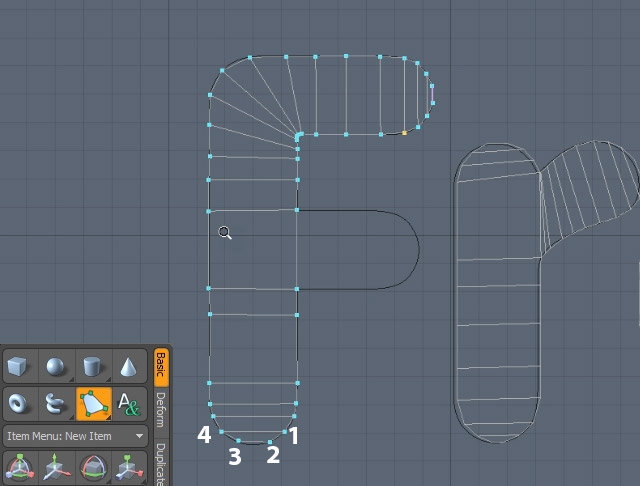
Create letter "F".
Active Pen Tool in basic tools palette.
Make sure that Make Quads option is turn on in Tool properties.
Place vertices like on the screen. (Start with 1, 2, 3, 4 Vertices)
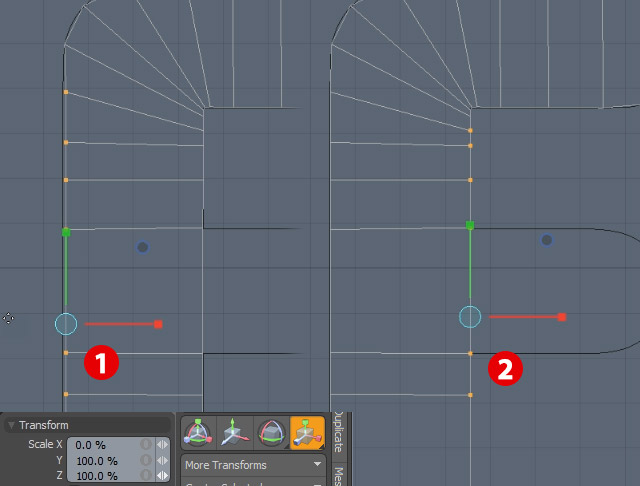
Step 34
Straighten vertices relative position on X axis with Scale Tool (R) [1] and [2].
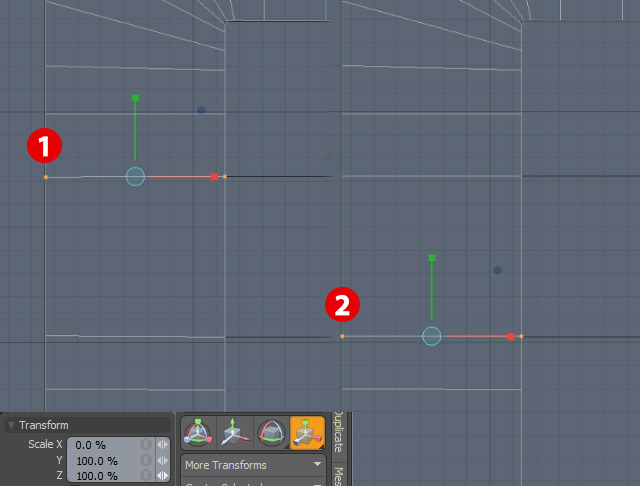
Step 35
Straighten vertices relative position on X axis with Scale Tool (R) [1] and [2].
Step 36
Active Pen Tool and draw geometry.
Make sure that you draw vertices in right order 1, 2, 3, 4.
Step 37
Select opposite edges.
Activate Bridge Tool
Well done. You have created letter "F".
Step 38
Select one edge like on the screen.
Activate Move Tool (w) and move it closer to the body of letter F. This will help to keep edges in place when letter will be in
Step 39
Select edges like on the screen.
Activate Scale Tool (R).
Set Scale on X axis to: 0. [1] [2]
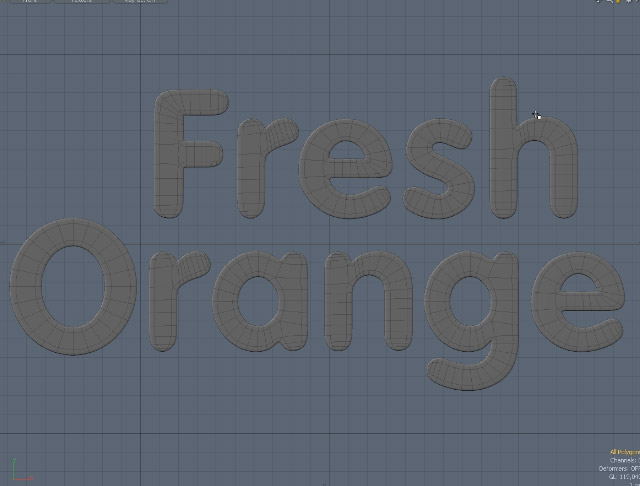
Step 40
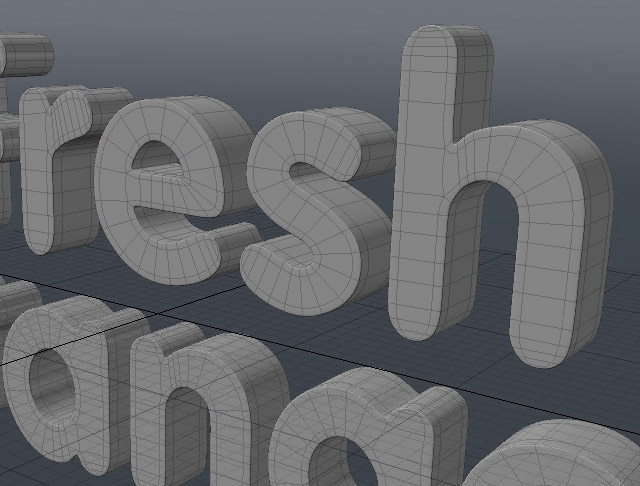
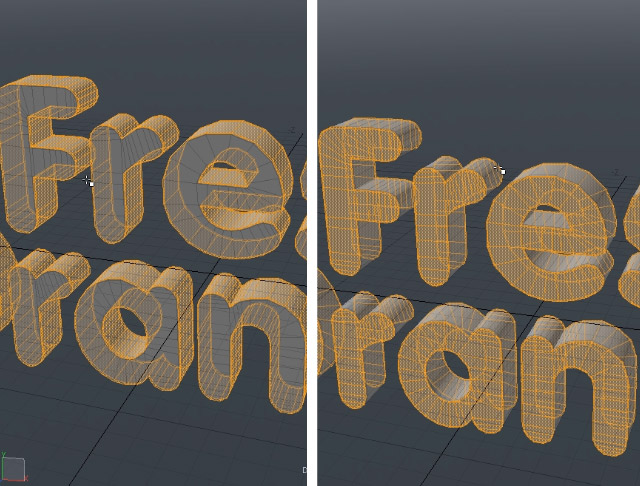
Well done! Your 2D letters should look like this. They are made of quads and they have great topology.
Step 41
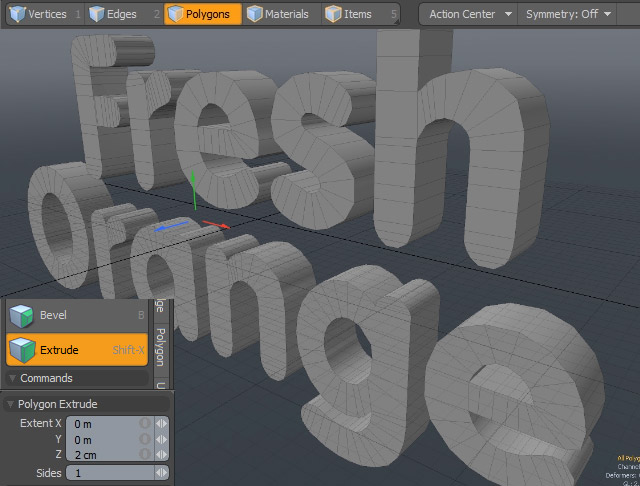
Now it is time to make letter true 3D object.
In Polygon Mode (3) press Shift-X to activate Extrude Tool.
Extrude polys for 2cm.
Press Space Bar to drop the tool.
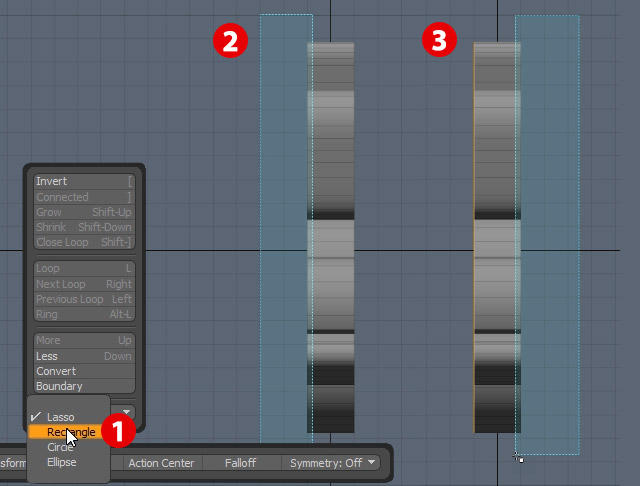
Step 42
Press Alt-Space Bar to bring floating modo modes palette.
Change Selection Mode to Rectangle [1].
Change Viewport to right to do that press 3 on keyboard.
Select front and back of the letters.
Step 42
Press Alt-Space Bar to bring floating modo modes palette.
Change Selection Mode to Rectangle [1].
Change Viewport to right to do that press 3 on keyboard.
Select front and back of the letters.
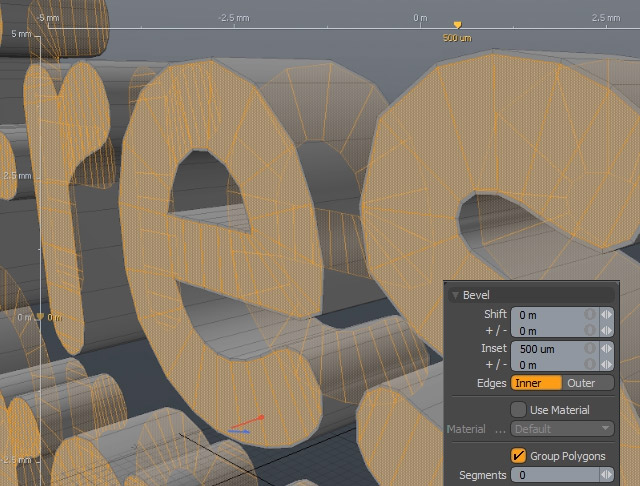
Step 43
Press (B) to activate Bevel Tool
Set Inset to 500 um (It will help keep edges in place in Subdivision mode.)
Step 44
Press Shift-Up arrow to expand selection.
Then press ([) to invert selection.
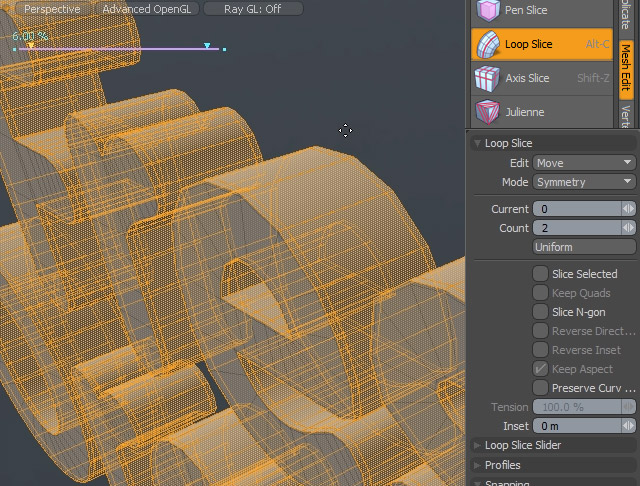
Activate Slice Tool (Alt-C) and add 2 edges.
Make sure that Mode is set to Symmetry.
Step 45
Now it is good time to test surface continuity.
Press (Tab) to go to Subdivision mode.
See how Modo is smoothing objects in very nice organic way.
Step 46
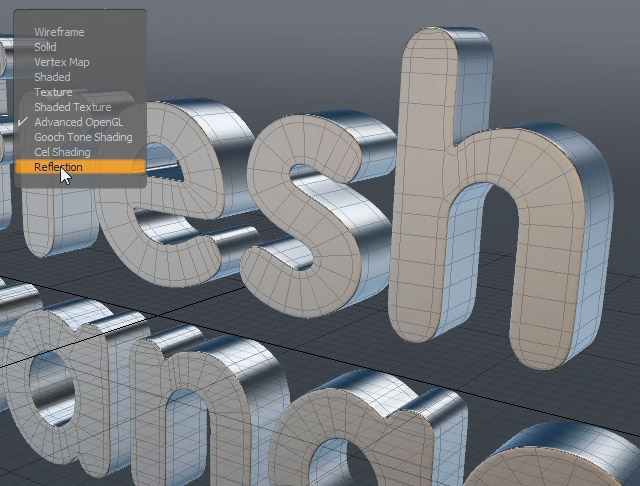
To test surface potential distortions go to Viewport Menu > Reflection.
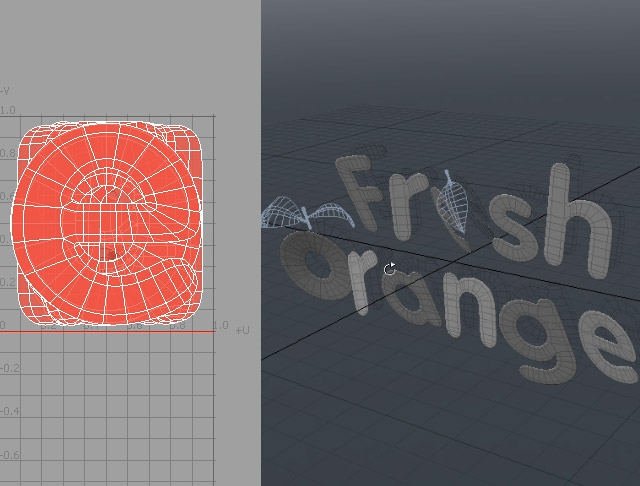
4. Create UV Maps for 3D Letters
Step 1
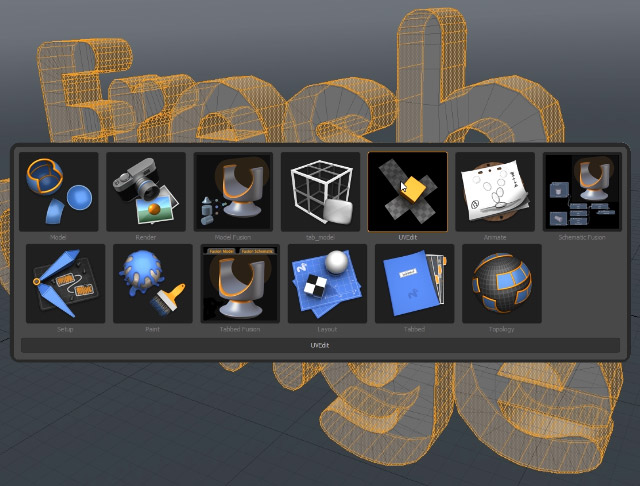
Press (Alt-Tab) to bring recent layouts menu Choose UV workspace.
Step 2
Invert selected polygons by pressing ([).
Step 3
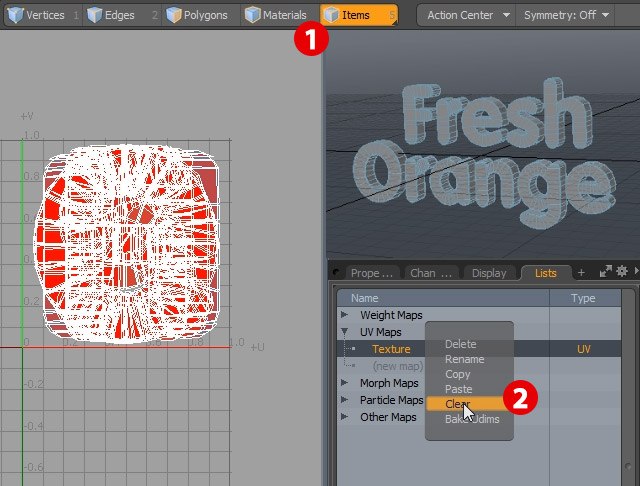
Change selection mode Item Mode (5).
Go to List > UV Maps > Texture.
Right Click on it and from the menu choose Clear.You need to delete automatically created UV map.
Step 4
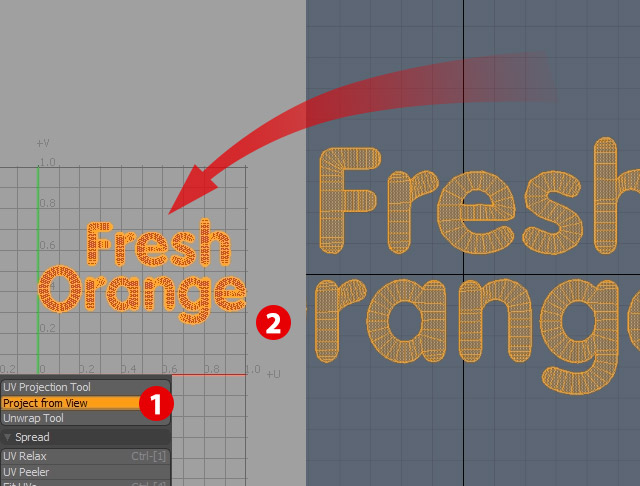
Press (1) on keyboard to change View to Front.
Go to UV tools and activate: Project from View. [1]
Then click on the 3D Viewport that you wish to grab information from. See how Modo took polygons from 3D viewport and placed them in UV space [2].
Press Space Bar to drop the tool.
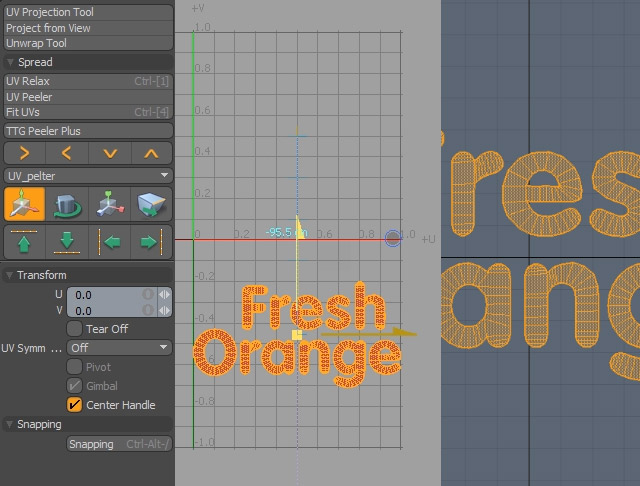
Step 5
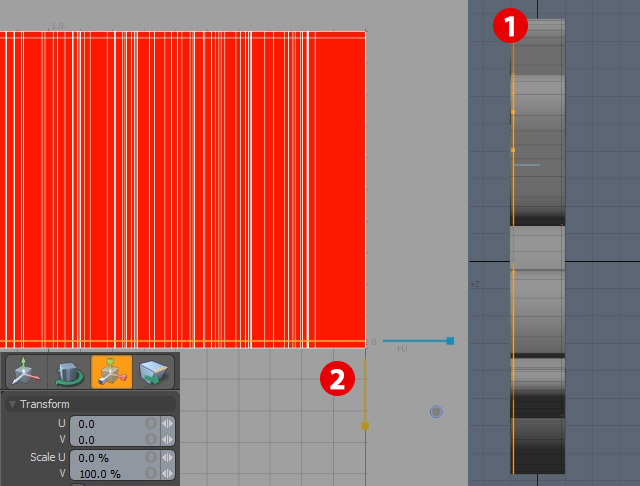
Now in UV space activate Move Tool (W) and move it to the -1.1 section of UV space.
Step 6
Now you will prepare UVs for texture painting in Photoshop.
Right Click and drag over the geometry of letter "O" using Rectangle Selection Mode.
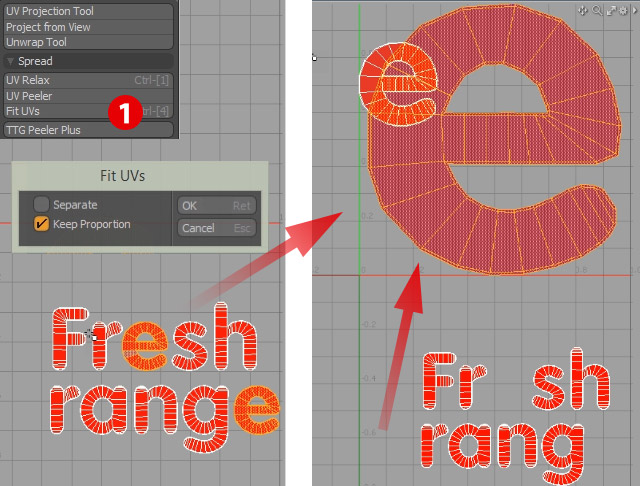
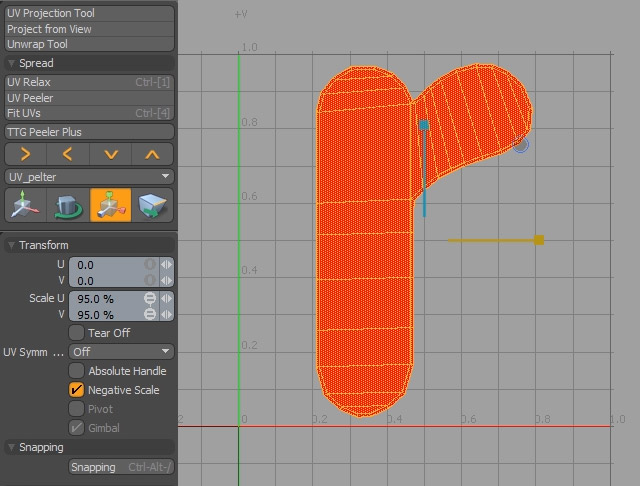
Then activate Fit UVs and make sure that Keep Proportion is active.
Activate Scale Tool (R) and scale polygons to 95% on every axis.
With polygons of letter "O" selected press (H) to temporarily hide selection.
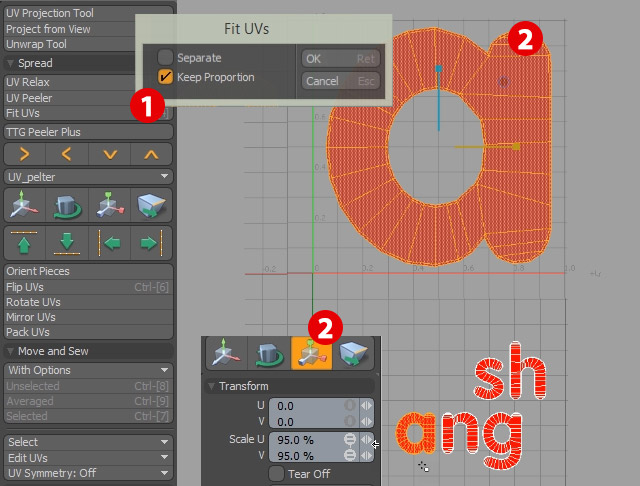
Step 7
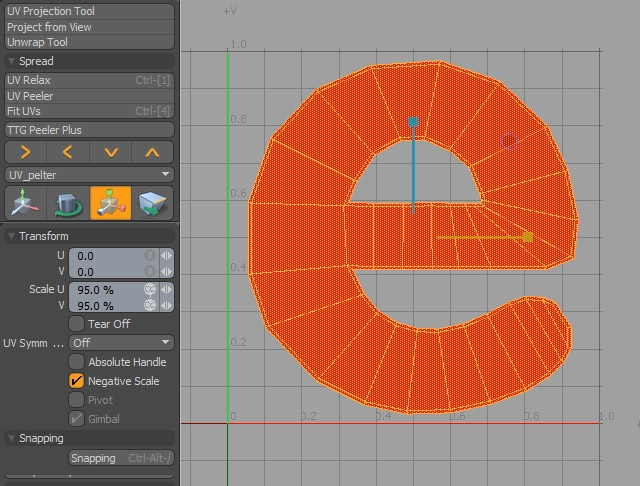
Do the same for letter "e".
Select first letter "e" and activate Fit UVs. [1]
Then select second letter "e" and activate Fit UVs. They have to overlay on each other and occupy the same UV space.
Step 8
Activate Scale Tool (R) and scale them for 95% on every axis.
With polygons of letter "F" selected press (H) to temporarily hide selection.
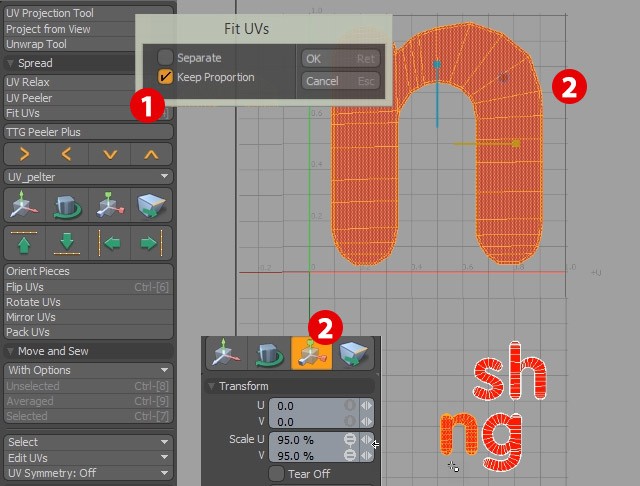
Step 9
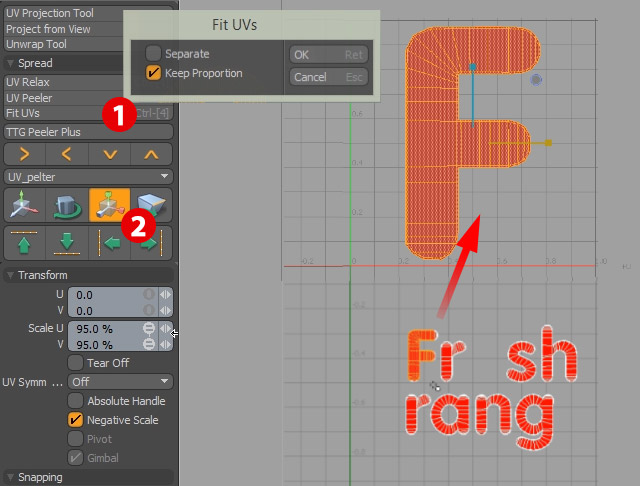
Do the same for letter "F".
Select letter "F" and activate Fit UVs. [1]
Activate Scale Tool (R) and scale them for 95% on every axis.
With polygons of letter "F" selected press (H) to temporarily hide selection.
Step 10
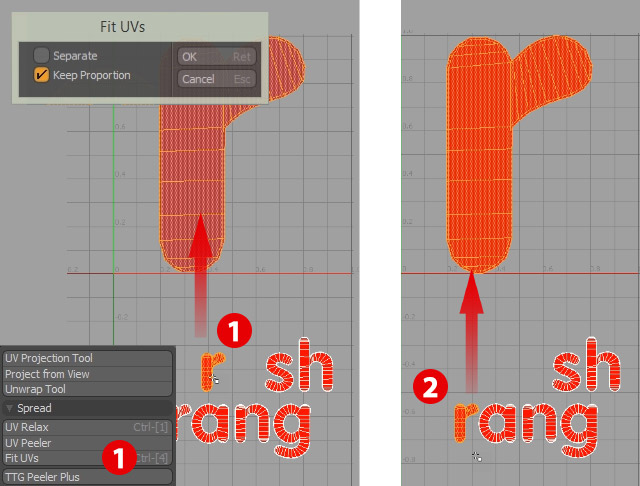
Select first letter "r" and activate Fit UVs [1], than do the same for second letter "r". [2]
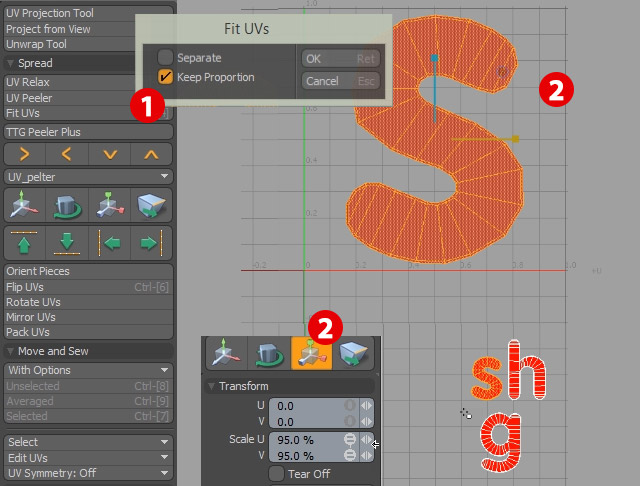
Step 11
Activate Scale Tool (R) and scale them for 95% on every axis.
With polygons of letter "r" selected press (H) to temporarily hide selection.
Step 12
Select first letter "a" and activate Fit UVs [1], than do the same for second letter "a". [2]
Activate Scale Tool (R) and scale them for 95% on every axis.
With polygons of letter "a" selected press (H) to temporarily hide selection.
Step 13
Select letter "n" and activate Fit UVs. [1]
Activate Scale Tool (R) and scale them for 95% on every axis. [2]
With polygons of letter "n" selected press (H) to temporarily hide selection.
Step 14
Select letter "s" and activate Fit UVs. [1]
Activate Scale Tool (R) and scale them for95% on every axis. [2]
With polygons of letter "s" selected press (H) to temporarily hide selection.
Step 15
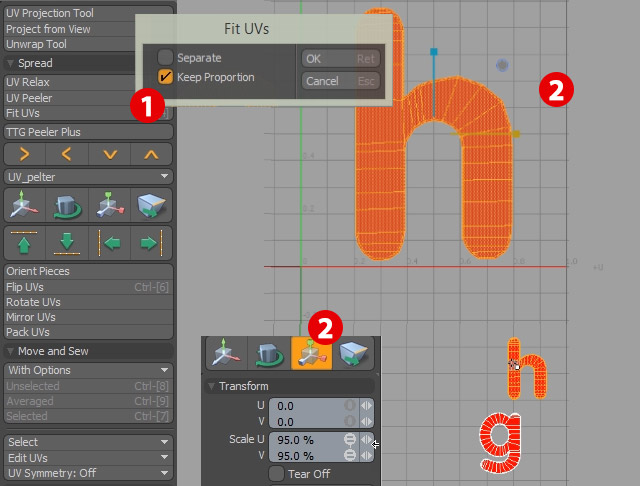
Select letter "h" and activate Fit UVs. [1]
Activate Scale Tool (R) and scale them for 95% on every axis. [2]
With polygons of letter "h" selected press (H) to temporarily hide selection.
Step 16
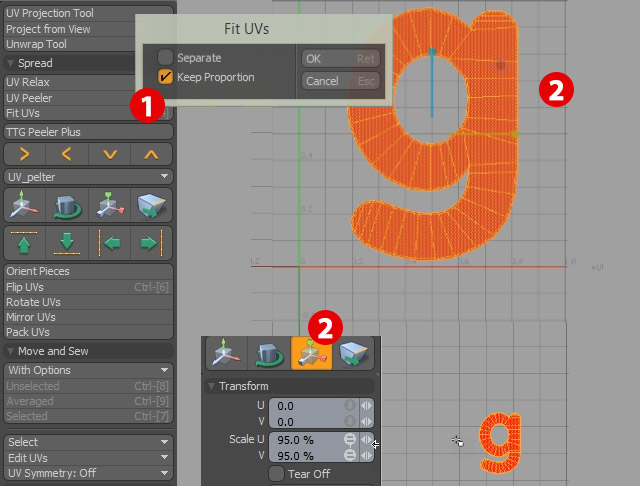
Select letter "g" and activate Fit UVs. [1]
Activate Scale Tool (R) and scale them for 95% on every axis. [2]
With polygons of letter "g" selected press (H) to temporarily hide selection.
Step 17
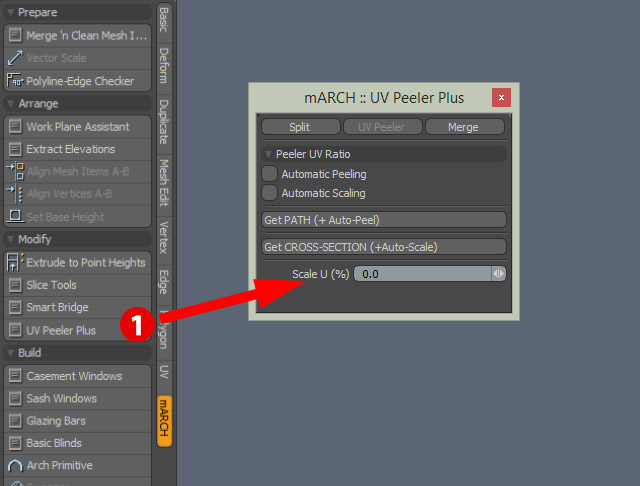
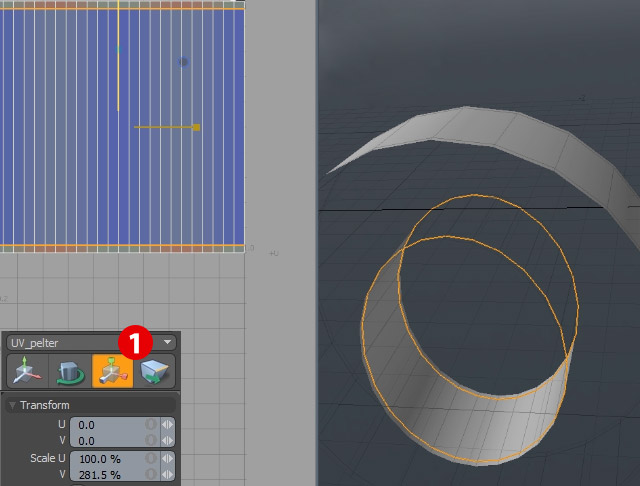
To speed up next part of creating UVs it is best to use mARCH KIT for modo.
It has many very useful tools for creating Architectural Visualizations
and other modeling tasks. My favorite tool from that set is mARCH: UV Peeler Plus. It automates process of proper scaling UV maps created with regular UV Peeler Tool. But you can do the same with regular modo tools, it just makes it quicker. For installation and usage instructions visit mARCH KIT site.
In mARCH Tools locate UV Peeler Plus. [1]
Press it and you will have floating palette.
Step 18
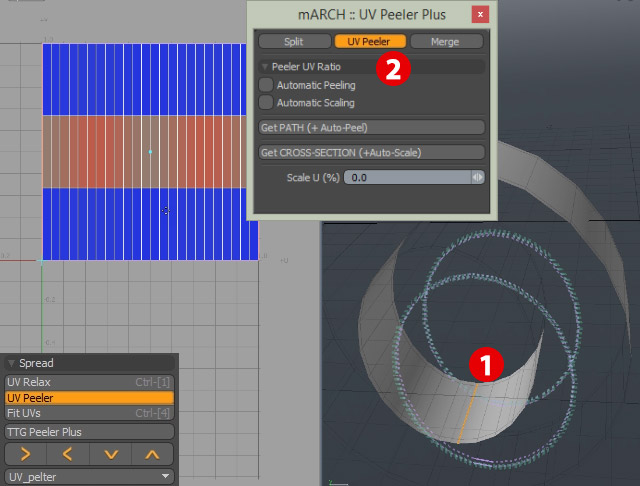
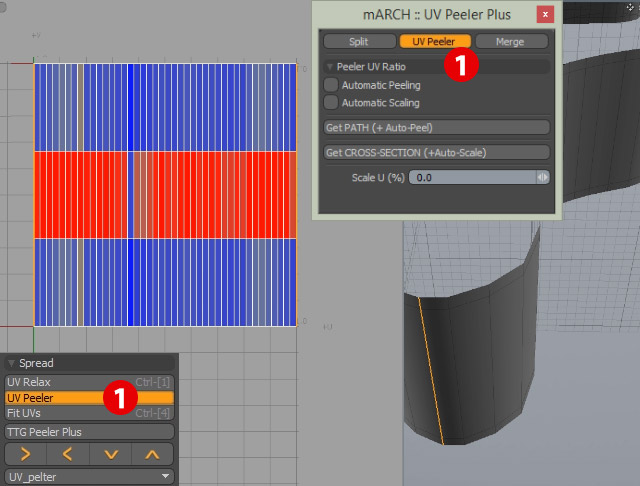
Now you need to scale polygons in UV space this way that they relative size to each other will be the same as it is in 3D space.
Select one edge by double click. [1]
Press UV Peeler on mARCH palette. [2]
Click on the UV space to show polygons.
Step 19
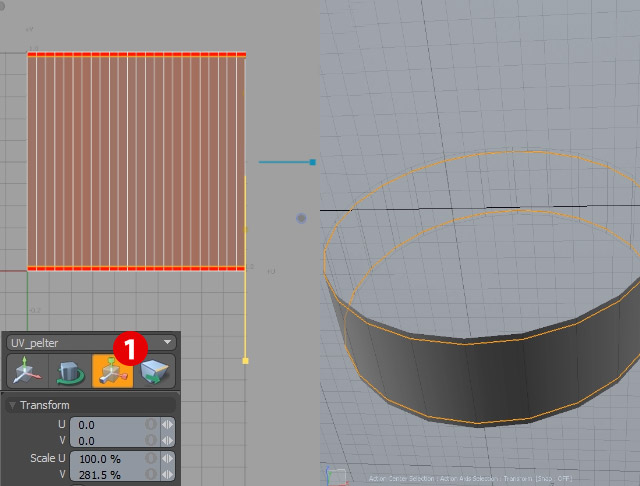
Select 2 edges on inner side of loop.
Activate Scale Tool (R) and scale it up only on V axis in UV space. [1]
Step 20
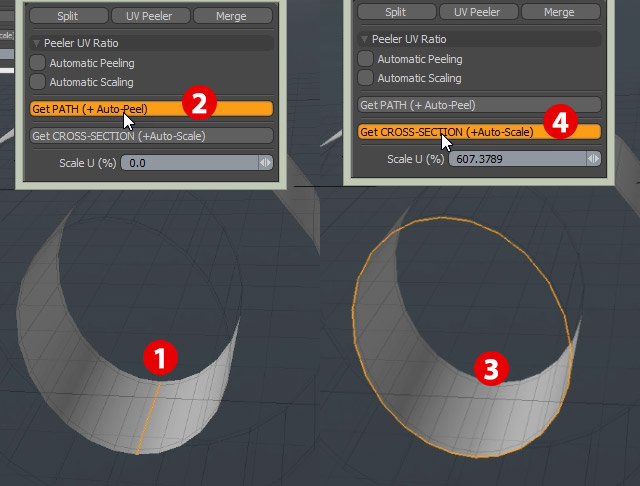
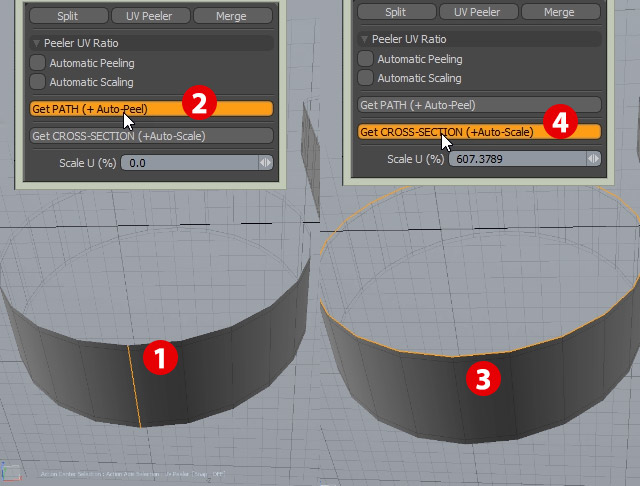
Now get proper scaling of created UV.
Once more select the same edge that was used as UV seam. [1]
Press Get PATH (-Auto-Peel). [2]
Now select edge that is perpendicular/circumference to first selected edge. [3]
Press Get CROSS-SECTION (-Auto-Peel) [4] Note that script created Scale U (%) Value.
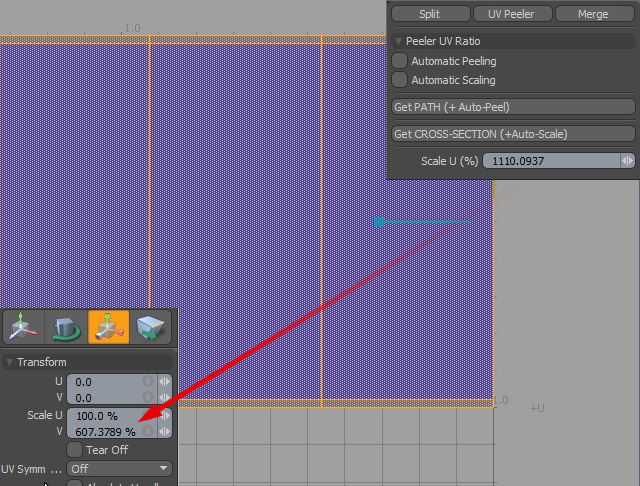
Step 21
Copy Scale U (%) Value in this case 607.3789. [1]
Activate Scale Tool (R) and paste this value to Scale V field.
Press Enter to execute scaling. Now you have proper scaling of UV map.
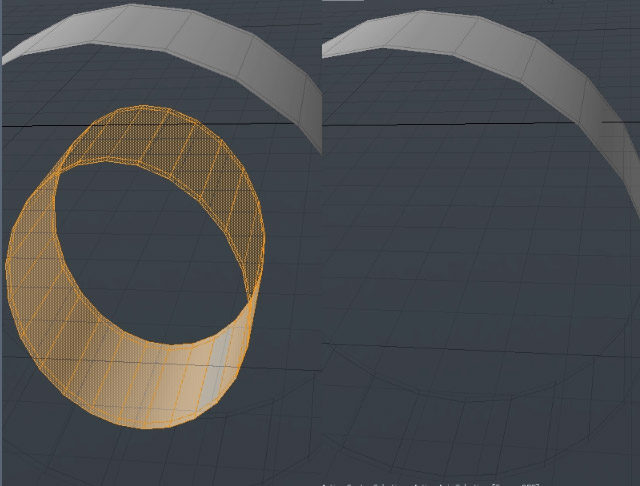
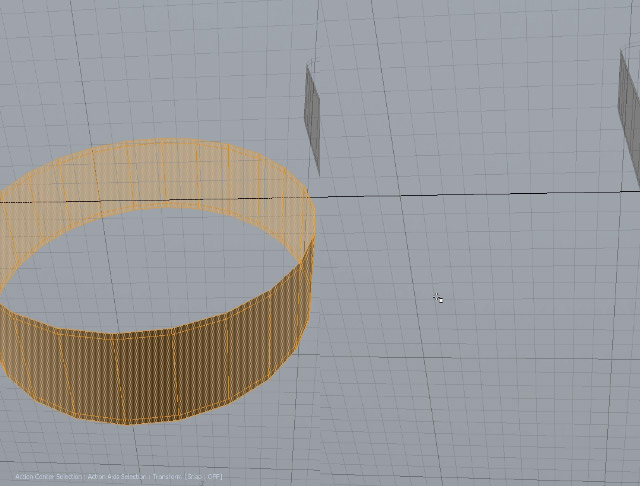
Step 22
Select created UV polygons.
Press H to hide them. This way you will avoid visual clutter in UV space.
Step 23
Select one edge by double click.
Press UV Peeler on mARCH palette. You can activate UV peeler also from standard Modo UV tools. It is the same tool. [1]
Click on the UV space to show polygons.
Step 24
Select 2 edges on inner side of loop.
Activate Scale Tool (R) and scale it up only on V axis. in UV space. [1]
Step 25
Once more select the same edge that was used as UV seam. [1]
Press Get PATH (-Auto-Peel). [2]
Now select edge that is perpendicular/circumference to first selected edge. [3]
Press Get CROSS-SECTION (-Auto-Peel) [4] Note that script created Scale U (%) Value.
Step 26
Copy Scale U (%) Value in this case 1110.0937.
Activate Scale Tool (R) and paste this value to Scale V field.
Press Enter to execute scaling.
Step 27
Select created UV polygons.
Press H to hide them. This way you will avoid visual clutter in UV space.
Step 28
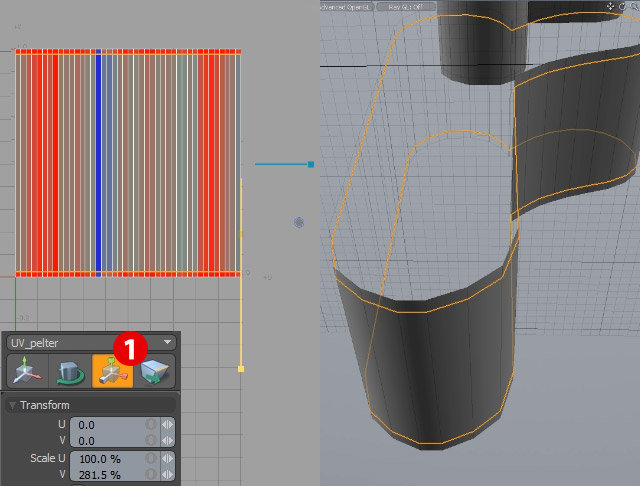
Now it is time to get UVs for more complex letter "r".
Select one edge on bottom of letter "r" by double click.
Press UV Peeler on mARCH palette. You can activate UV peeler also from standard Modo UV tools. It is the same tool. [1]
Click on the UV space to show polygons.
Step 29
Select 2 edges on inner side of loop.
Activate Scale Tool (R) and scale it up only on V axis. in UV space. [1]
Step 30
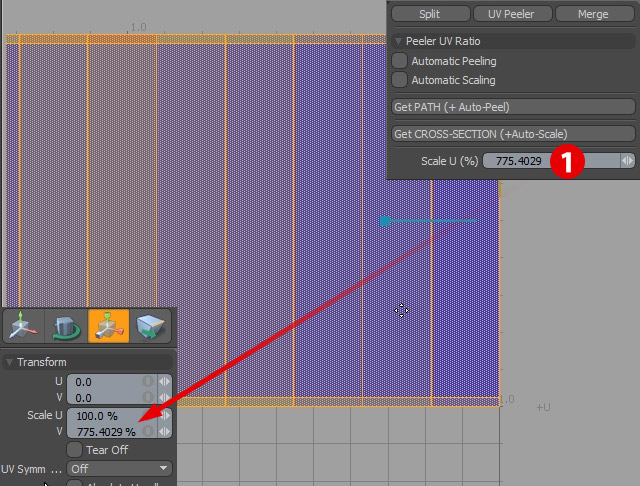
Once more select the same edge that was used as UV seam. [1]
Press Get PATH (-Auto-Peel). [2]
Now select edge that is perpendicular/circumference to first selected edge. [3]
Press Get CROSS-SECTION (-Auto-Peel) [4] Note that script created Scale U (%) Value.
Step 31
Copy Scale U (%) Value in this case 775.4029 [1]
Activate Scale Tool (R) and paste this value to Scale V field.
Press Enter to execute scaling.
Step 32
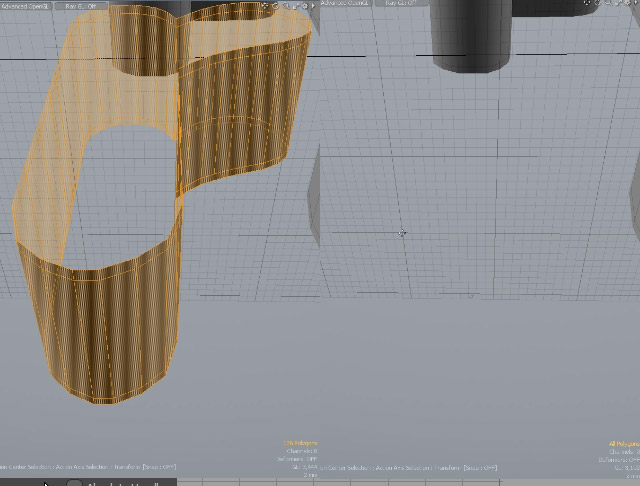
Select created UV polygons.
Press H to hide them. This way you will avoid visual clutter in UV space.
Repeat all those steps for all letters.
Step 33
With all letters properly UV'ed you need to refine small details to have best possible texture mapping.
Press (H) to unhide all polygons.
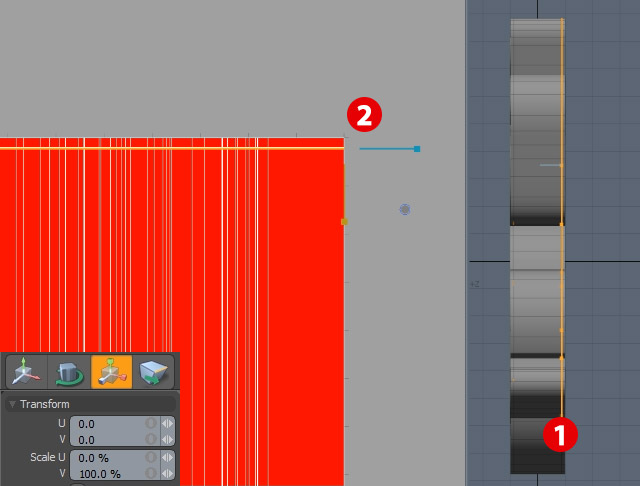
Change view to Right View.
With Rectangle Selection select all edges near the back of the letters. [1]
Then Activate Scale Tool (R) and zero out U scale. [2]
Step 34
With Rectangle Selection select all edges near front of the letters. [1]
Then Activate Scale Tool (R) and zero out U scale. [2]
Step 35
Well done! You have created great UV map for all letters! Press Tab to see letters in Subdivision mode.
5. Model the Leaf
Step 1
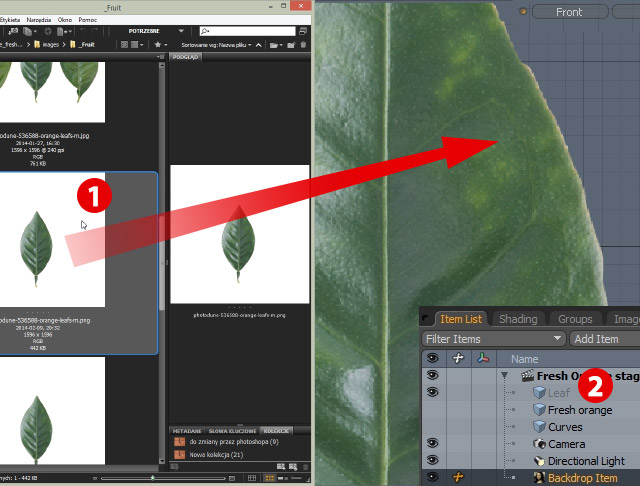
In Bridge, locate orange leaf PNG that you created in the beginning of tutorial.
Grab file and Drag and Drop it onto 3D Front viewport of Modo. [1]
Press (N) to create new mesh. [2]
Change its name to: Leaf.
Step 2
Now change properties of Backdrop item:
Set its Pixel Size to 650 um.
Activate Scale Tool (R) and scale it to 13.5% on X and Y axis.
Step 3
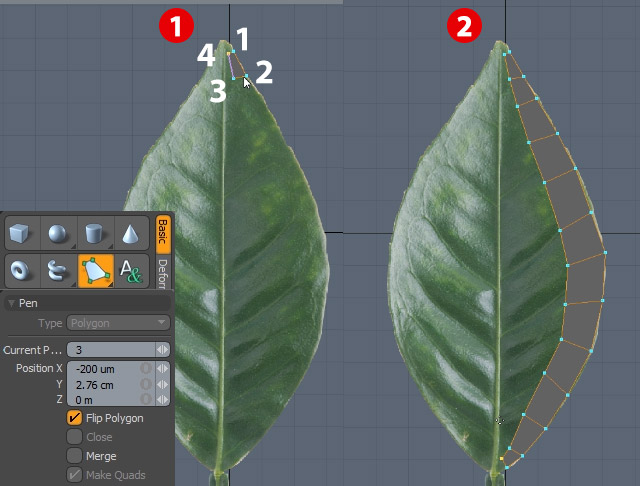
You will use pane tool again to draw leaf shape.
Activate Pen Tool.
Draw vertices in 1, 2, 3, 4 order. [1]
Add points until you will have nice strip of quads ready. [2]
Step 4
Draw polygons to the base of leaf. [1]
Now press (Shift-V) to mirror this strip to the other side. [2]
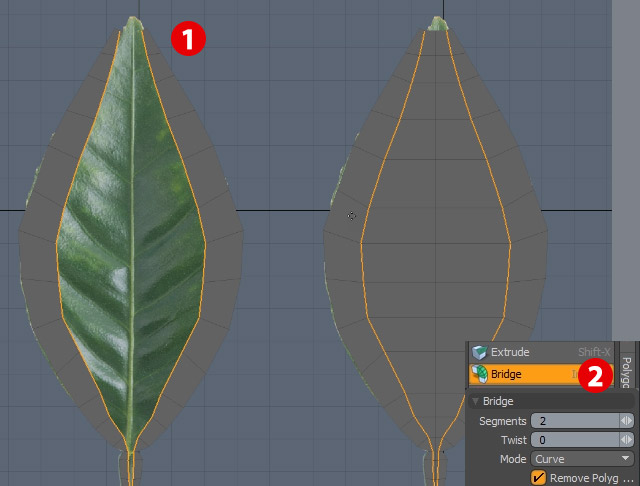
Step 5
Select edges that facing each other.
In Modo Tool look for: Duplicate > Bridge
Set its segments to: 2 and click on 3D Viewport.
Press Space Bar to drop the tool.
Step 6
Select edges on opposite sides of leaf.
Go to Action Center > Local and Activate Scale Tool (R).
Change scale on Green Handle - Y axis to very low value: 10 - 5%.
Step 7
Then press (Alt-S) to change to Selection Action Center.
Scale relative position of edges to 15% on X axis.
Step 8
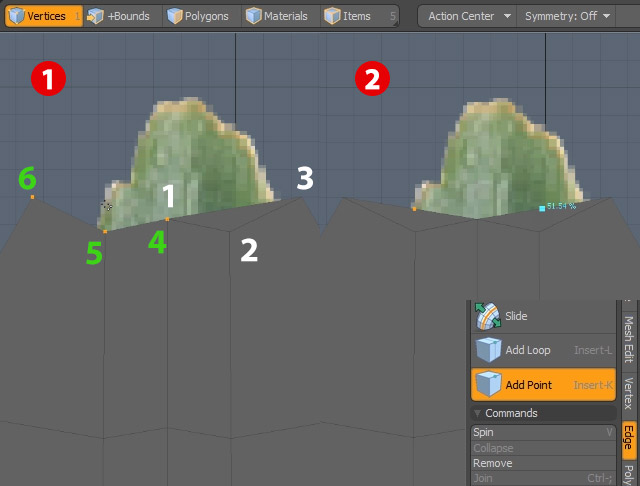
Create additional polygons to finish leaf.
In Vertex Mode (1) select vertices in 1, 2, 3 order.
Press (P) to create polygon.
Repeat this process for other side.
Select vertices in 4, 5, 6 order. [1]
Then activate Add Point Tool and draw one vertex on the 50% of edge length. [2]
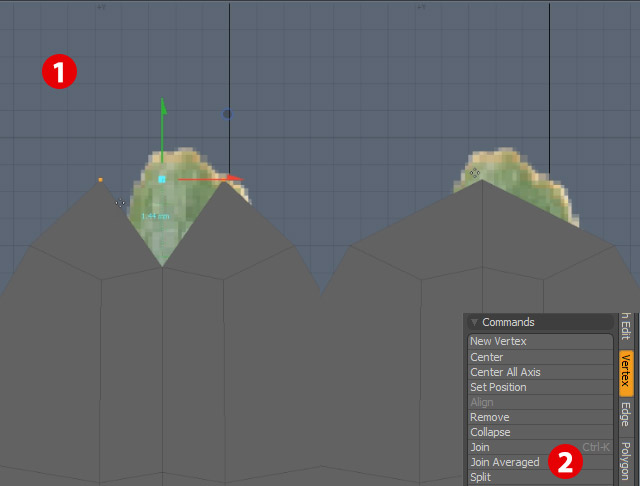
Step 9
Select both vertices and move them up with Move Tool (W).
Then in Vertex Tools activate Join Averaged command
.
Step 10
With Rectangle Selection select extra polygons on the base of the leaf and delete them.
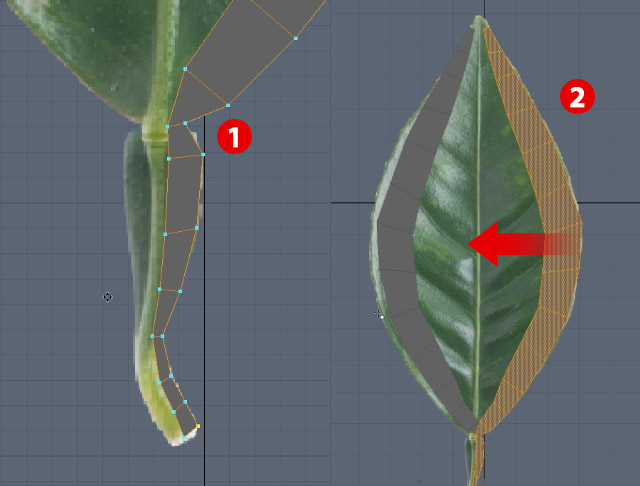
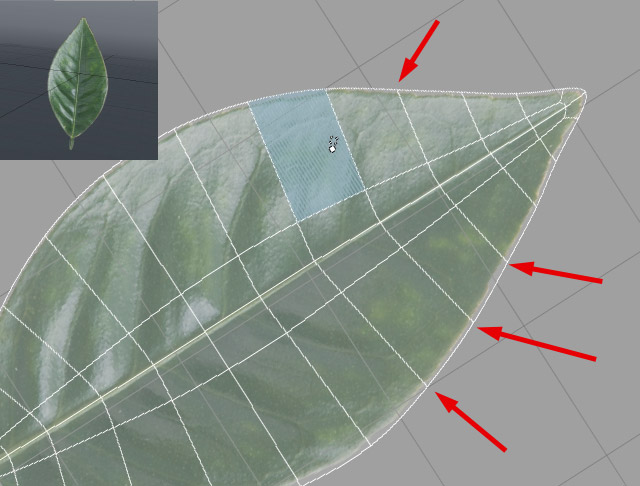
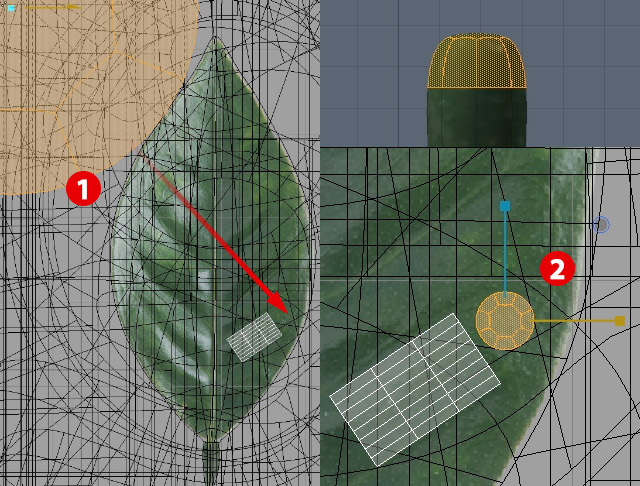
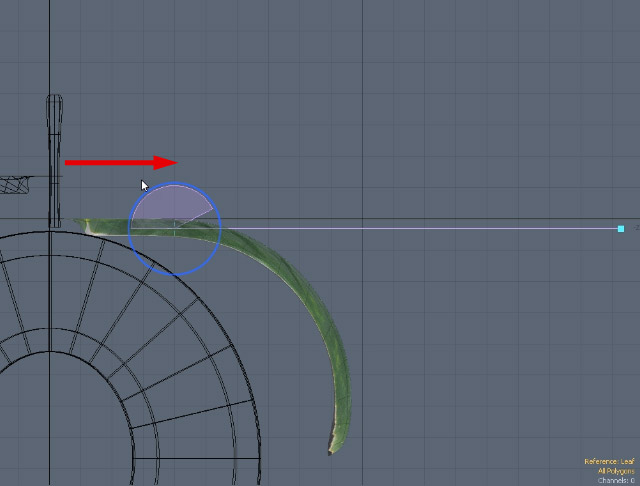
Step 11
Activate Element Move Tool (T) and tweak vertex position to match Background image.
Your finished leaf should look like on the image below.
Step 12
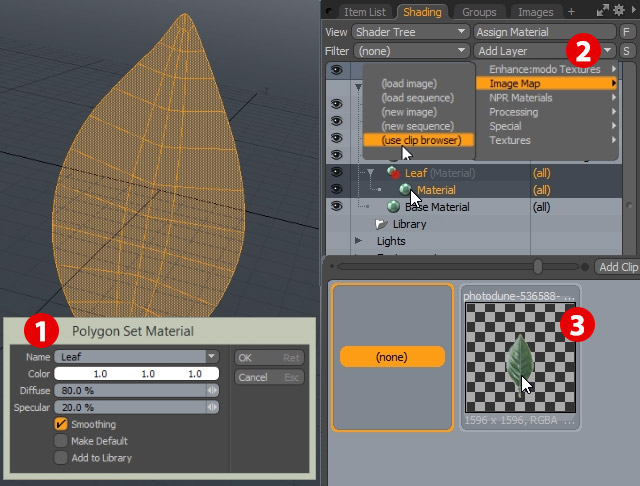
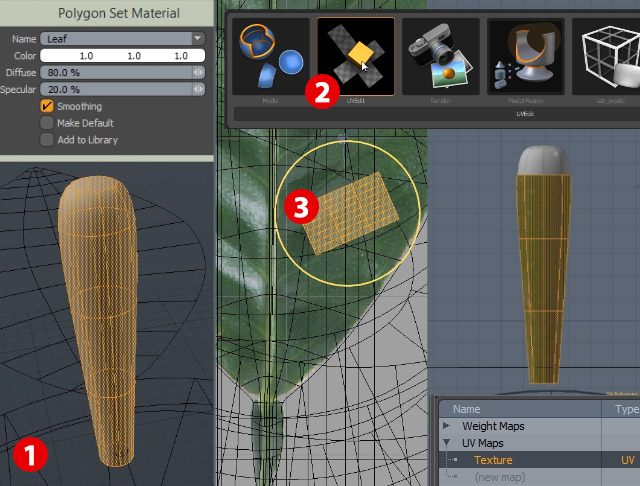
Double click on polygons to select all.
Press (M) to add Leaf Material tag to geometry. [1]
In Shader Tree go to Add Layer > Image Map > (use Clip Browser). [2]
Choose leaf png image. [3]
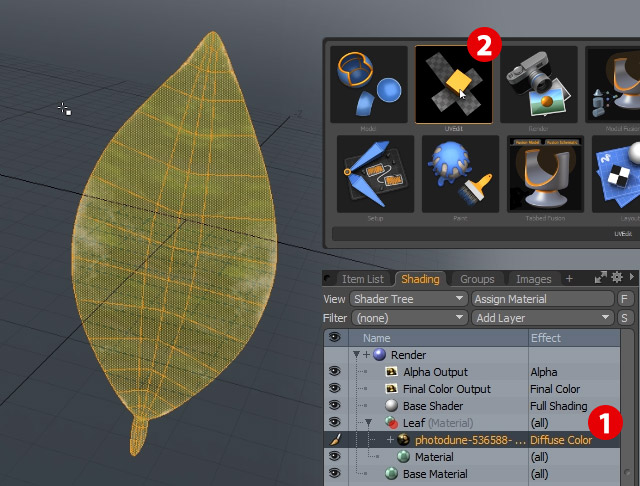
Step 13
Select image in the Shader Tree to see it in UV Viewport. [1]
Now switch to UV layout (Alt-Tab). [2]
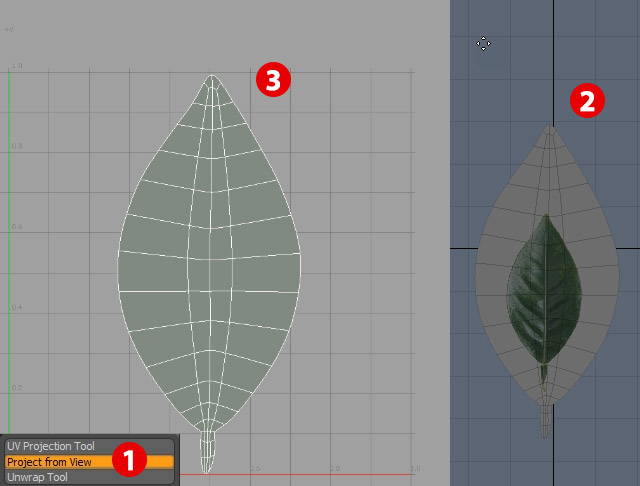
Step 14
Now activate Project from View Tool. [1]
Click on the 3D viewport to execute command. [2]
See how Modo grabbed UVs from 3D object. [3]
Press Space Bar to drop the tool.
Step 15
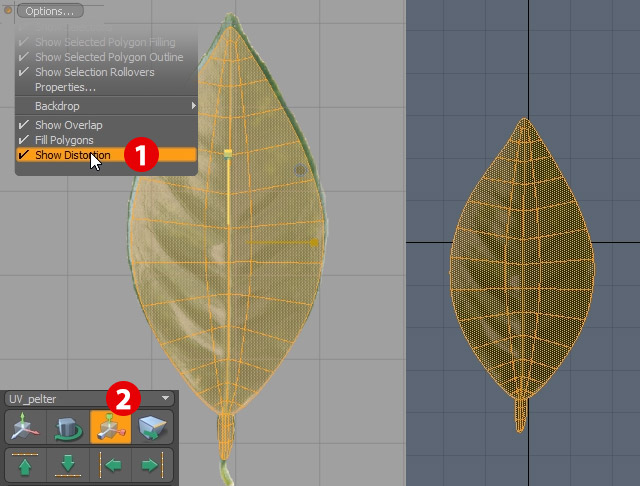
Go to Options Menu of UV viewport
Turn off Show Distortion. [1]
Activate Scale Tool (R) and scale down polygons to match bitmap.
Step 16
Refine vertices placing on edge of leaf. They must overlap bitmap slightly. This will help stencil leaf later on.
Step 17
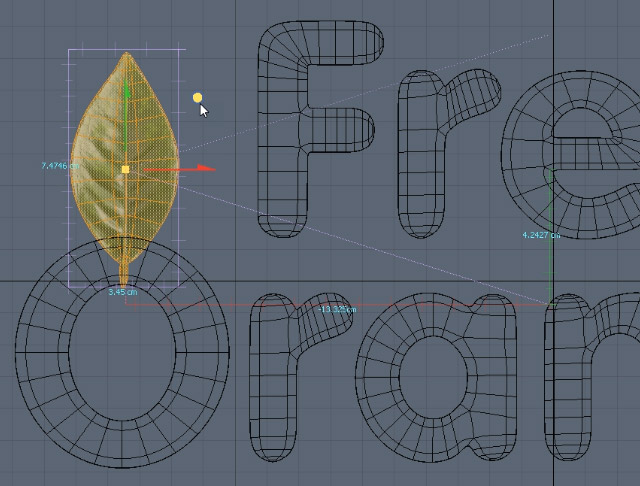
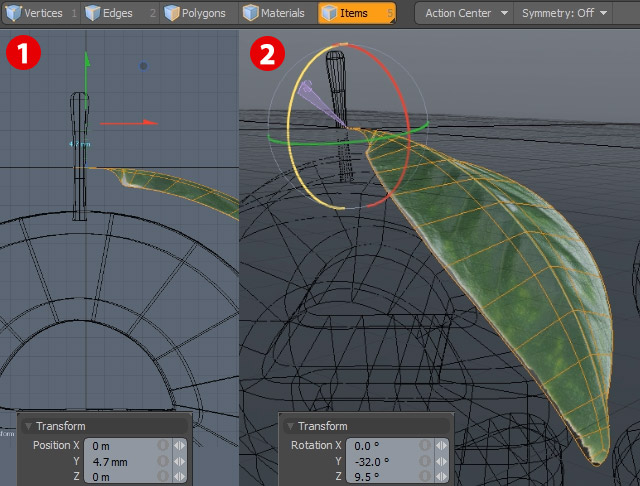
Activate Move Tool (W) and move leaf over letter "O".
Step 18
Select "Fresh Orange" mesh and go to Polygon Mode (3)
Now select polygons in the middle of "O" and Activate Scale Tool (R)
Scale them down a little.
Step 19
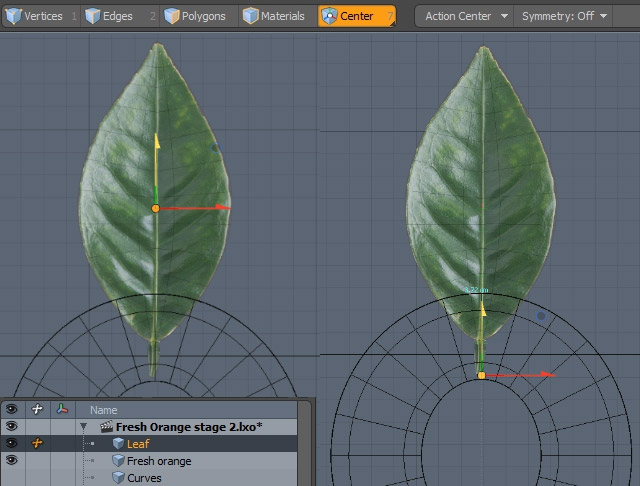
In Item Mode (5) select "Leaf" mesh.
Then change to Center Mode (7).
Select Center and activate Move Tool (W).
Move center to the base of the leaf.
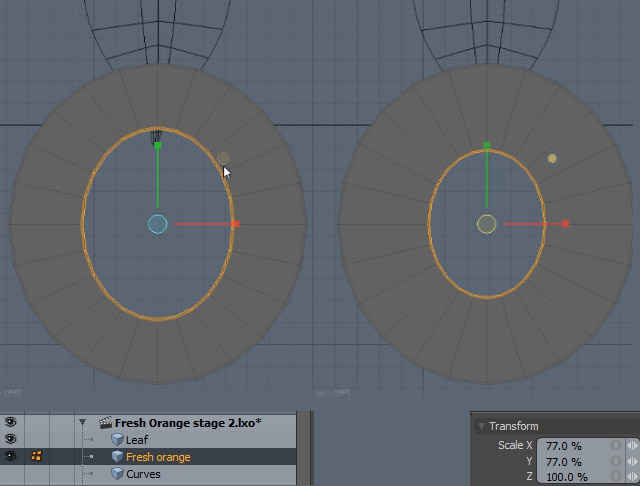
Step 20
Move leaf to top of letter "O". [1]
In Item List press first column on the left side from "Leaf" mesh to
change Origin Point to that mesh Origin Point for a little while. [2]
Activate Rotate Tool (R) and rotate leaf for 90°.
Step 21
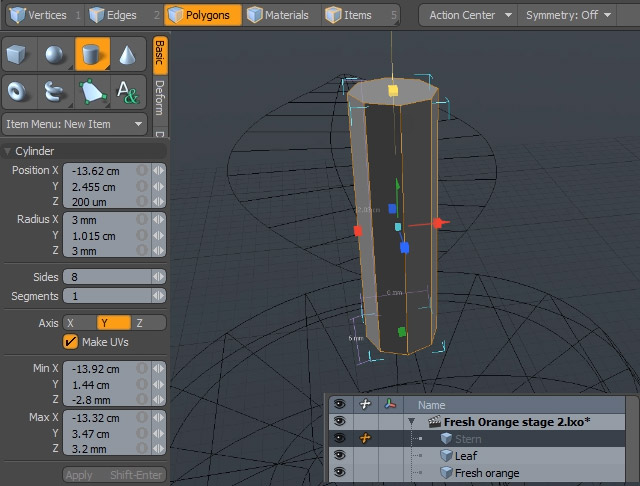
Create stern of the leaf.
Press (N) to create new Mesh.
Activate Cylinder Tool and draw it on the screen.
Step 22
Scale down base of the stern with the Scale Tool. [1]
Select top polygon and activate Bevel Tool (B) and Extrude and Inset polygon the same time. [2]
Next select polygons on the circumference of stern and activate Loop Slice Tool (Alt-C). [3]
Step 23
Press Tab to see stern in subdivision mode.
Press (M) to add Material Tag to polygons. Choose existing "Leaf" material.
Then switch to UV layout (Command/Ctrl-Tab). [2]
Move, Scale and Rotate UV patches as shown on the screen. [3]
Step 24
Select top circle of the stern. [1]
Move, Scale and Rotate UV patch as shown on the screen. [2]
Step 25
Refine stern shape to your needs.
Use Scale Tool (R) for this.
Step 26
Scale top of the stern to make it more rounded. [1]
Select "Leaf" mesh item and in Edge Mode select edges on the circumference of leaf.
Move them down a little. [2]
Step 27
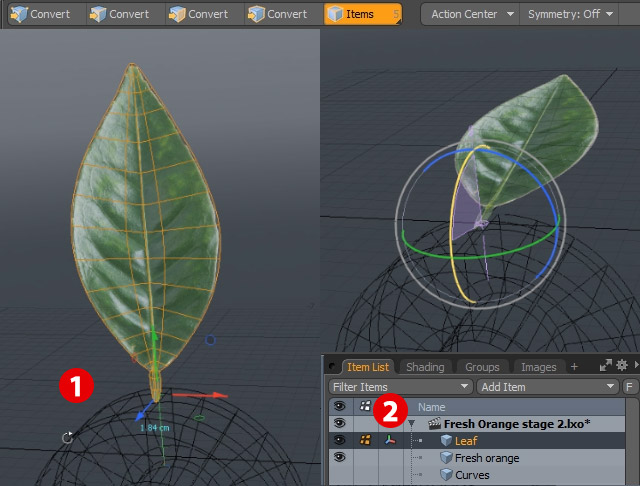
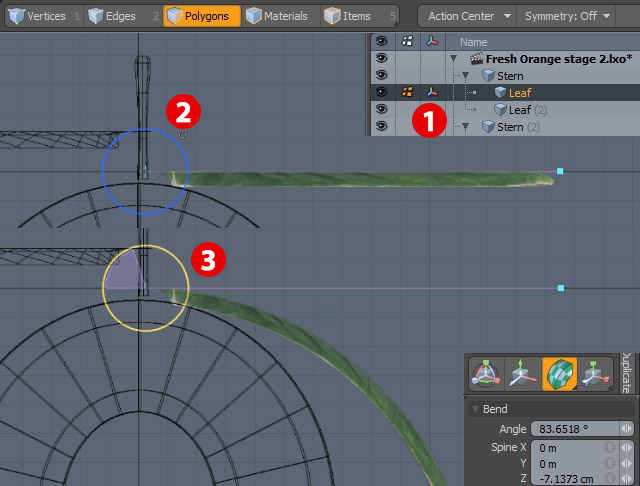
In the Item List drag and put "Leaf" mesh inside "Stern" mesh. [1]
Then rotate it 90° [2]
Step 28
Right click on "Leaf" mesh.
Choose Duplicate from the right click menu
Rotate this leaf in opposite direction.
Step 29
Adjust leaf placing until you will be happy.
Step 30
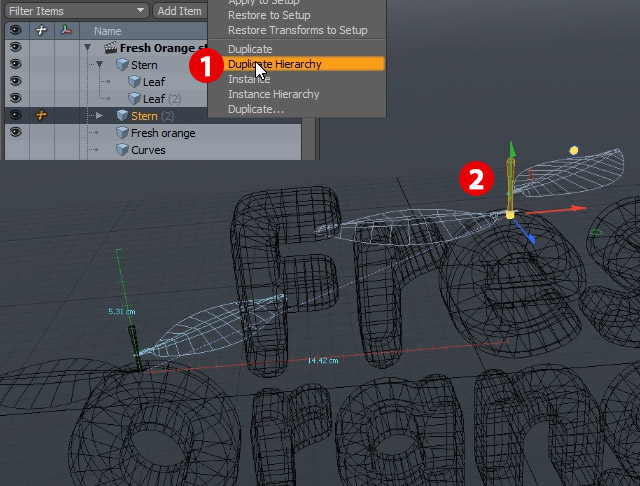
In Item Mode (5) choose Duplicate from the right click menu. [1]
Then move stern copy over the "e" letter. [2]
Step 31
Adjust leaf placing until you will be happy.
Step 32
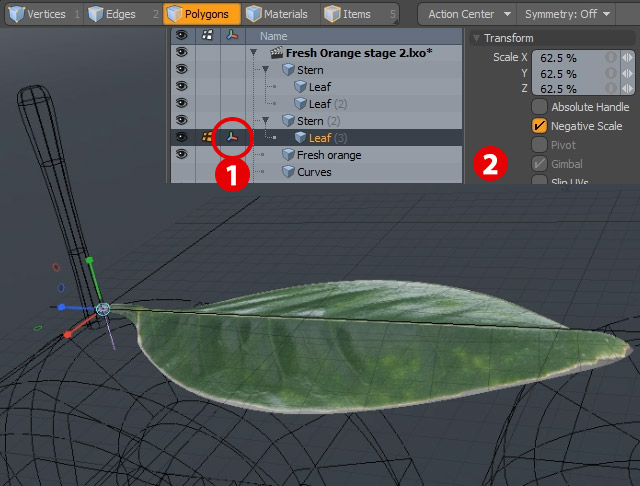
In Item List press first column on the left side from "Leaf" mesh to
change Origin Point to that mesh Origin Point for a little while. [1]
Then scale leaf in Polygon Mode.
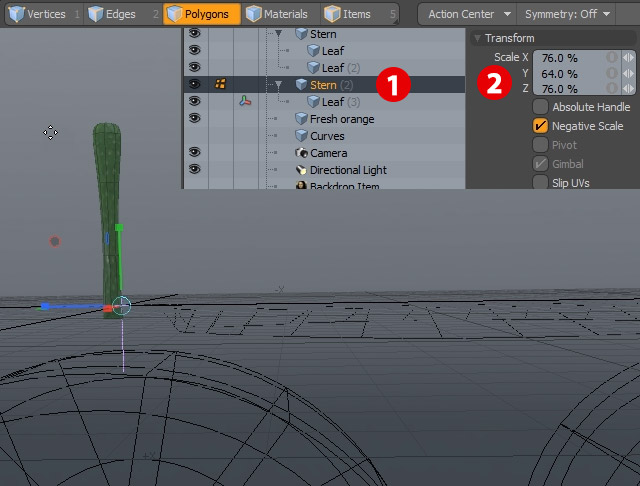
Step 33
In Polygon Mode (3) scale down stern. [1]
Step 34
Delete one extra leaf, and move the only one little bit lower.
Step 35
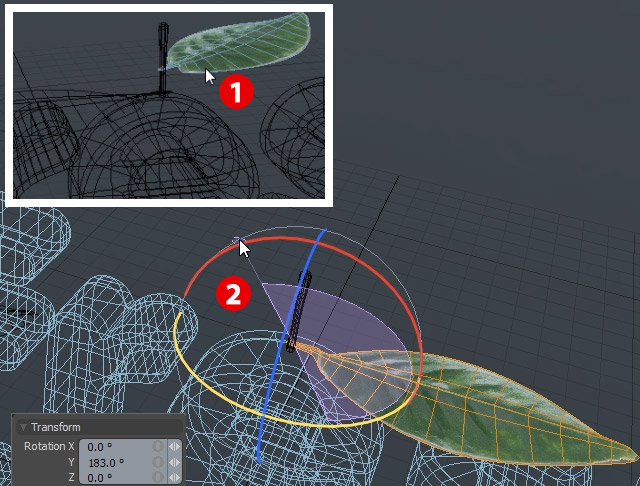
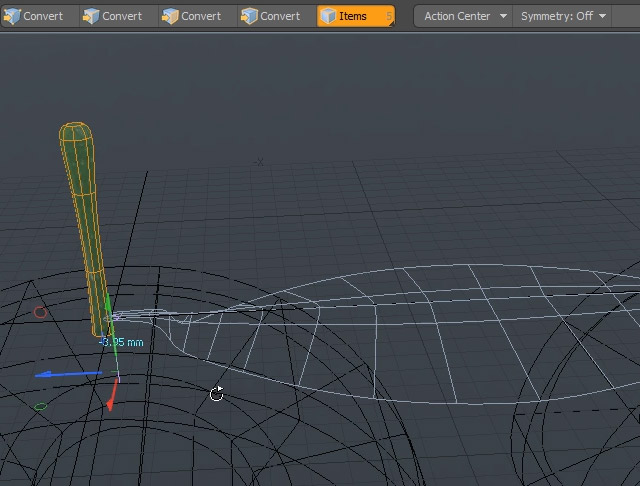
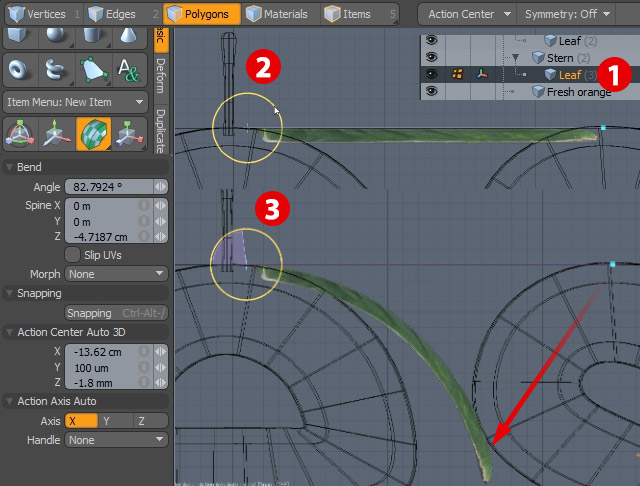
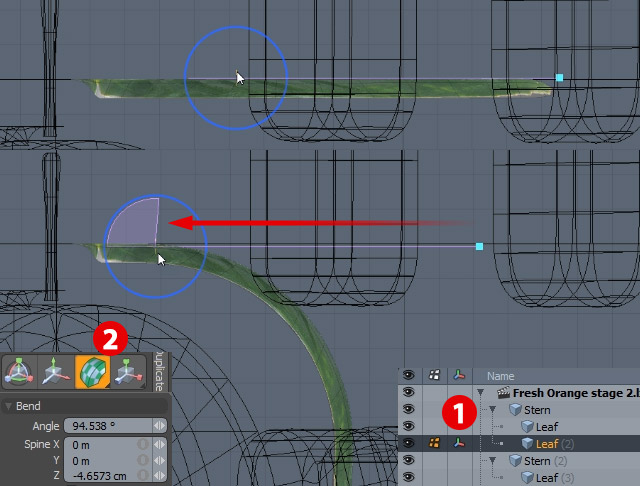
Select Leaf in Item List. [1]
In Polygon Mode (3) activate Bend Tool (Command/Ctrl-E)
Click on the screen in place that you want to start bending. [2]
Use yellow circle to bend leaf. [3]
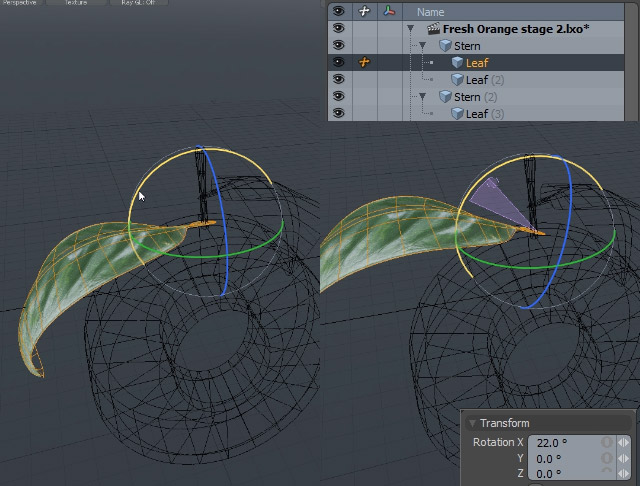
Step 36
Adjust placing of the leaf until you will be happy.
Step 37
Use Bend Tool (Command/Ctrl-E) to shape leafs.
Step 38
What is great about Modo is that you can change Bend Tool position while tool is live. This way you can change shape of the leaf.
Step 39
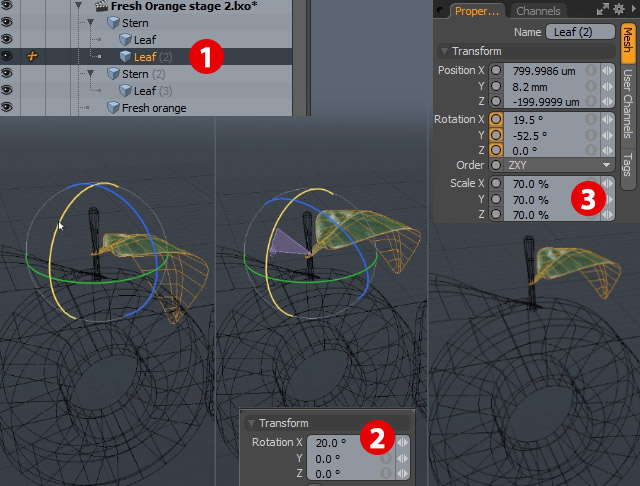
Adjust shape of the upper leaf too. Play around with different Bend center positions.
Step 40
Rotate and refine position of leafs of the letter "O".
Step 41
Rotate also second upper leaf. Use Scale Tool (R) and make this leaf smaller.
Step 42
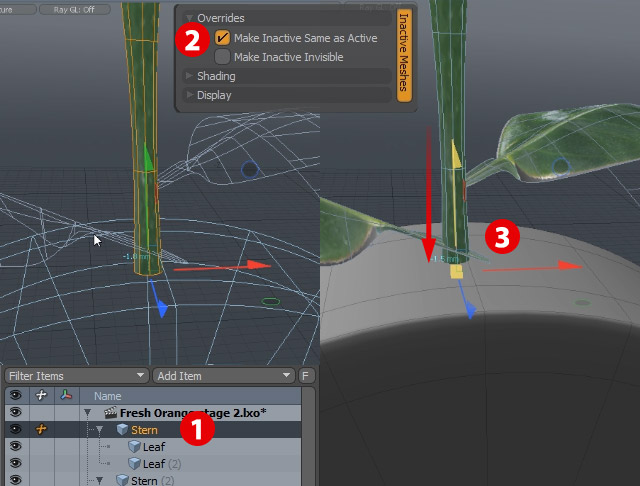
Now the final placing of stern.
Select stern Mesh in item mode. [1]
Open Viewport Properties (K) and turn on Make Inactive Same as Active. [2]
Now you will see when stern will intersect with letter surface.
Move it slightly down. [3]
Step 43
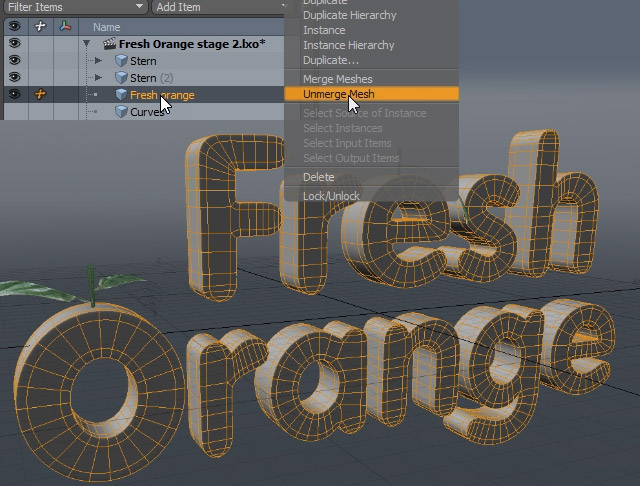
Now after all those efforts you can finish your letters.
In Item Mode (5) select "Fresh Orange" mesh.
From Right Click Menu choose Unmerge Mesh.This will split your one mesh to individual letters, and then you will be able to move and rotate them independently.
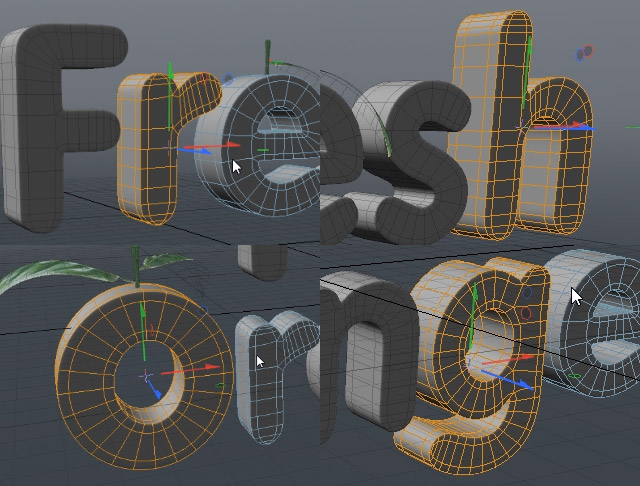
Step 44
In Item Mode (5) Select letter "F".
Go to: Center to Bounding Box > Center [3]
Step 45
Do that for all of the letters.
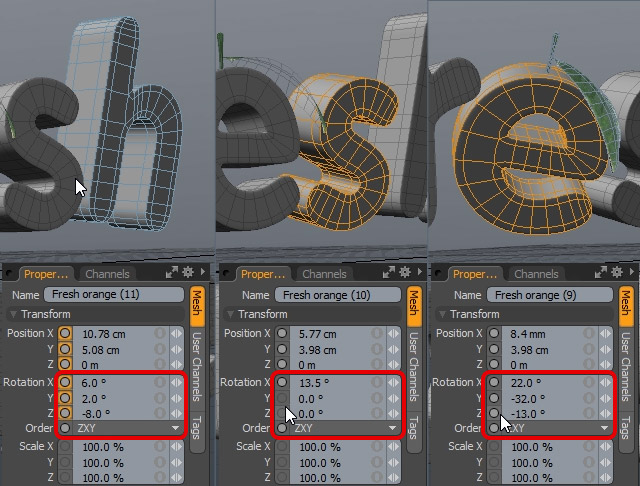
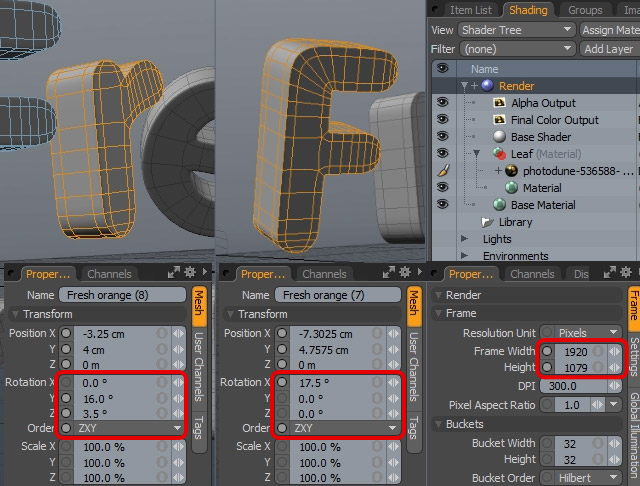
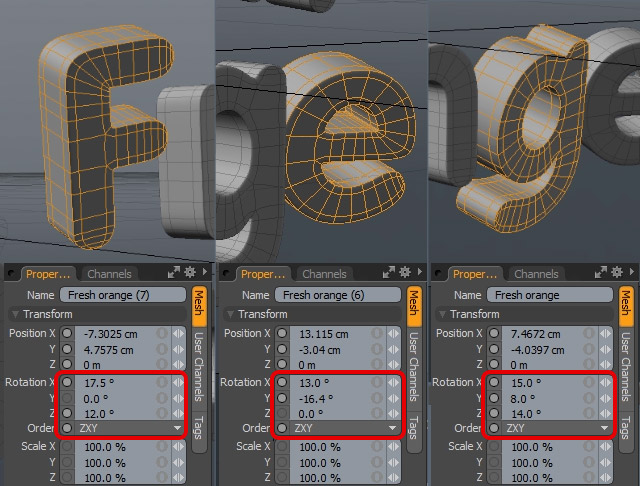
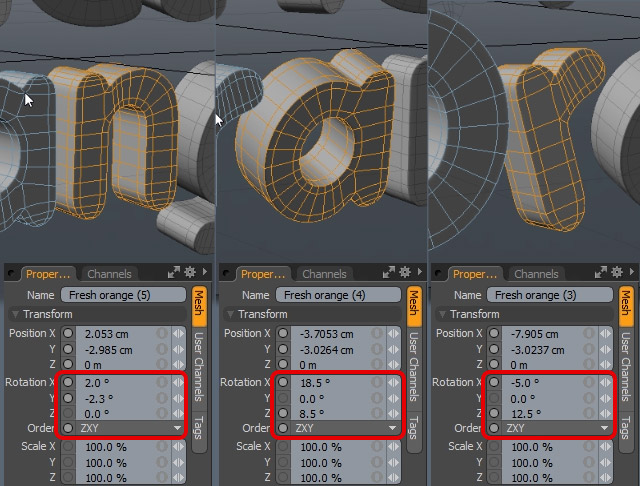
Step 46
To add some live and funny feeling to orange text play around with Rotation of individual letters.
In Item Mode (5) select each letter and in its properties channel change values as you can see on the picture.
Remember to put stern mesh inside letter that is its base. This way stern will inherit rotation of the parent letter.
Step 47
To truly match my artwork you must change image size to the same dimensions.
Go to Shader Tree and select Frame Size
Change values as shown on the screen.
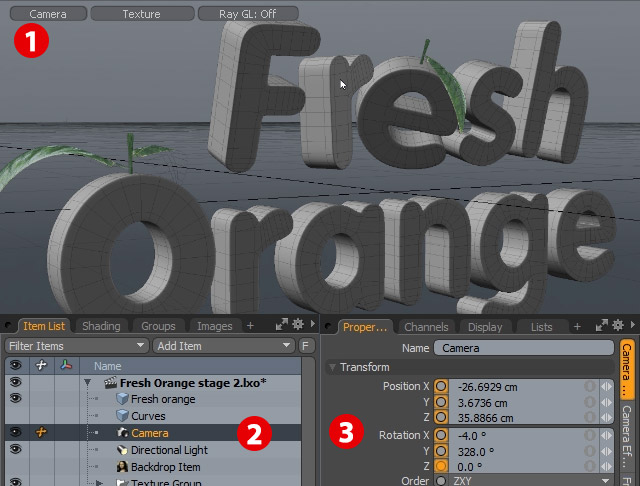
Step 48
Change Viewport view to Camera (.) on keyboard. [1]
Then select camera in item list. [2]
Change it Position and Rotation as shown on the screen grab
Step 49
Now adjust rotation of the rest of letters.
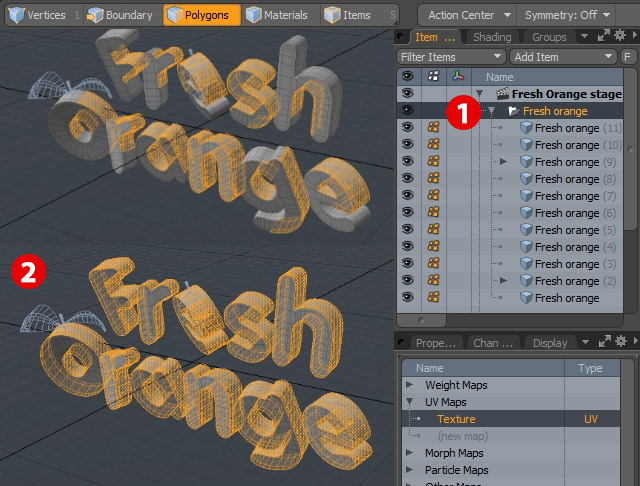
6. Make Groups and Export UVs to EPS
Step 1
Group meshes in one folder and call it " Fresh orange". [1]
Select few polygons on sides of letters.
Then press (L) to select loops.
Step 2
Press (H) to hide this geometry. Your scene should look like this.
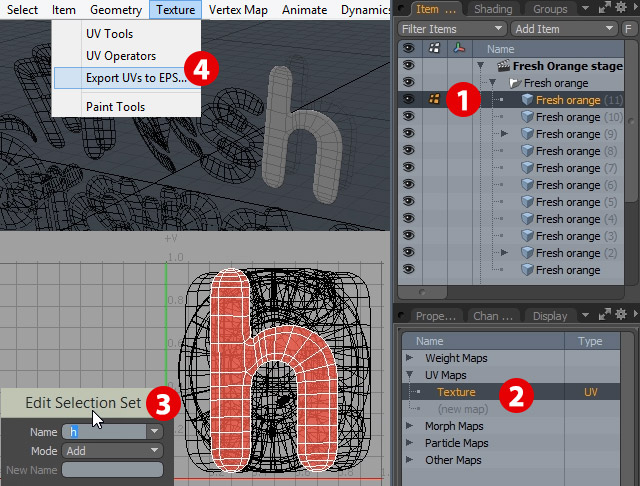
Step 3
Select first letter. [1]
Make sure that you have UV map selected. [2]
Go to Selection > Add Selection Set. and add "h" selection set. [3]
Finally go to Texture > Export UVs to EPS.
Save this file as: h.EPS.
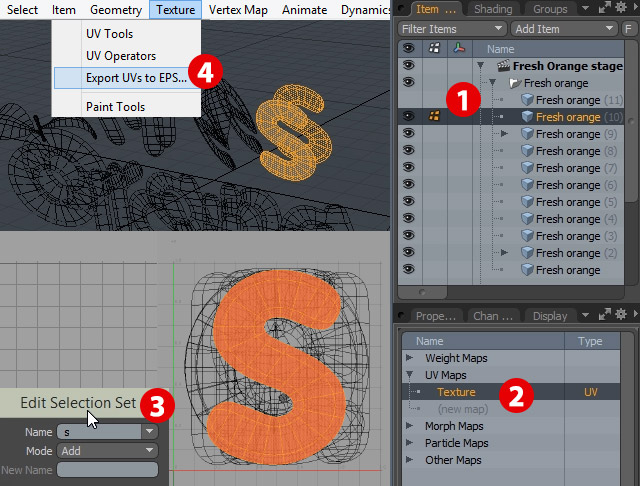
Step 4
Select first letter. [1]
Make sure that you have UV map selected. [2]
Go to Selection > Add Selection Set. and add "s" selection set. [3]
Finally go to Texture > Export UVs to EPS.
Save this file as: s.EPS.
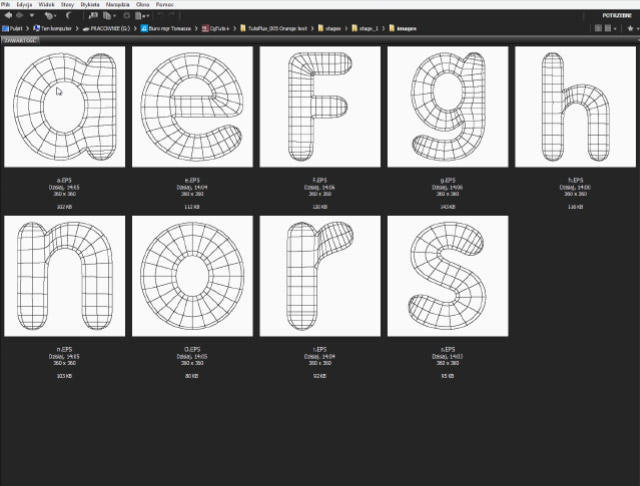
Step 5
After export you should have something like me. One EPS file for each letter.
7. Create High Resolution Orange Textures
Step 1
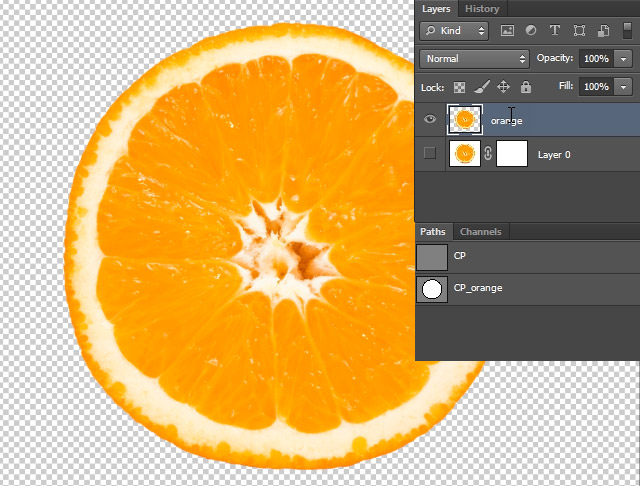
Now let's use Photoshop to create set of hires orange cut textures.
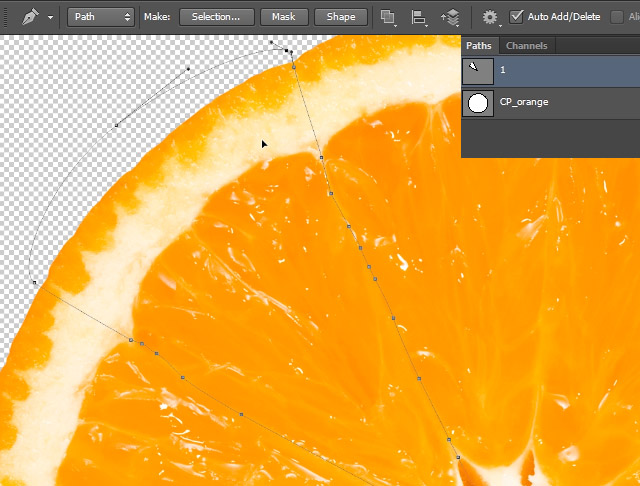
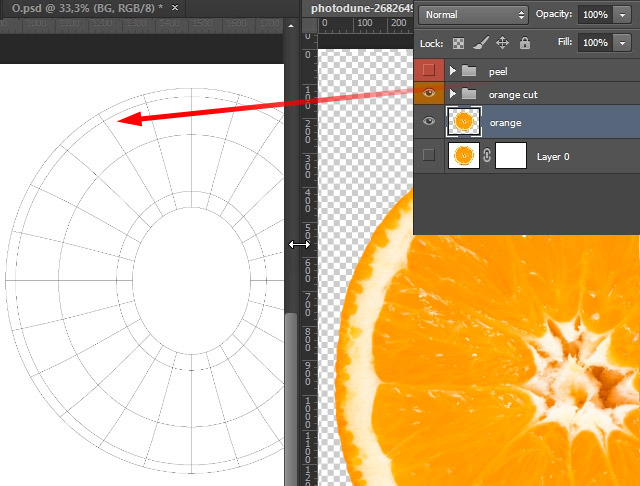
Draw Path with Pen Tool (P) to cut out orange from Background.
Step 2
Call this layer "orange".
Call work path "CP_orange"
Step 3
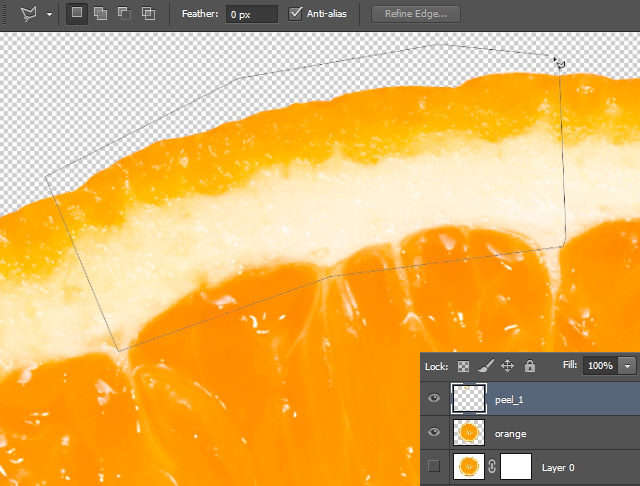
Now with polygonal selection tool draw quick selections.
Press (J) to create new layer "peel_1"
Step 4
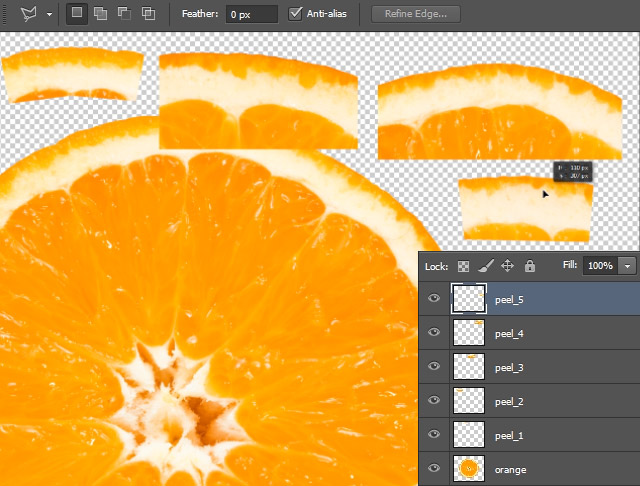
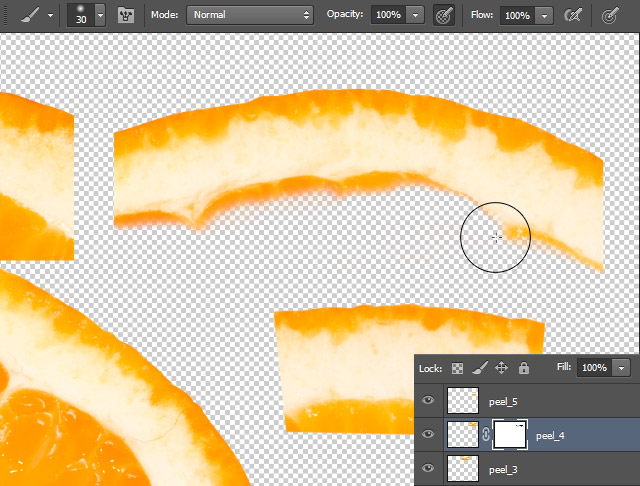
Create few different orange peel parts.
Step 5
Mask juicy parts.
Step 6
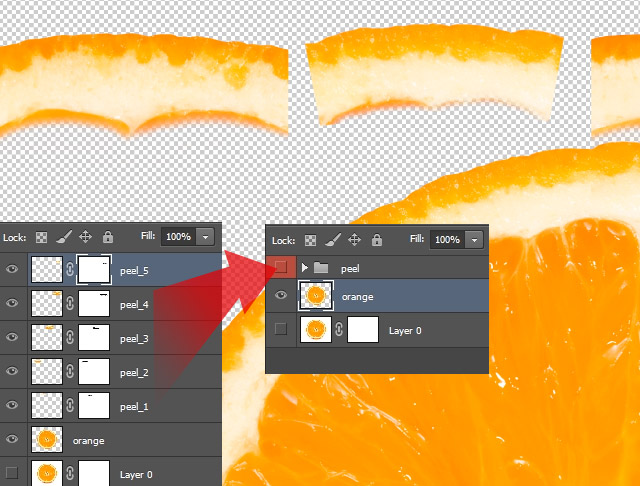
Group (Command/Ctrl-G) all peel parts in to one folder and call it peel. Change this folder color to red.
Step 7
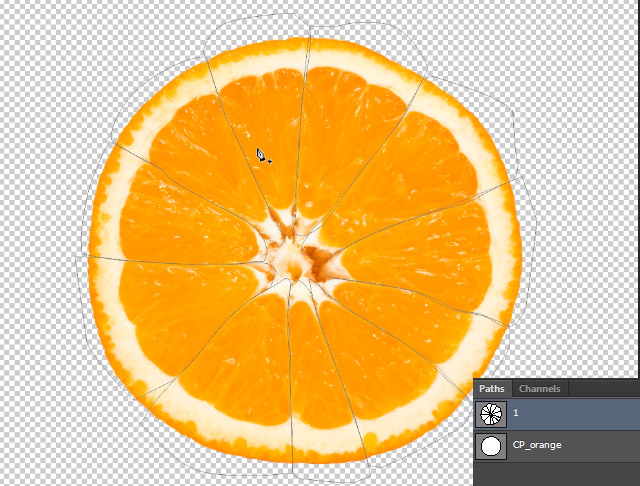
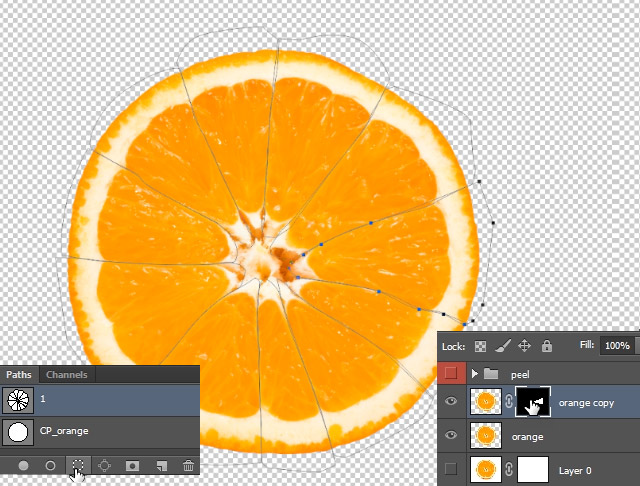
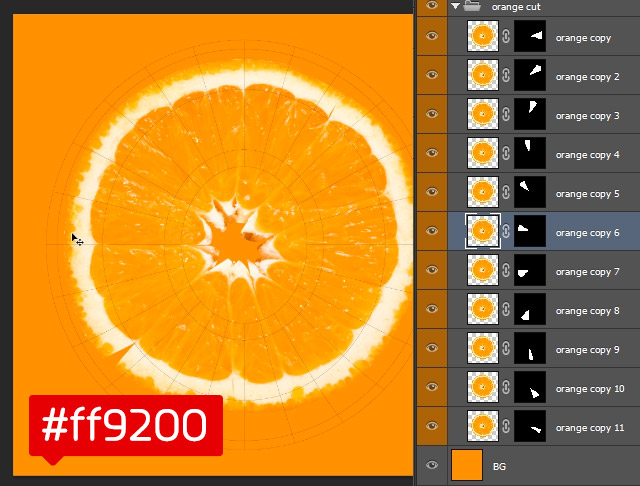
Now with the Pen Tool (P) create slice of an orange.
Step 8
After you finish Path "1" should look like this.
Step 9
Duplicate "Orange" layer.
Select path with Path Selection Tool.
In Path Palette create selection from it.
Apply this selection as mask over new layer.
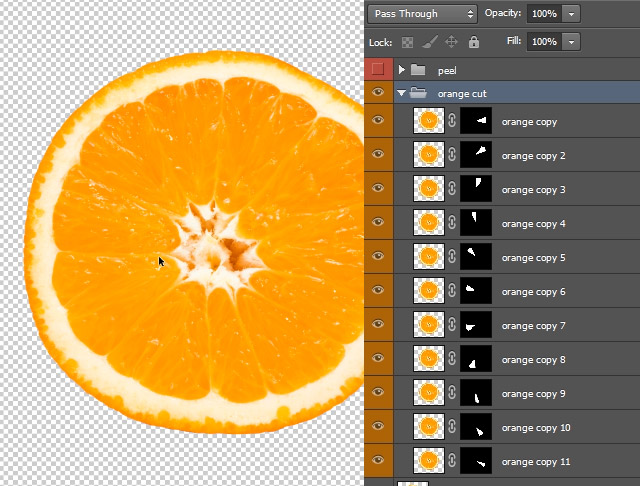
Step 10
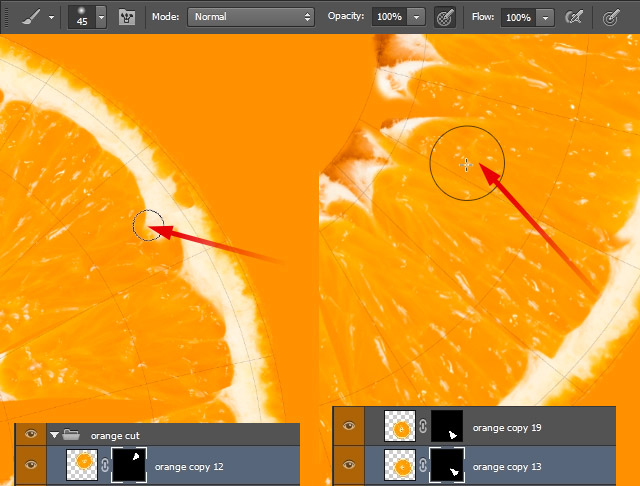
After cutting orange to smaller parts you should have something like
me. Small parts of orange masked and grouped into one folder "orange
cut".
Save this files as base for texture creation.
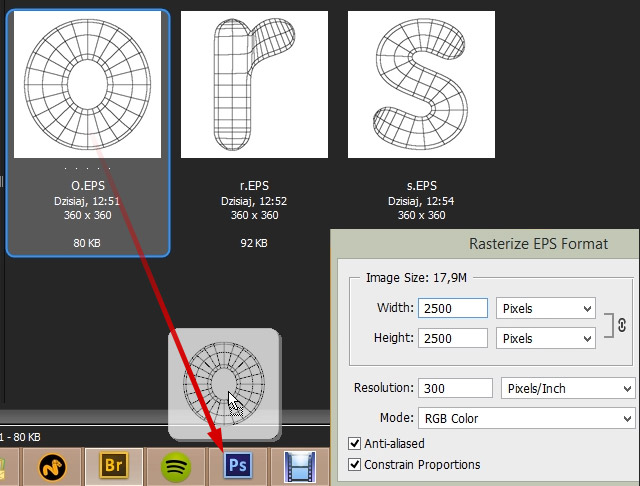
Step 11
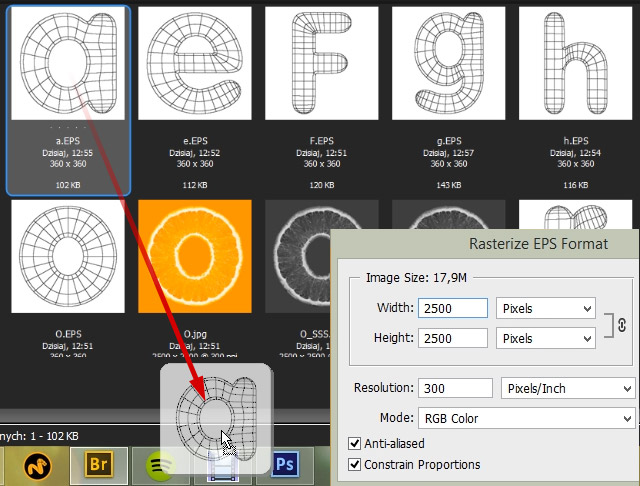
In Bridge locate eps files exported from Modo.
Grab "O.eps" and Drag and Drop it onto Photoshop.
On Rasterize eps file choose image size as on picture.
Step 12
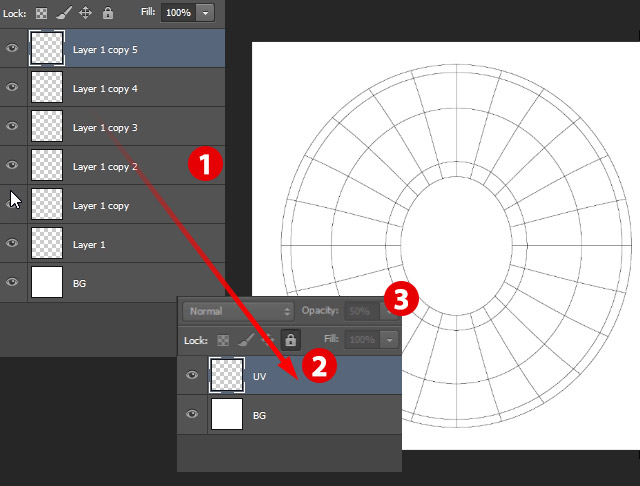
Pres (J) few times to quickly duplicate Wireframe layer. [1]
Then grab all those layers and merge them into one. Use (Command/Ctrl-E) [2]
set its Opacity to: 50%. [3]
I this new document create BG layer.
Use Bucket Tool (B) to fill it with white color.
Step 13
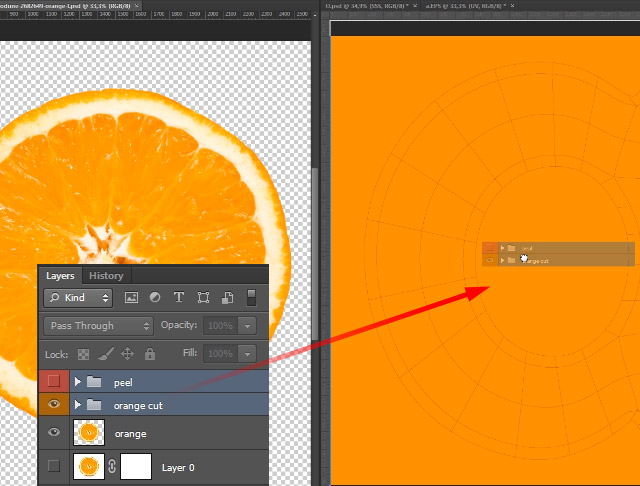
Drag and Drop 2 groups that you have created to the new document.
Step 14
Fill BG layer with #ff9200 color.
Step 15
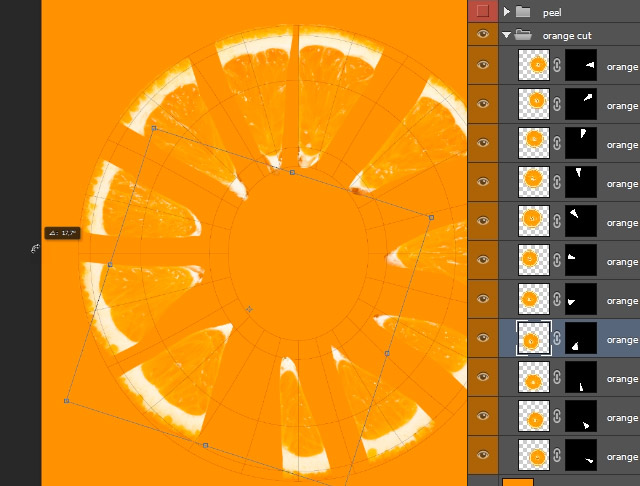
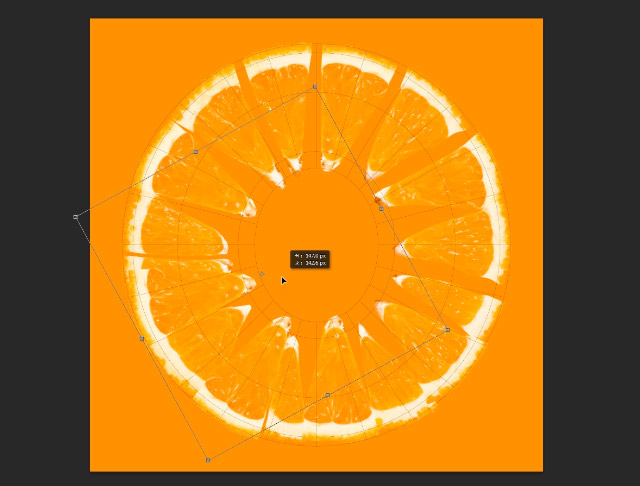
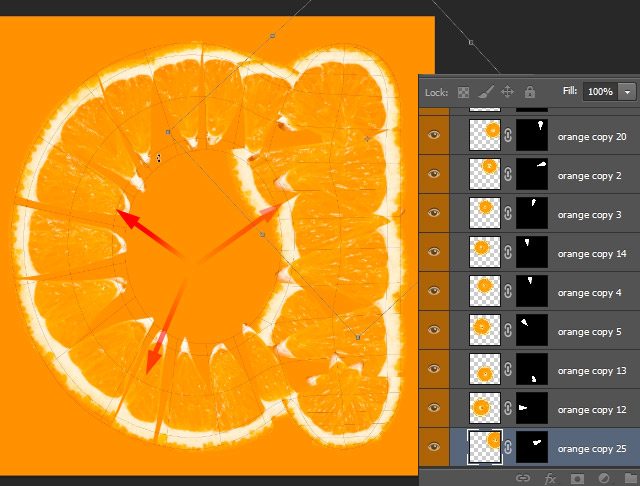
Use Transform Tool to move and place orange cuts over UV template.
Step 16
Drag pieces with Alt pressed to duplicate layers in needed.
Step 17
Activate Brush Tool (B) and uncover mask to blend in pieces together.
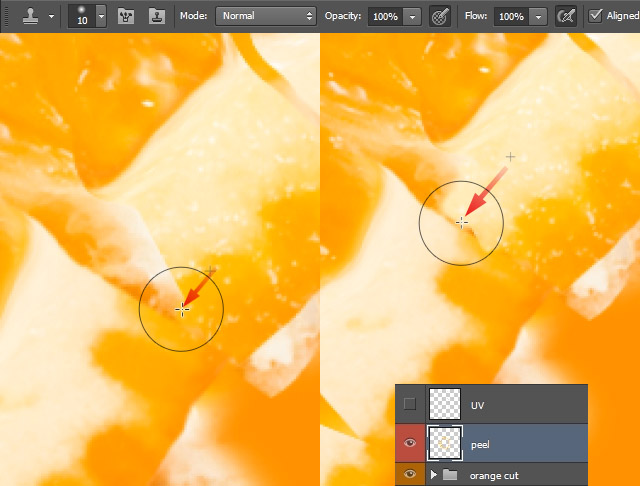
Step 18
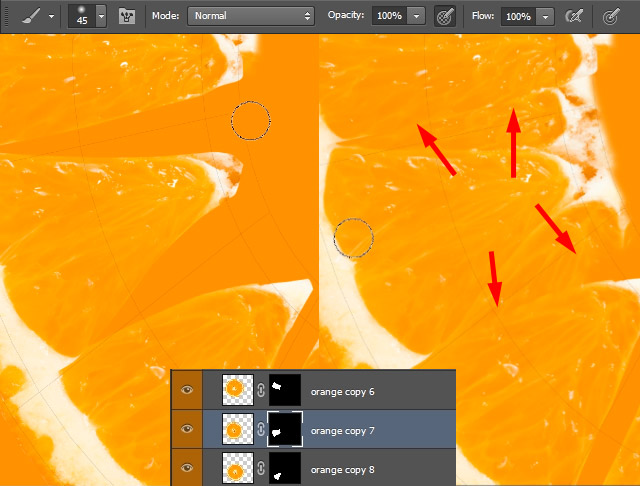
Turn on Peel group.
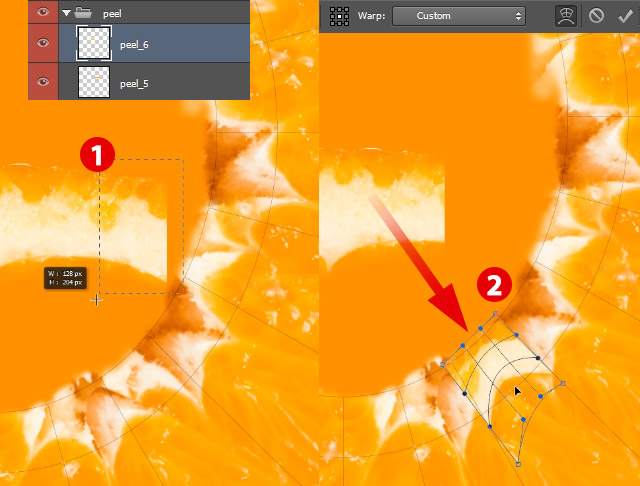
Select fragments of the orange Albedo and place them in inner part of the orange. [1]
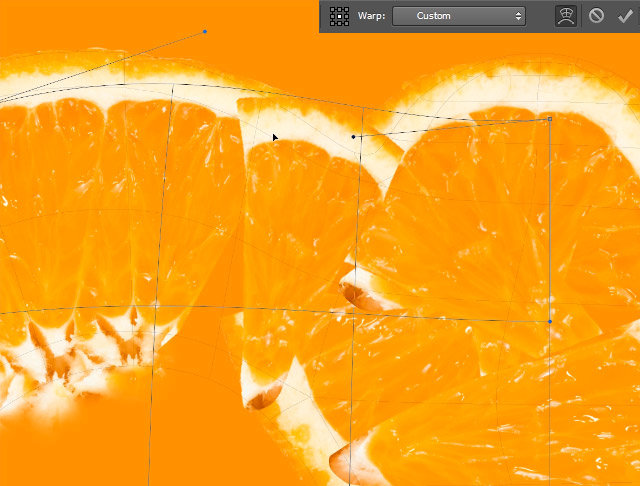
Use Warp Tool (Command/Ctrl-T) to shape it until will look natural.
Step 19
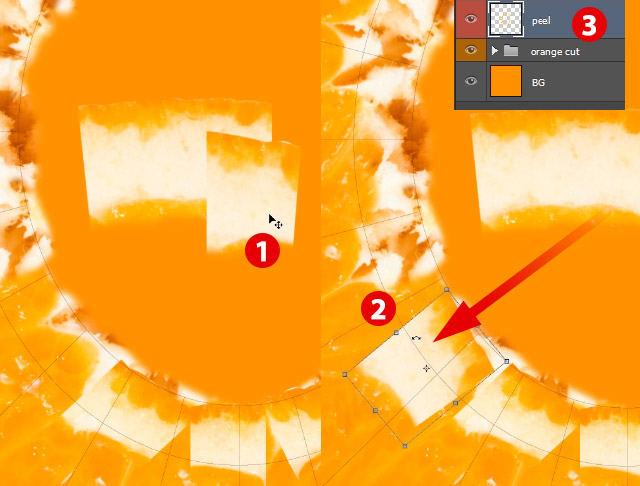
Use all pieces to add variation to this albedo part. [1]
Move them and adjust position to match UV template. [2]
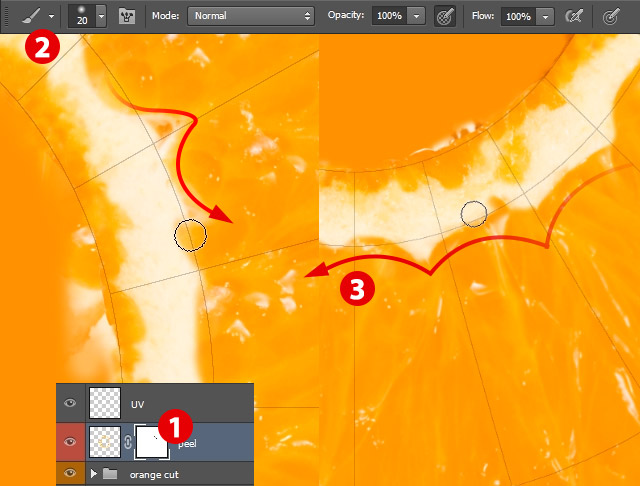
When you finish, merge this "Peel" group together (Command/Ctrl-E)
Step 20
Go to Filter > Liquify.
With Smudge Tool gently move albedo to mimic real orange skin.
Step 21
Fill gaps with Clone Stamp Tool (S).
Step 22
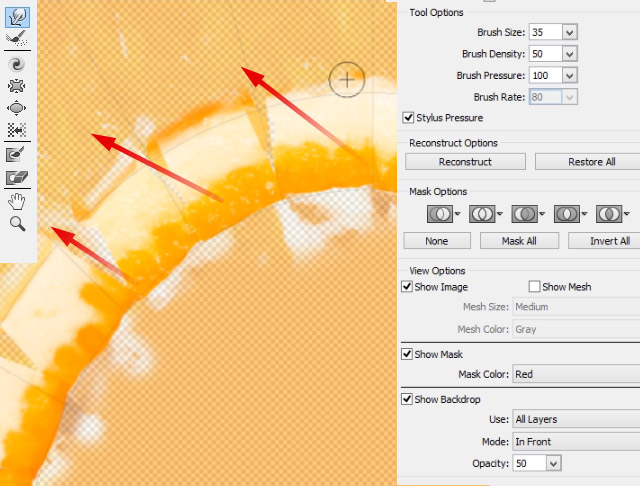
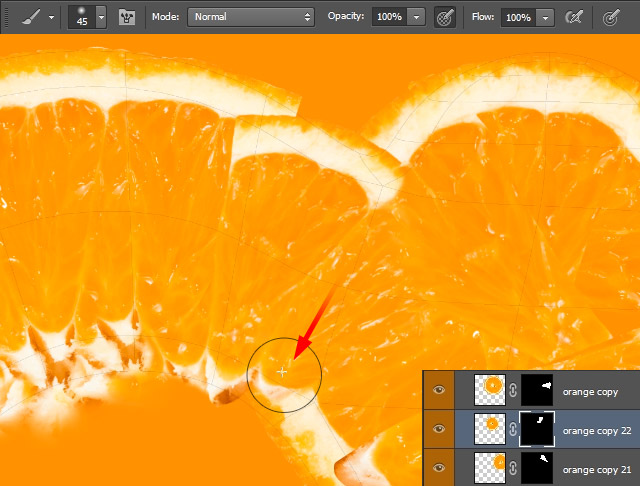
Add layer mask to "peel" layer. [1]
Gently mask parts of the albedo to form natural "star like pattern." [2] and [3]
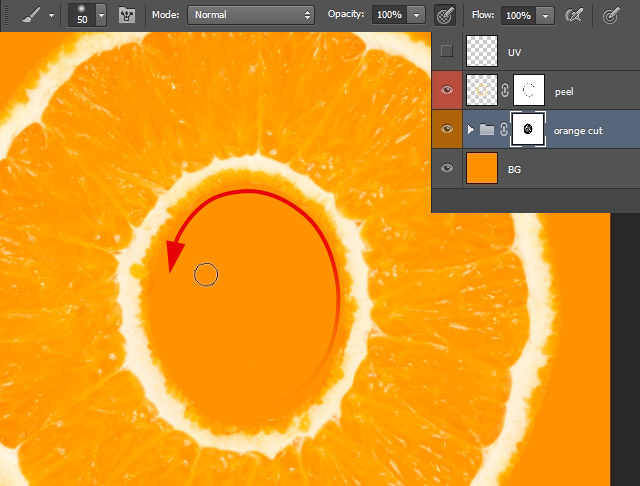
Step 23
Just to have great professional looking texture, select orange cut group and mask parts that are inside.
Step 24
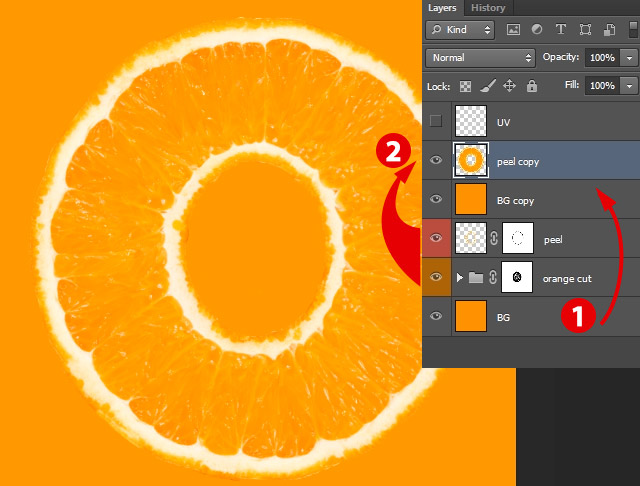
Drag/copy BG layer above peel layer. [1]
Select "peel" layer and "orange cut group."
Press (J) to quickly duplicate them.
Merge them by pressing (Command/Ctrl-E). [2]
Step 25
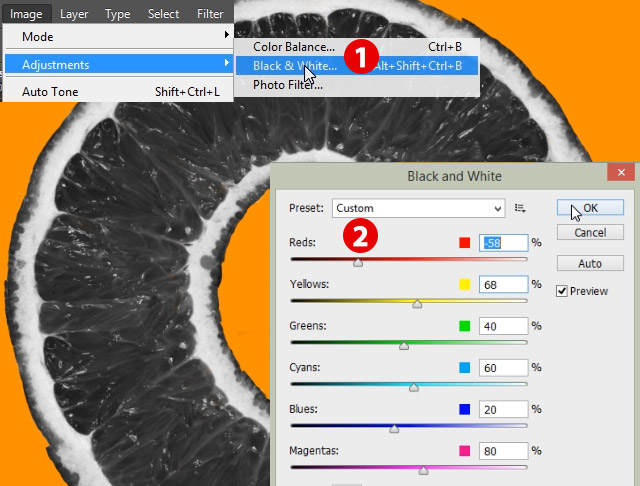
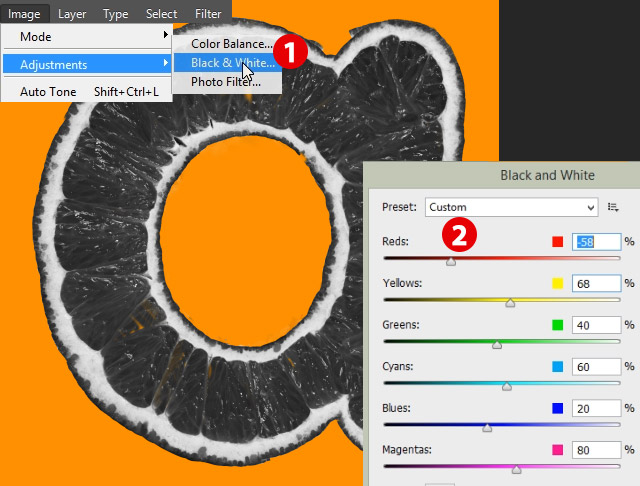
Go to Image > Adjustments > Black & White. [1]
Adjust color toning like on the screen. [2]
Step 26
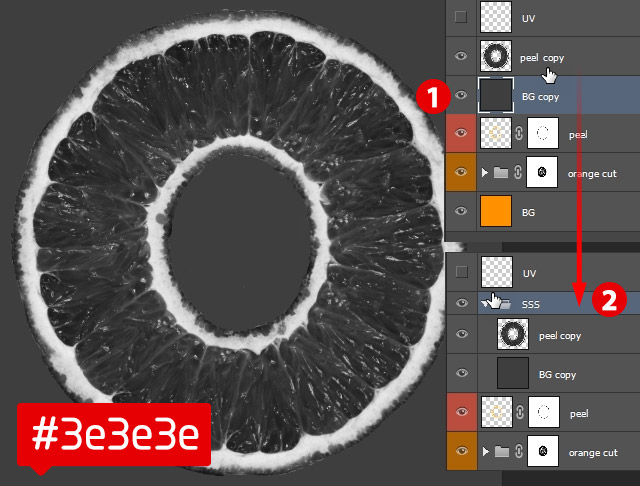
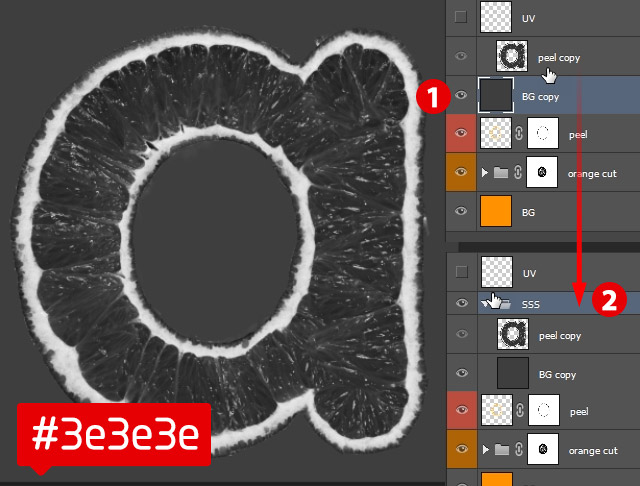
Fill BG copy with dark gray color: #3e3e3e. [1]
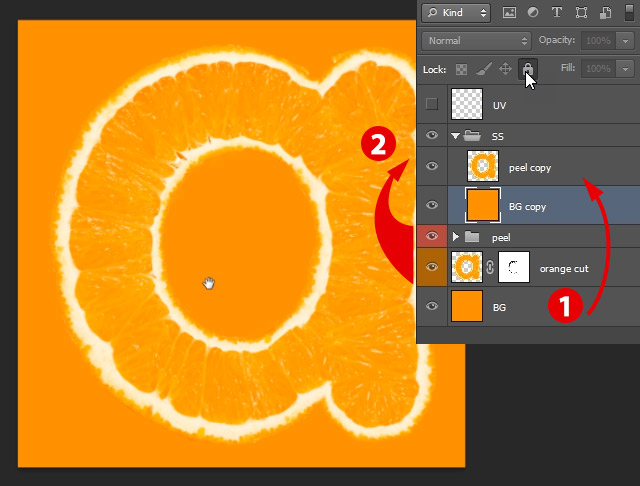
Grab both layers and group them in "SSS" folder. This stands for Sub Surface Scattering.
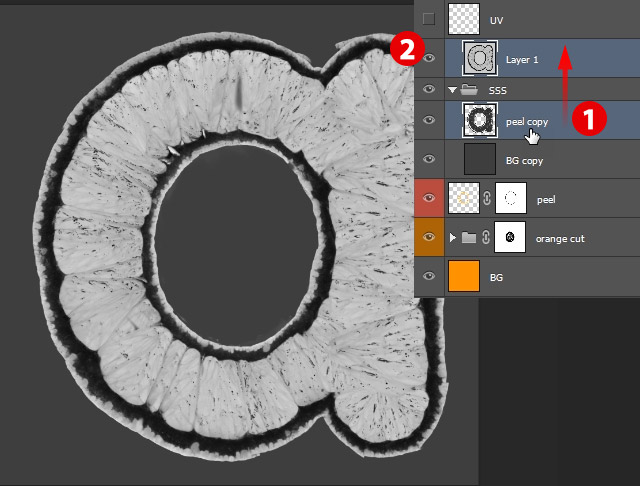
Step 27
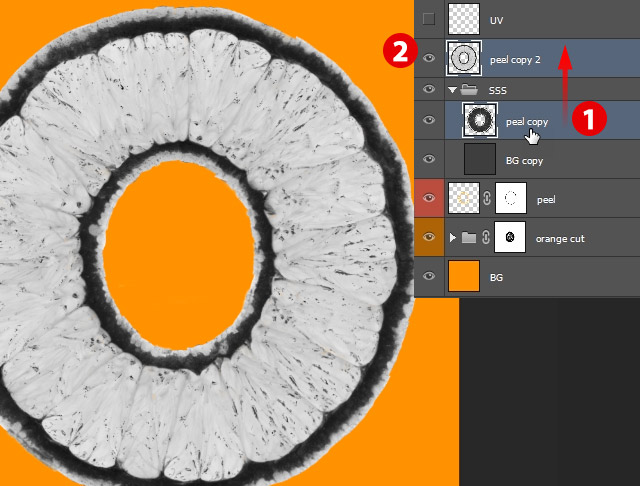
Duplicate "peel copy" layer and drag above all layers. [1]
Invert this layer by pressing (Command/Ctrl-I). [2]
Step 28
Press (Command/Ctrl-A) to select all pixels on layer "peel copy 2".
Then press (Command/Ctrl-C) to copy them.
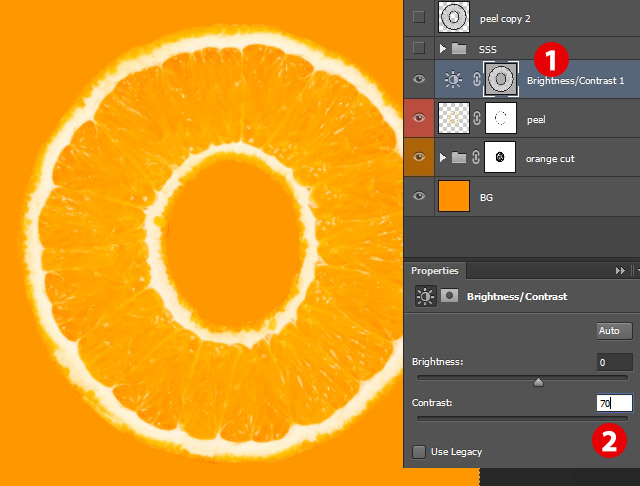
Add Brightness/Contrast layer
Add mask to that layer
Hold Alt and press on the layer mask icon to see contents of the mask.
Paste there copied pixels.
Hold Alt and press on the layer mask icon to leave layer mask. [1]
Set Contrast value to 70.
You can save image as O2.jpg
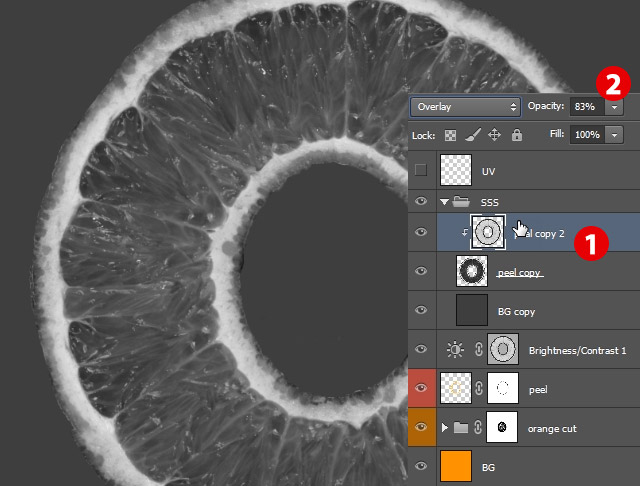
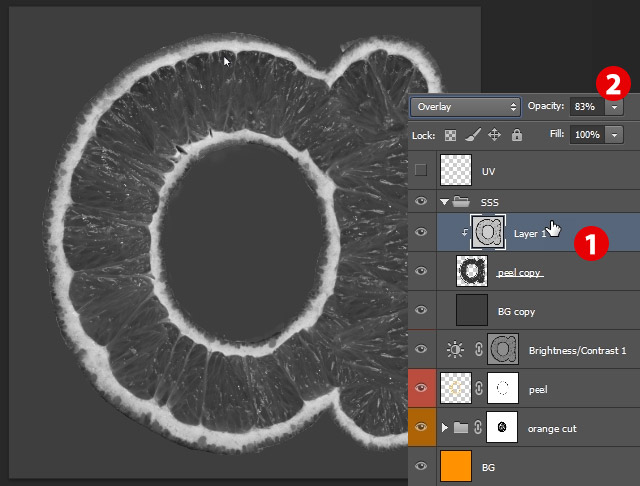
Step 29
Select "peel copy 2" layer and clip it by the lower layer. [1]
Turn on "peel copy 2" and set it Blending Mode to Overlay for about 83%. [2]
You can save image as "O_SSS.jpg"
8. Create Texture for Letter "a"
Step 1
In Bridge locate eps files exported from Modo.
Grab "a.eps" and Drag and Drop it onto Photoshop.
On Rasterize eps file choose image size as on picture.
Step 2
Pres (J) few times to quickly duplicate Wireframe layer. [1]
Then grab all those layers and merge them into one. Use (Command/Ctrl-E) [2]
Call it "UV"
Set its Opacity to 50%. [3]
In this new document create BG layer.
Use Bucket Tool (B) to fill it with orange #ff9200.
Step 3
Drag and Drop the two groups that you have created to the new document.
Step 4
Use Transform Tool to move and place orange cuts over UV template.
Step 5
Activate Brush Tool (B) and uncover mask to blend in pieces together.
Step 6
Use Warp Transform to adjust shape to UV template.
Step 7
With Brush Tool uncover layer mask to blend part of the fruits.
Step 8
With Clone Stamp Tool refine edges of albedo to match UV template.
Step 9
Keep unmasking orange cuts until they merge into one organic surface.
Step 10
In letter "O" I have showed you how to use Liquify filter, but you can be more efficient using Puppet Warp. One
thing you need to remember, apply any layer mask before using Puppet
Warp on any layer, because it will be applied with lowest, settings.
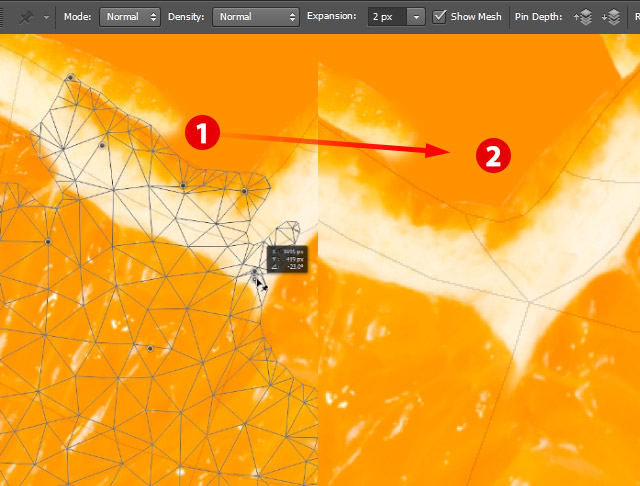
Select piece of orange layer.
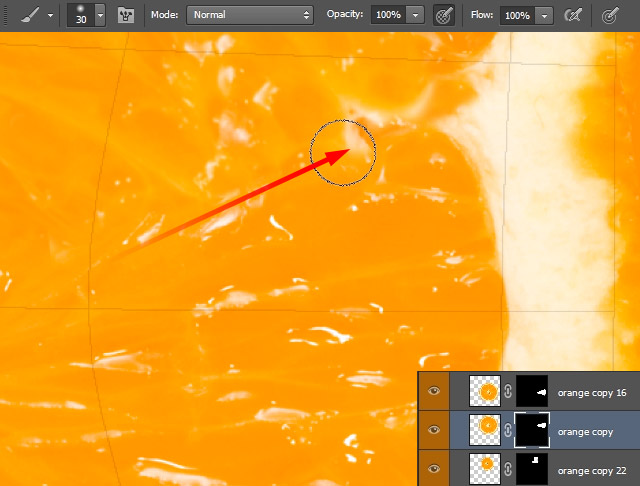
Unmask with Brush Tool some parts of it. [1]
Press (Shift-Alt-Command/Ctrl-T) to activate Puppet Warp.
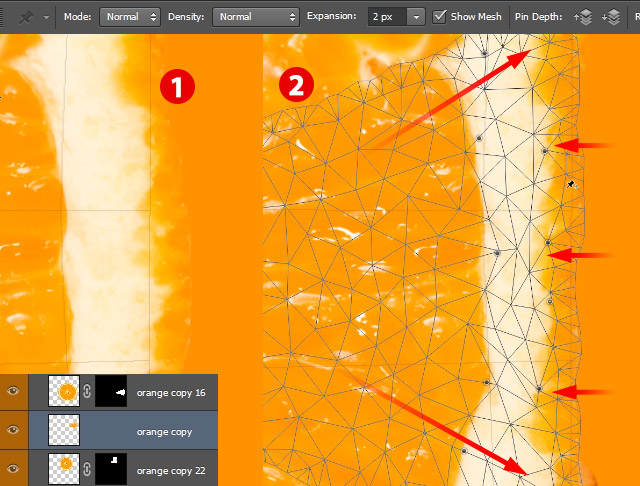
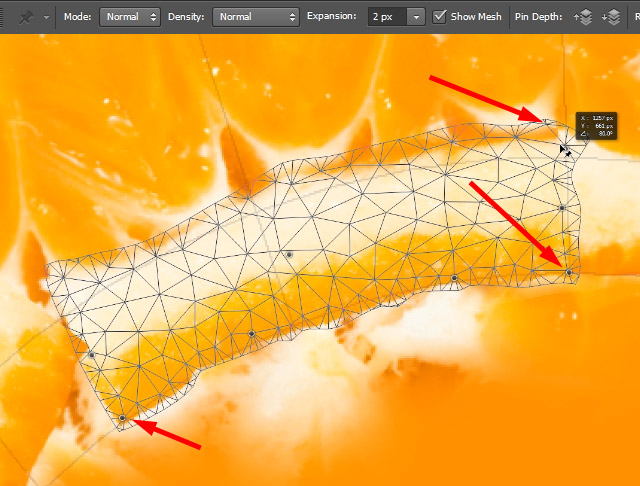
Place pins in desired places, and start moving them around to match shape of UV template. [2]
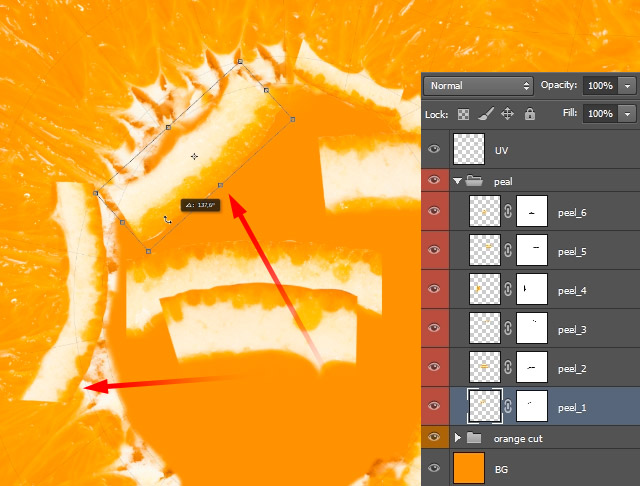
Step 11
In order to hold texture in place Place pins in 1, 2, 3, 4 on one side of the patch.
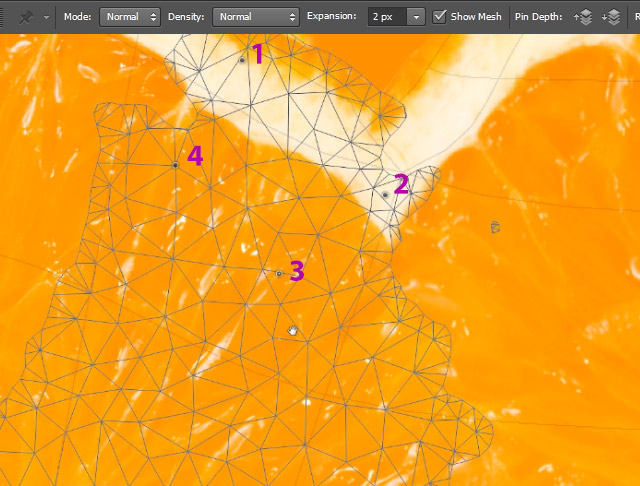
Step 12
Place pins 5, 6, 7 on the other side and start to move them.
Step 13
When you finish moving pins, texture sits in place. Exactly where you want it.
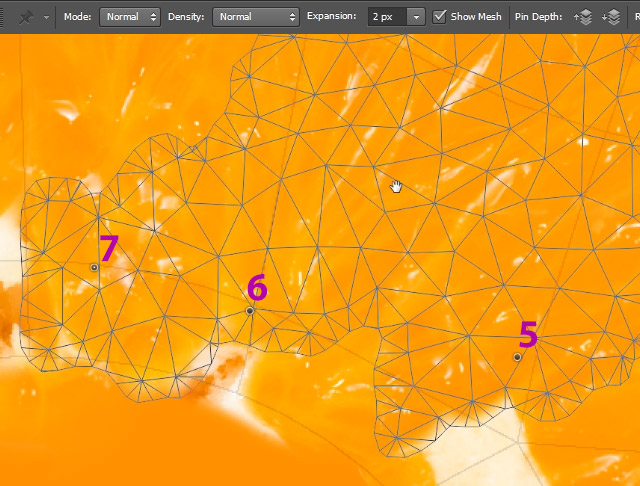
Step 14
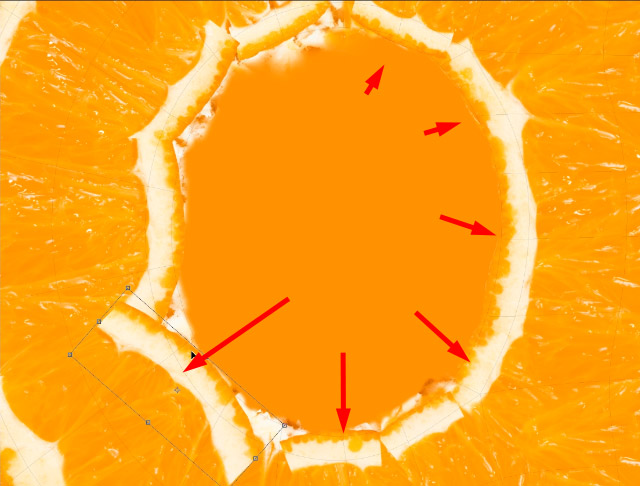
Use all pieces of peel to add variation to this albedo part. [1]
Move them and adjust position to match UV template. [2]
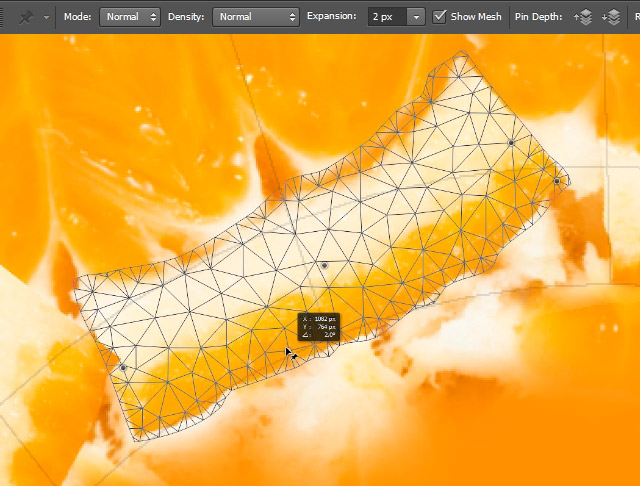
Step 15
You can dice peel parts to smaller pieces to fit to curvature little better.
When you finish, merge this "Peel" group together (Command/Ctrl-E)
Step 16
Use Puppet Warp again to bend orange peel the way you need it.
Step 17
Pay attention to placing of pins. This way bad distortion will be invisible.
Step 18
When you finish, merge contents of "Peel" group together (Command/Ctrl-E)
Step 19
Add layer mask to merged "peel_6" layer. [1]
Mask this albedo to give impression of real orange insides being held by this peel.
Step 20
Drag or copy BG layer above peel layer. [1]
Select "peel" layer and "orange cut group."
Press (J) to quickly duplicate them.
Merge them by pressing (Command/Ctrl-E). [2]
Step 21
Go to Image > Adjustments > Black & White. [1]
Adjust color toning like on the screen. [2]
Step 22
Fill BG copy with dark gray color: #3e3e3e. [1]
Grab both layers and group them in "SSS" folder. This stands for Sub Surface Scattering.
Step 23
Duplicate "peel copy" layer and drag above all layers. [1]
Invert this layer by pressing (Command/Ctrl-I). [2]
Step 24
Press (Command/Ctrl-A) to select all pixels on layer "peel copy 2".
Then press (Command/Ctrl-C) to copy them.
Add Brightness/Contrast layer
Add mask to that layer
Hold Alt and press on the layer mask icon to see contents of the mask.
Paste there copied pixels.
Hold Alt and press on the layer mask icon to leave layer mask.
Set Contrast value to 70. [2]
You can save file as "a.jpg "
Step 25
Select "layer 1" layer and clip it by the lower layer. [1]
Turn on "peel copy 2" and set it Blending Mode to Overlay for about 83%. [2]
You can save file as "a_SSS.jpg "
9. Review Letters
Step 1
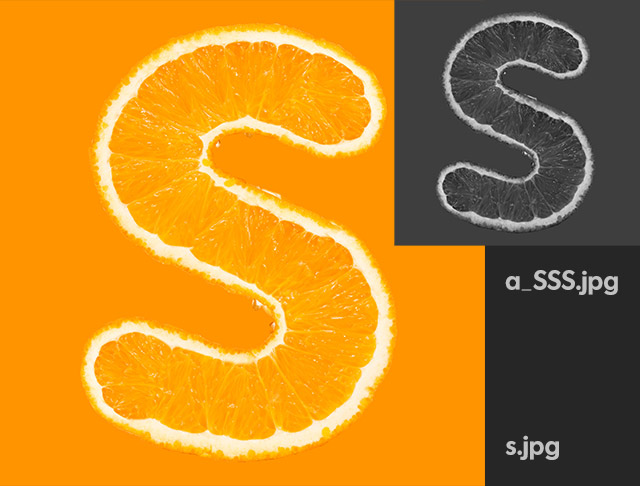
This is our texture for "S".
Step 2
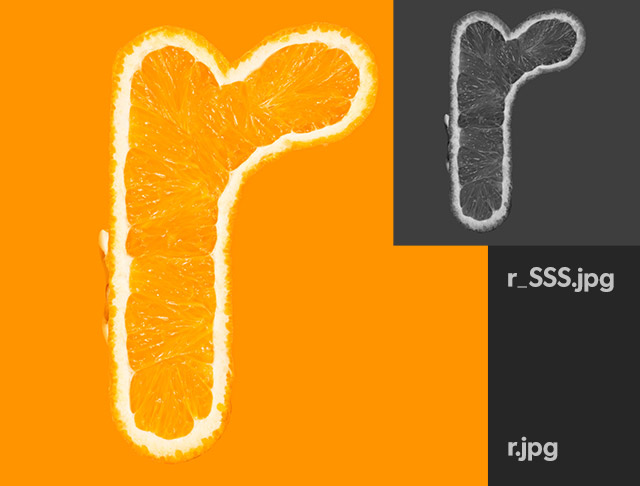
This is our texture for "r".
Step 3
This is our texture for "h".
Step 4
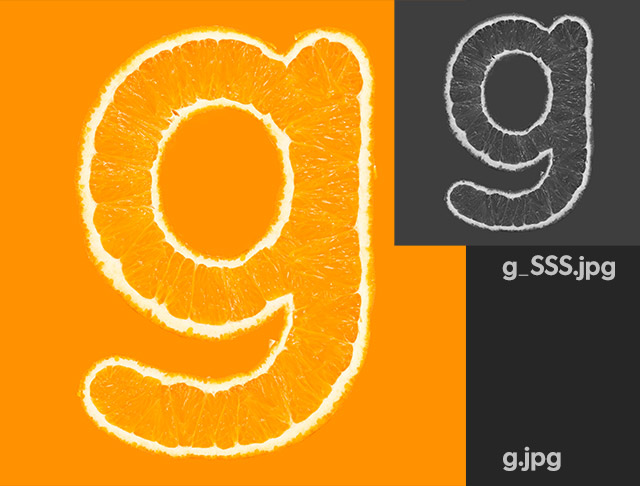
This is our texture for "g".
Step 5
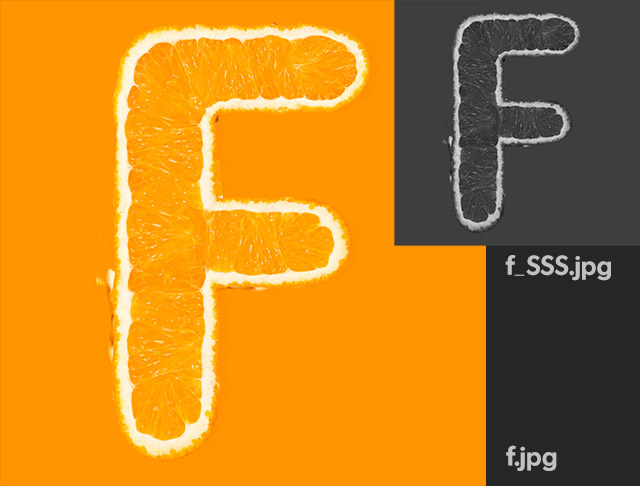
This is our texture for "F".
Step 6
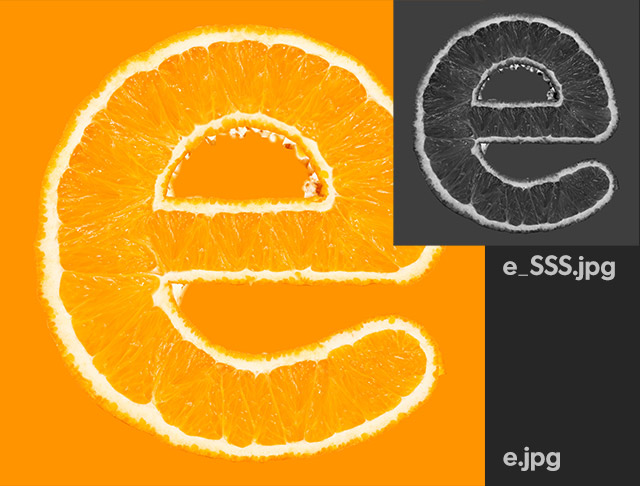
This is our texture for "e"
10. Create Seamless Orange Peel Texture
Step 1
Open orange picture from tutorial files.
Step 2
Draw square selection on the middle of the fruit. Copy information clipboard.
Step 3
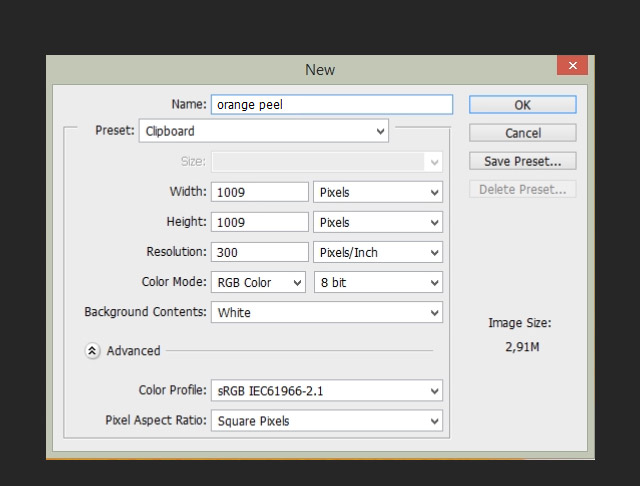
Create new document.
Step 4
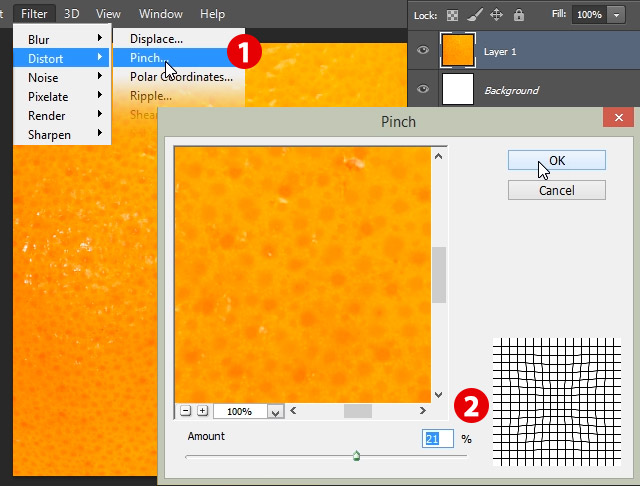
Go to Filter > Distort > Pinch. [1] Then set it Amount as on the screen. [2]
Step 5
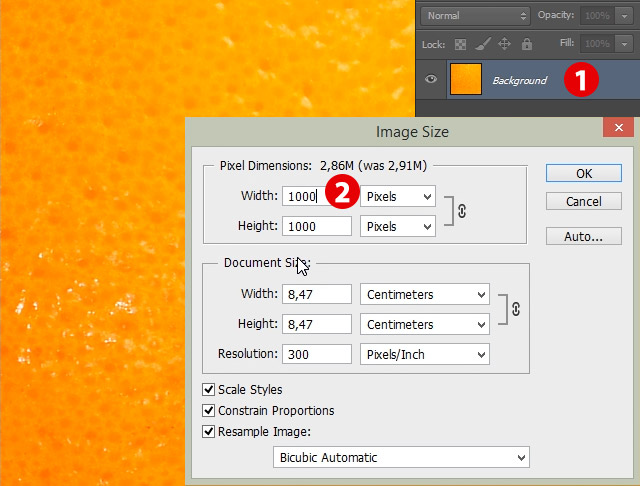
Change image size to 1000x1000 px.
Step 6
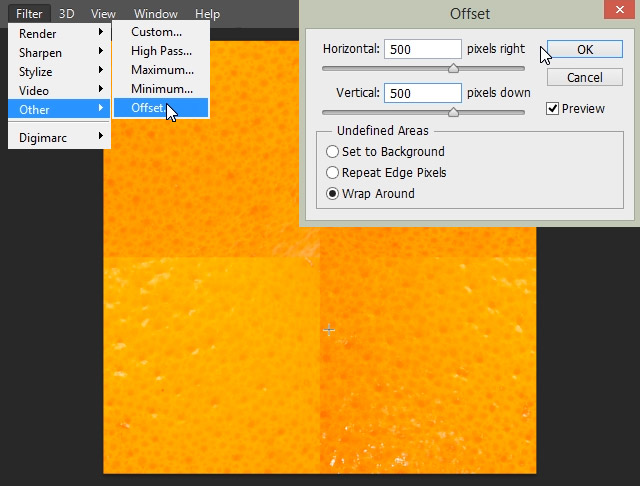
Go to Filter > Other > Offset and set its values like on the screen.
Step 7
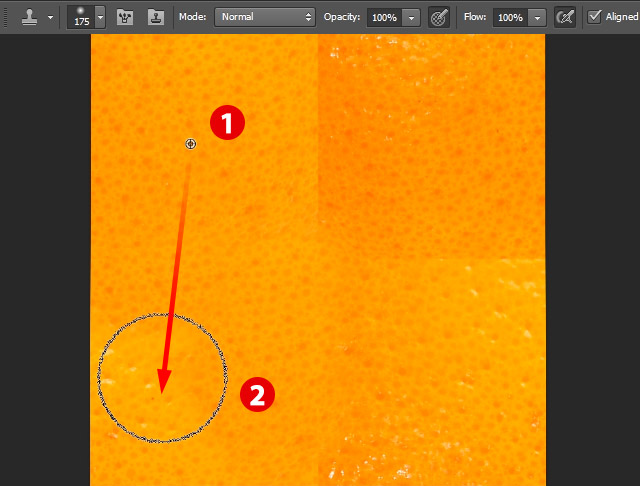
Now it is time to eliminate seams from texture.
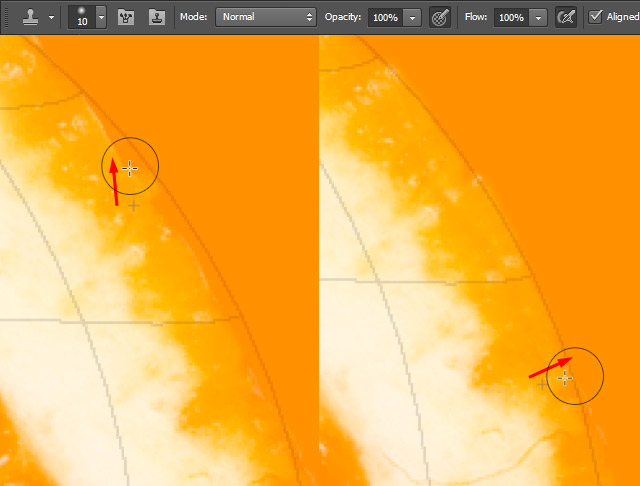
Activate Clone Stamp Tool (S).
Start cloning texture from [1] to [2].
Step 8
Keep Cloning until you won't be able to see seams.
Step 9
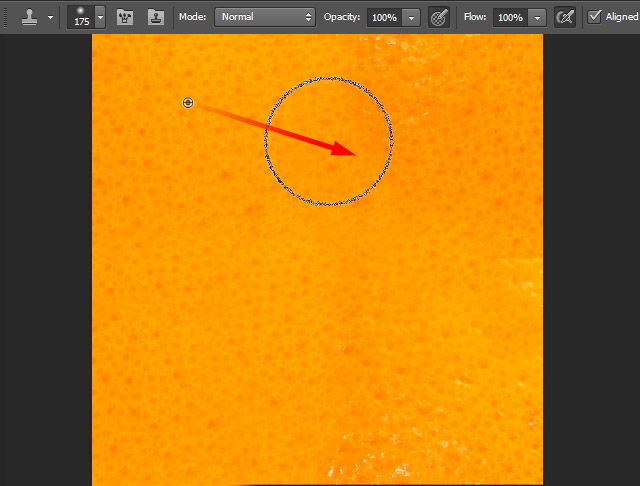
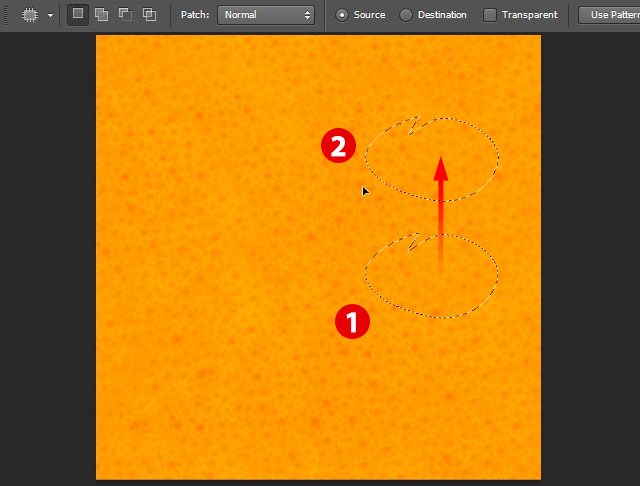
You can use patch tool to introduce more realism to your orange peel texture.
Press (J) to activate Patch Tool
Draw selections over areas where you have uneven pattern [1] and drag over areas with most evenly spaced dots. [2]
Repeat patching until you are happy with results and texture seams are invisible.
Then you can save it as "orange peel.jpg"
Step 10
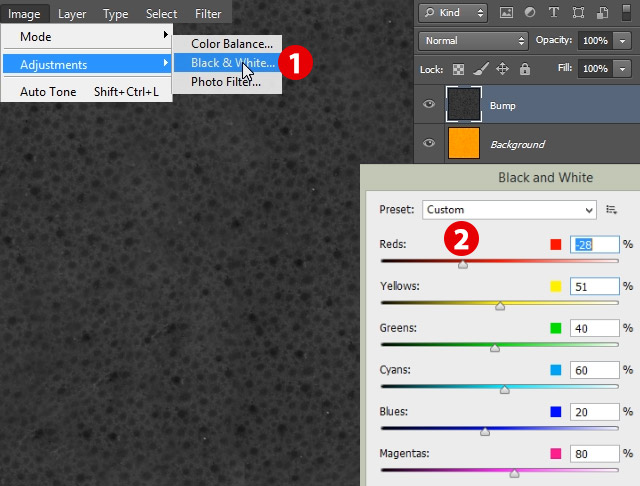
Now you will create a bump map from the color map.
Press (J) to create another layer.
Call it Bump
Go to Image > Adjustments > Black & White. [1]
Set its setting like on screen grab. [2]
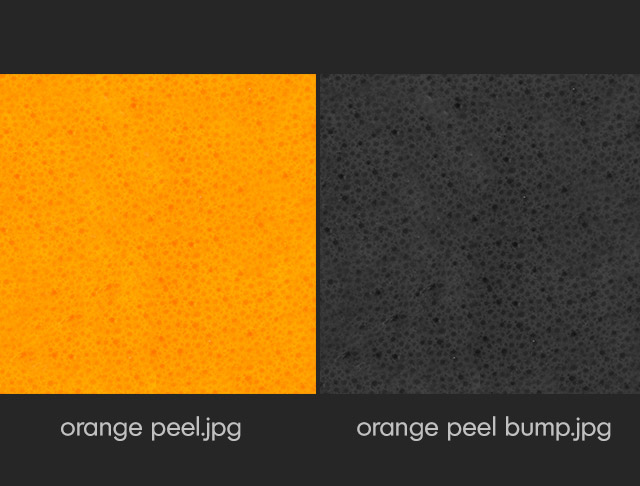
Save this Bump map as "orange peel bump.jpg"
Step 11
Your two ready maps should look like this.
11. Set Final Camera Angle
Step 1
In Modo content folder, you will find many useful resources. Among
them is a special object that will let you render shadows on
transparent backgrounds. This great feature helps to blend rendered
images into photographs, or just change background in post processing in
Photoshop.
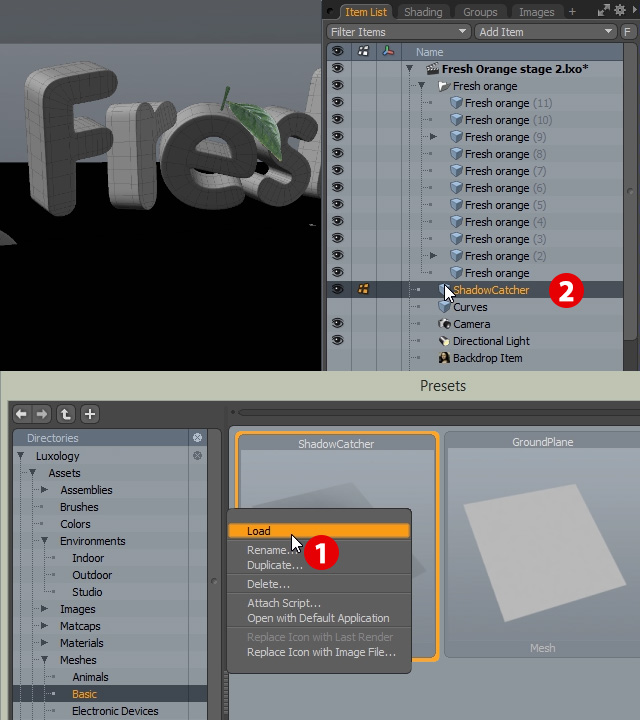
In Modo, press F6 to bring Presets palette.
Go to Luxology > Assets > Meshes > Basic and locate ShadowCatcher mesh.
Right click on it and choose Load. [1]
New mesh was loaded into the Item list. [2]
Step 2
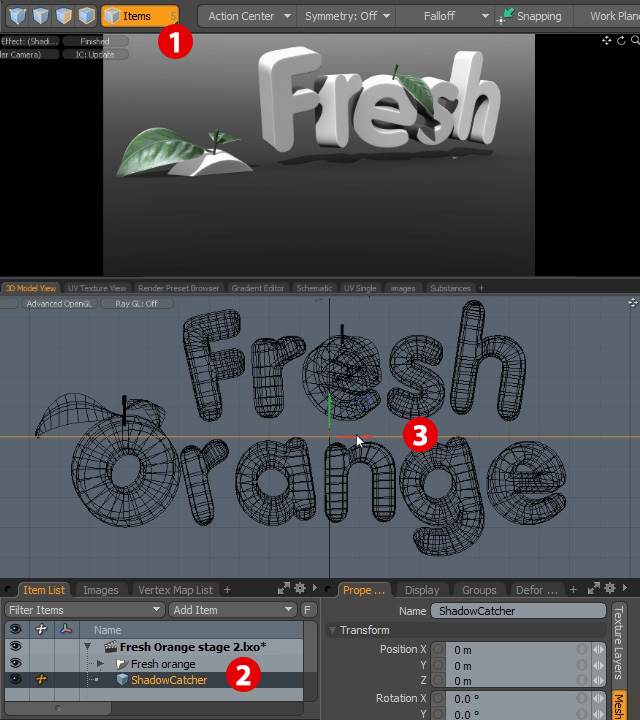
For now this ShadowCatcher hides part of the characters. let's fix it.
Change selection mode to Item Mode. [1]
In the Item List select ShadowCatcher mesh. [2]
Activate Move Tool (W) and move it down. [3]
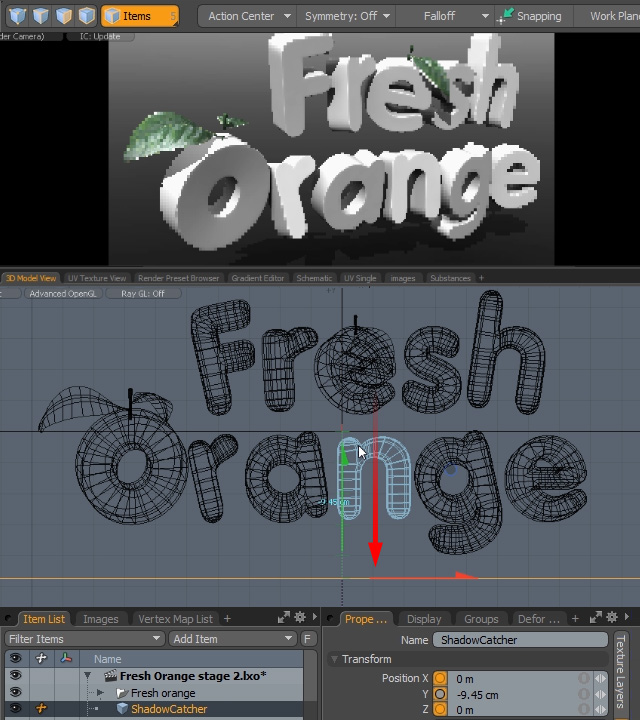
Step 3
As you can see now all letters are visible, and shadow is casting on ShadowCatcher.
Step 4
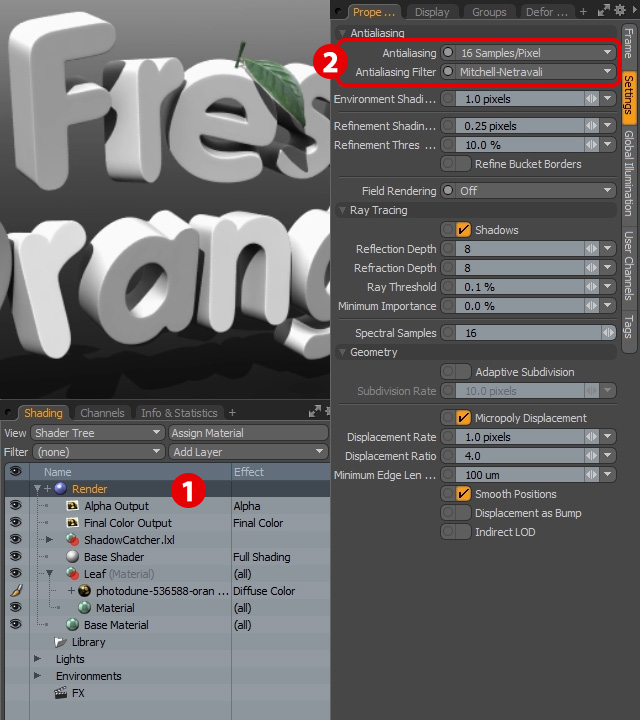
Change scene setting to get final render quality.
Select Render item. [1]
In its properties change Anti-aliasing to 16 Samples/Pixel.
As Antialiasing Filter choose Mitchell-Netravali.
Make sure that all settings are the same as below.
Step 5
Good scenes require good lightning.
In Preset Browser go to Luxology > Assets > Environments > Studio. [1]
Choose "Soft Tent 01" and right click on it and choose Load [2].
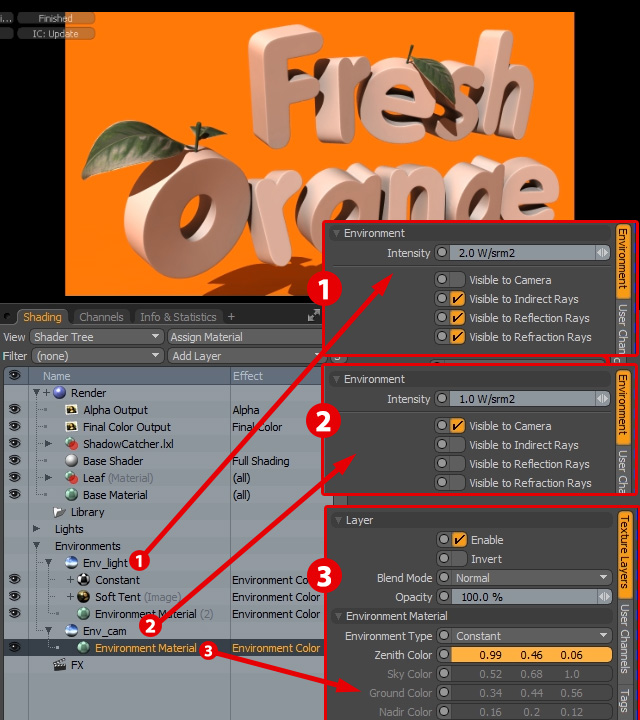
Select Environment item in the Shader Tree and change its name to "Env_Light"[3]
Step 6
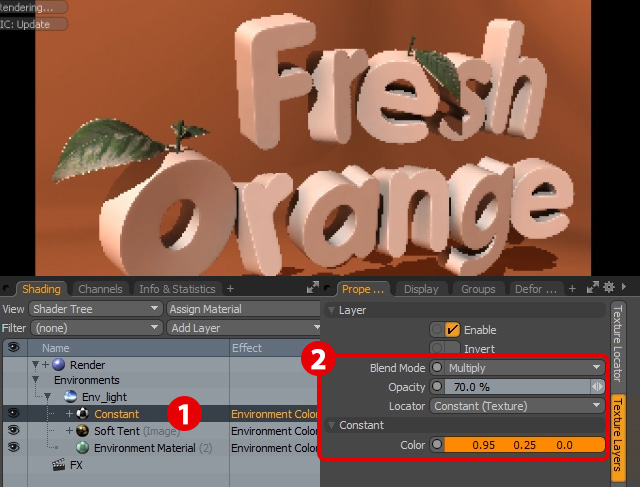
In Shader Tree go to Add layer > Processing > Constant.
In its properties change it Blend Mode to Multiply 70%.
Change it color to worm orange. This way ambient light around letters will be slightly orange.
Step 7
Set up environments for post production in Photoshop.
Change Env_light Intensity to 2.0 w/srm2 and turn off Visible to Camera. [1]
Duplicate Env_light item and change its name to: Env_Cam.
Delete bitmap and Constant layer inside it. Set its Intensity to 1.0 w/srm2
Turn off Everything except Visible to Camera. [2]
Select Environment material and set its color to constant light orange.
Step 8
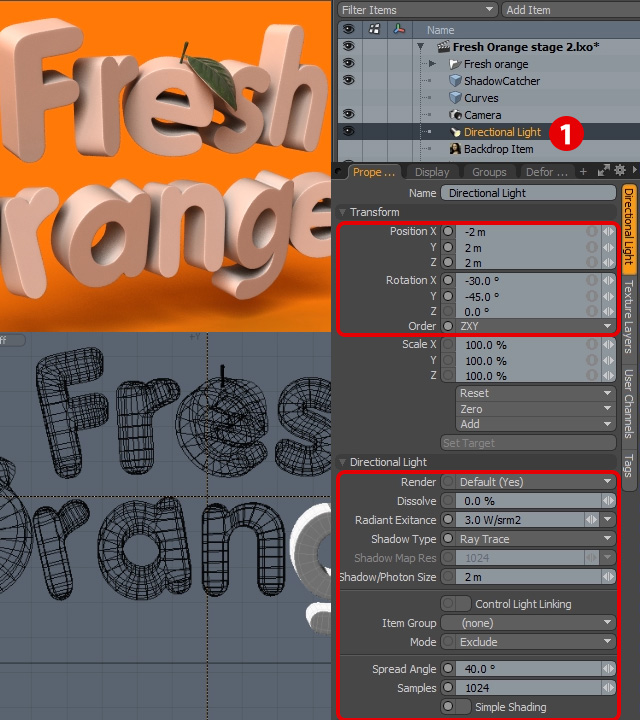
Now light the scene! Select directional light [1] and set its position to shown on the screen. Type the same values in it Properties.
Step 9
In Item List go to Add Item > Lights > Area Lights. [1]
Set all its Properties as shown on the screen.
Step 10
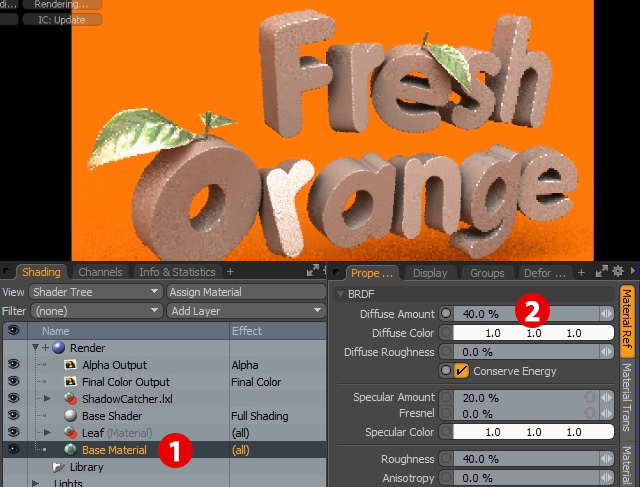
Select Base Material in Shader Tree. [1]
Set its Diffuse Amount to: 40%.
12. Create Geometry for Water Droplets
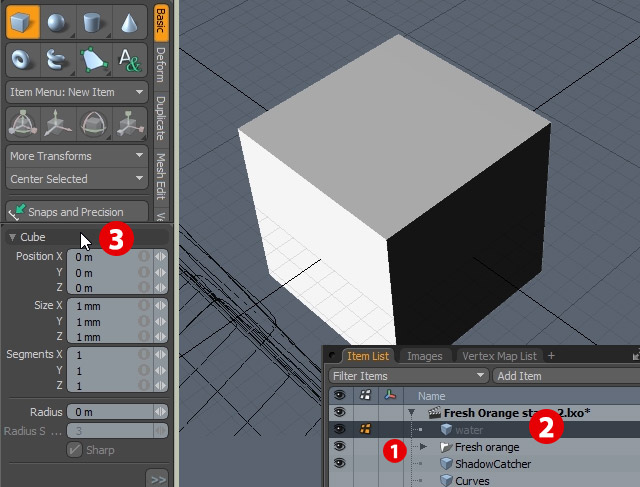
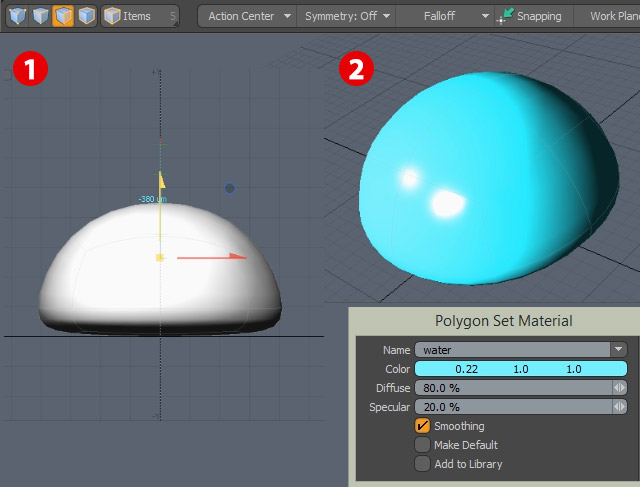
Step 1
In Item list create new mesh [1] and call it water. [2]
Activate Cube Tool and draw small box for about 1mm on every axis. [3]
Press Space Bar to drop the tool.
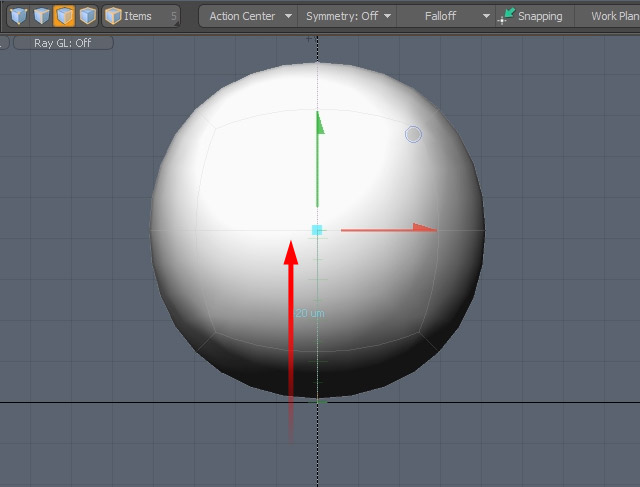
Step 2
Press Tab to create sphere.
In Polygon Mode (3) move sphere up
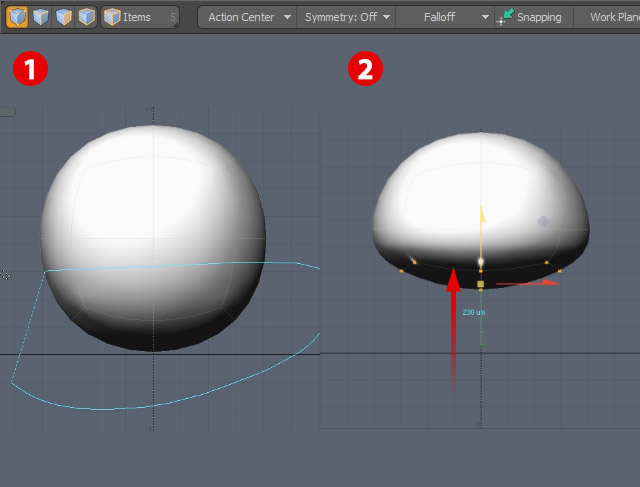
Step 3
In Vertex Mode select vertices on the bottom of sphere. (1)
Activate Move Tool (W) and move them up. [2]
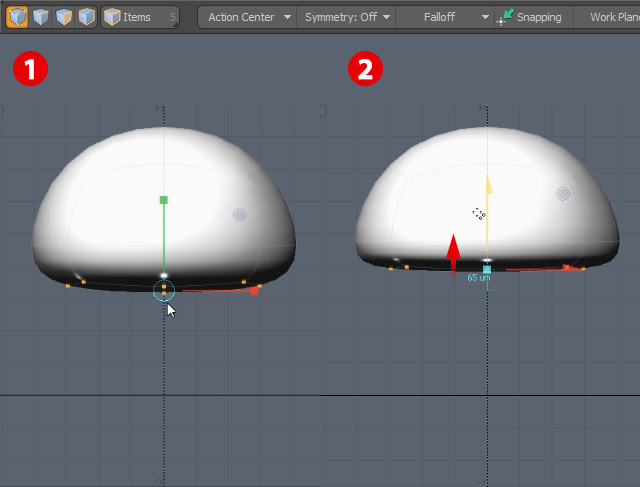
Step 4
Activate Scale Tool (R) and lover scale on Y axis. [1]
Then move vertices slightly up. [2]
Step 5
In Polygon Mode (3) move all polygons down like on the screen. Bottom of the drop must touch origin.
Press M to add Water Material
Step 6
Change selection mode to Item Mode (5)
Go to Edit > Center to Bounding Box > Bottom.This way you control point at witch geometry will be placed over the letter surface.
13. Set Up Basic Materials and Surface Generators
Step 1
In item mode select all letters except sterns and leafs. [1]
Press M to add orange peel group
Change it color to orange like on the screen. [2]
Select Material inside this group and set its parameters as shown on the screen. [3]
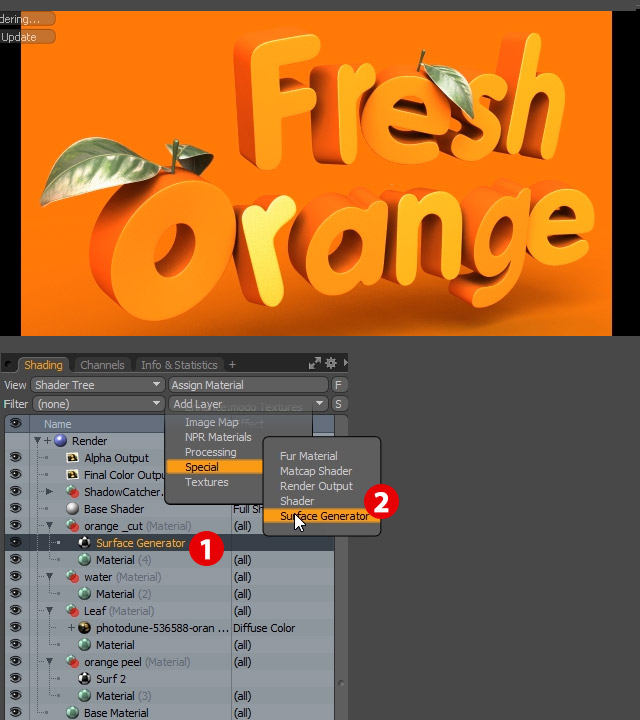
Step 2
In Shader Tree go to Add Layer > Special > Surface Generator [2].
Call it Surf 2. Leave its default settings for now.
Step 3
Now you will create material for the cut part of fruit text.
Select few polygons on sides of each letter. [1]
Press L to select loop of polygons. [2]
Press (Shift-Up Arrow) to grow selection. [3]
Step 4
Press [ to invert selection. [1]
Press (M) to add orange_cut material. [2]
Change its color to more yellow.
Step 5
Open orange_cut group. [1]
In Shader Tree go to Add Layer > Special > Surface Generator [2].
Leave its default settings for now.
14. Cover Text With Drops of Water
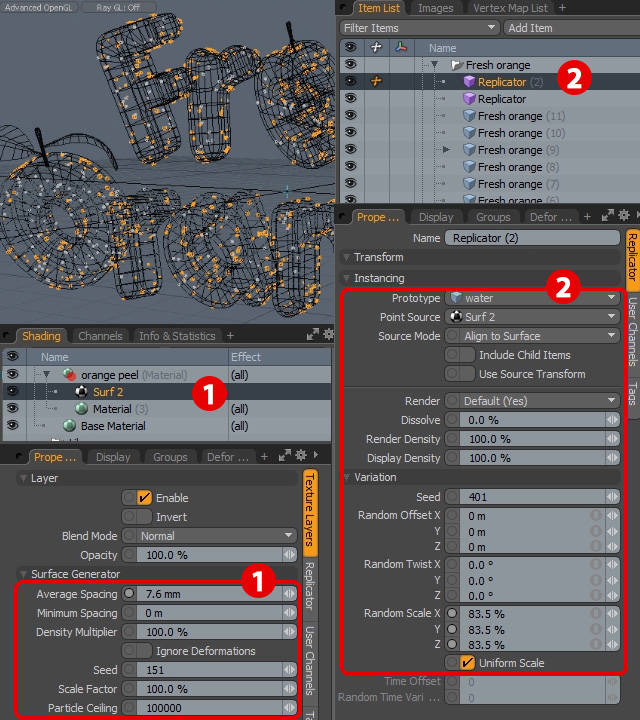
Step 1
In previous steps you have created Surface Generators. They are
special materials which generate points scattered over the surface. You
will use those points propagate drops of water over the surface of
letters.
Select Surface Generator of orange_cut material group.
Set its paramieters to the one shown on the screen. [1]
In item list go to Add item > Particles > Replicator.
Select this Replicator and set its parameters to shown on th screen. [2]
Be sure to select water mesh as Prototype and Surface Generator as Point Source.
Step 2
Open orange_peel material group and select Surf_2 Surface Generator. [1]
Set its parameters to shown on the screen. [1]
In item list go to Add item > Particles > Replicator.
Select this Replicator and set its parameters to shown on th screen. [2]
Be sure to select water mesh as Prototype and Surf_2 as Point Source.
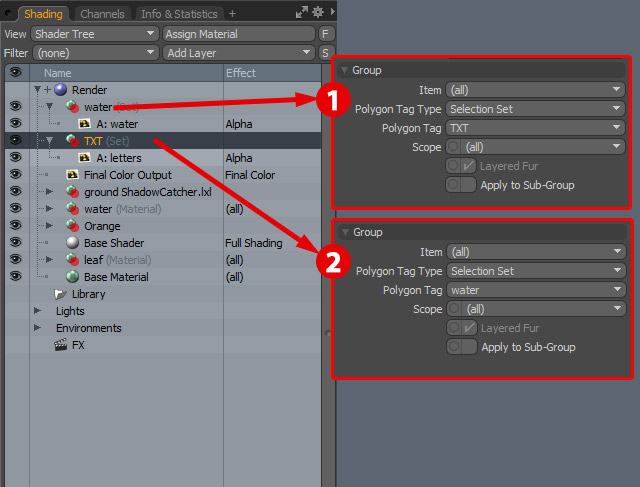
15. Use Selection Sets to Create Masks
Step 1
Modo can create item masks for you to use as layer masks in
compositing stage in Photoshop. To do that you need to create Selection
Sets. Do the following:
Select water mesh in item list. [1]
Then select all its polygons [2]
Then go to Select > Assign Selection Set. [3]
Name this selection set: water.
Step 2
in Item list select all meshes of letters including sterns and leafs. [1]
Then select all polygons.
Then go to Select > Assign Selection Set. [2]
Name this selection set: TXT.
Step 3
In the shader tree go to Add layer > Group.
Set this group properties as shown on image [1]
Then go to Add layer > Special > Render Output and call it A:water.
Right click in it effect and change to Alpha.
In the shader tree go to Add layer > Group.
Set this group properties as shown on image [2]
Then go to Add layer > Special > Render Output and call it A:letters.
Right click in it effect and change to Alpha.
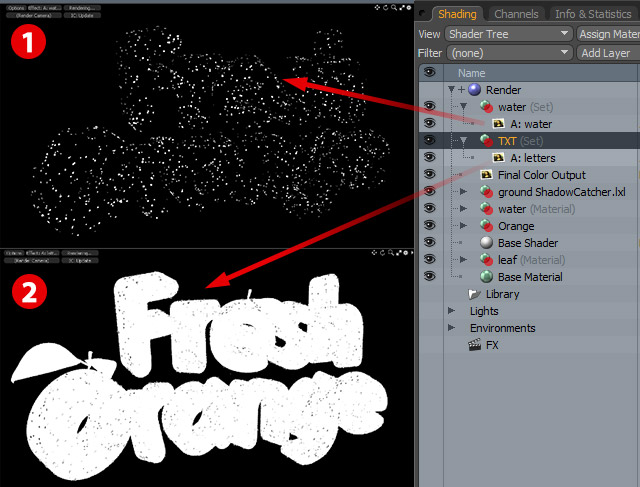
Step 4
You can check your outputs in preview. Just select them from drop down menu of preview window.
Set it to A: water - to see mask created only for droplets.
Set it to A: TXT - to see mask created only for droplets.
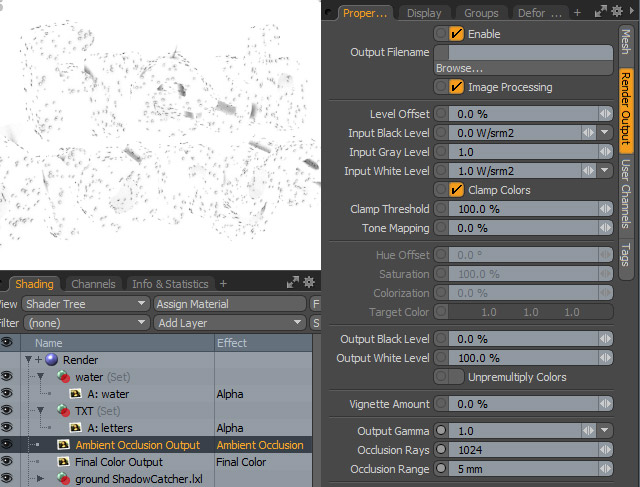
Step 5
Then go to Add layer > Special > Render Output and create new one.
Right click in it effect and change to Ambient Occlusion
Set it properties as shown on the screen.
Step 6
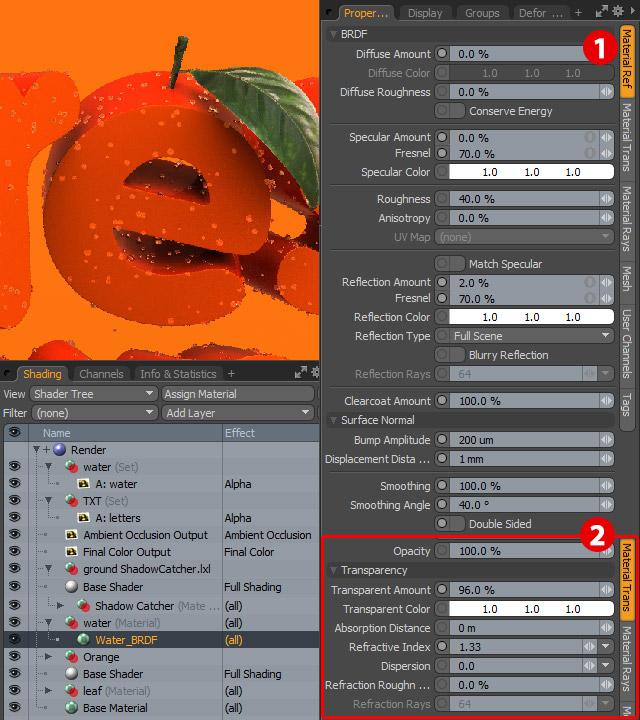
Now refine material properties.
Select Water material and change its name to Water_BRDF
Change it Material Ref [1] and Material Trans [2] as shown on the screen grabs.
Step 7
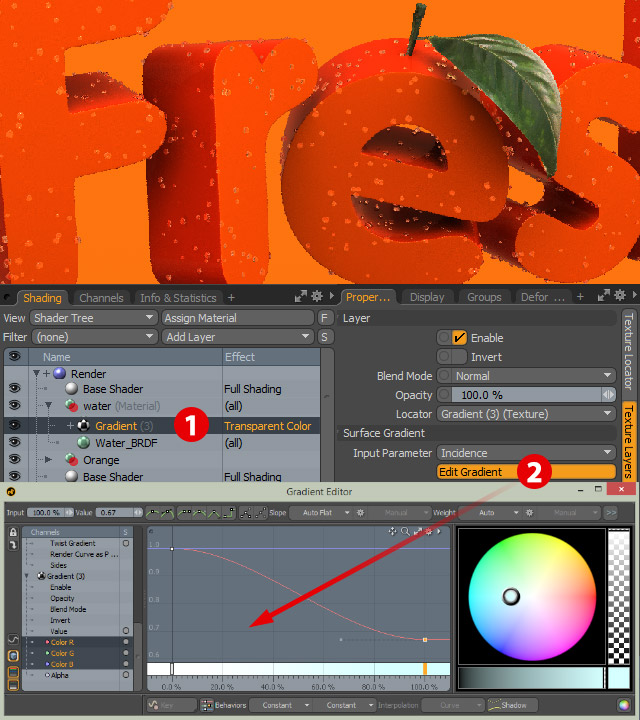
In shader Tree go to Ad Layer > Processing > Gradient
Set its Effect to Transparent Color. [1]
In Gradient Editor add two color keys white on 0% and light blue on 100%.
Step 8
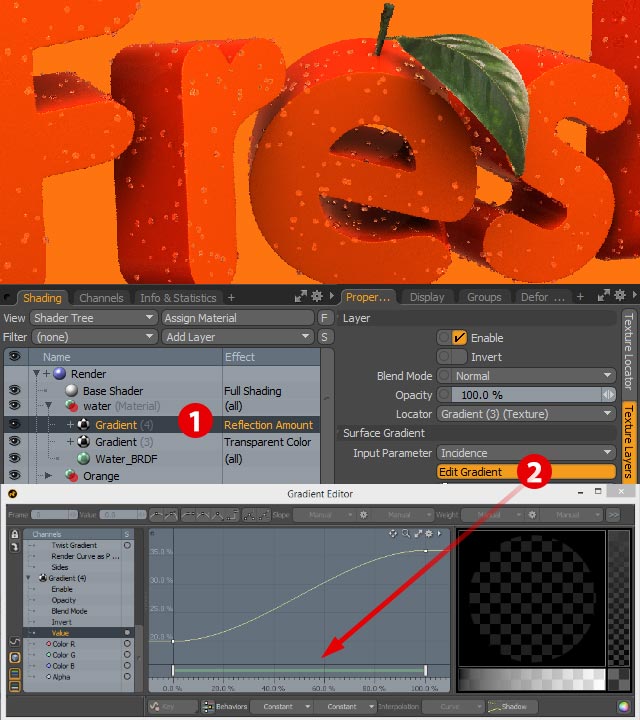
In shader Tree go to Ad Layer > Processing > Gradient
Set its Effect to Reflection Amount. [1]
In Gradient Editor add two key values: At 0 - 20%, and at 100 - 35%
Step 9
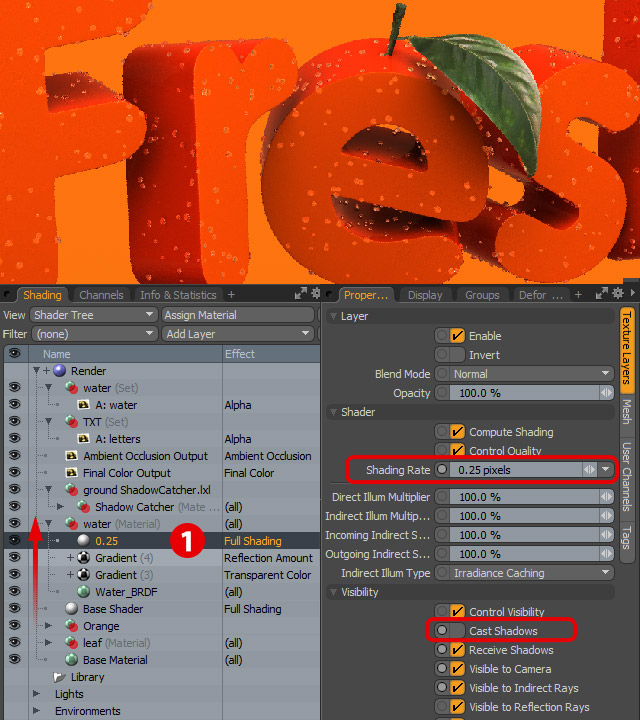
Finally add custom shader to water material.
Go to Add layer > Special > Shader. [1]
Change its Shading rate to: 0.25 pix
Turn off Cast Shadows option.
Grab water group and drag it above Base Shader.
Step 10
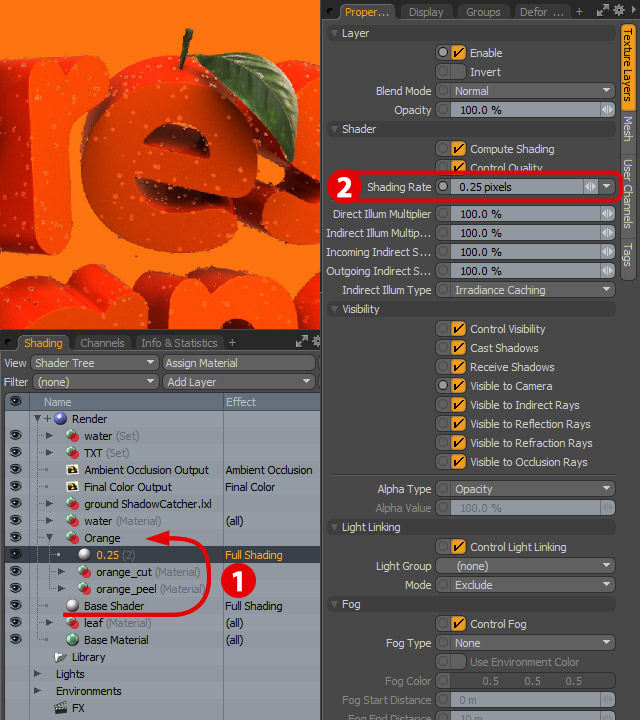
Create custom shader to control shading of the letters.
Select orange_cut and orange_peel groups and press (Command/Ctrl-G) to create new group.
Call it Orange and drag it above Base Shader [1]
Go to Add layer > Special > Shader.
Change its Shading rate to: 0.25 pix [2]
Step 11
Now refine orange materials.
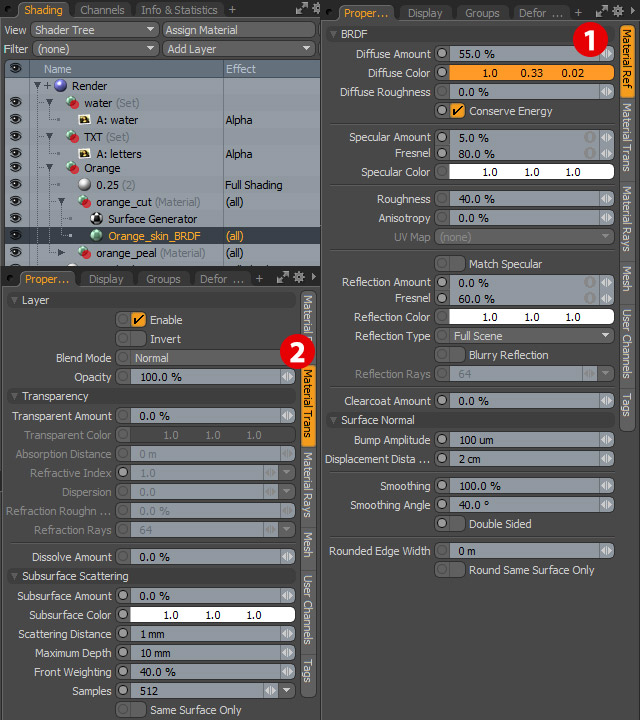
Select Orange_skin_BRDF and change all its parameters Material Ref [1] and Material Trans [2] as shown on the screen.
Step 12
To show textures on each letter you will use Selection Sets that you have created earlier.
With Orange_skin_BRDF selected go to Add Layer > Group
In its properties set Polygon Tag Type to Selection Set. [1]
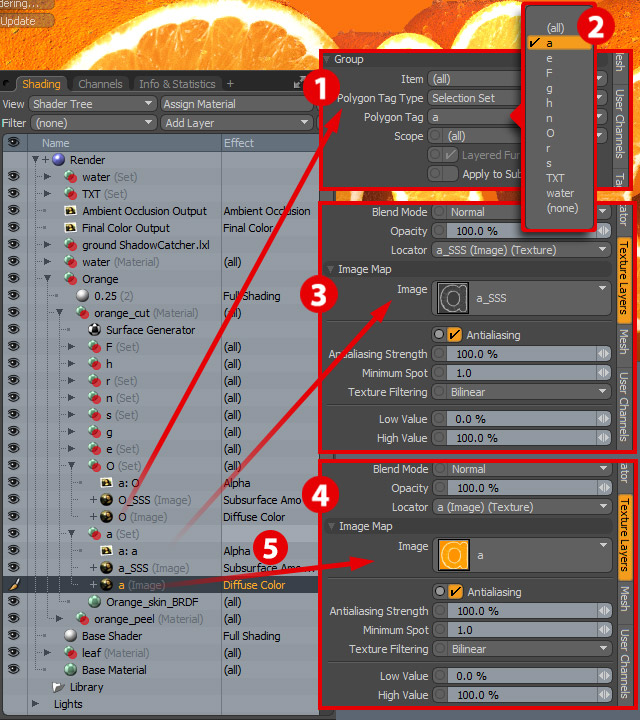
Choose "a" Polygon Tag. [2]
Then in Bridge grab a.jpg and a_SSS.jpg and DragandDrop into "a" group
Select a_SSS.jpg and set its effect to Subsurface Amount [3]
Select a.jpg and make sure that its effect is set to Diffuse Color [4]
Go to Add Layer > Special > Render Output and add a:a output.
Set its Effect to Alpha.
Repeat all those steps for all visible letters.
16. Refine Orange Peel Material
Step 1
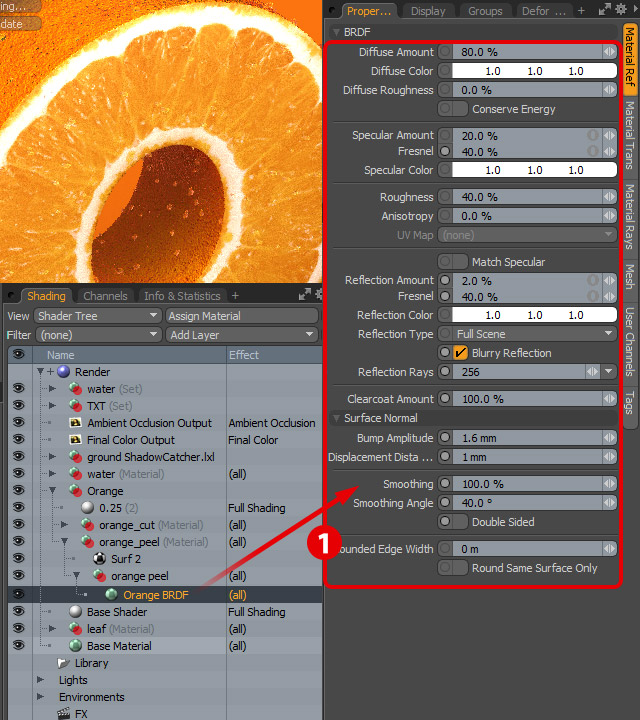
Select Orange BRDF material.
Make sure that you have all parameters set as shown on th screen. [1]
Leave Material Trans tab with default settings.
Step 2
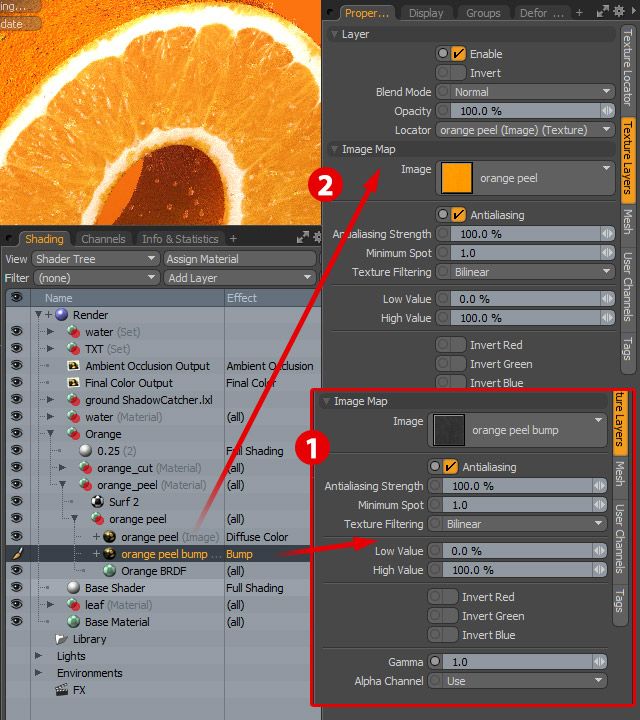
In Bridge grab "orange peel.jpg" and orange "peel bump.jpg"
DragandDrop them above Orange BRDF. Set those map properties as shown on the screen. [1] and [2]
Step 3
Add extra color to texture
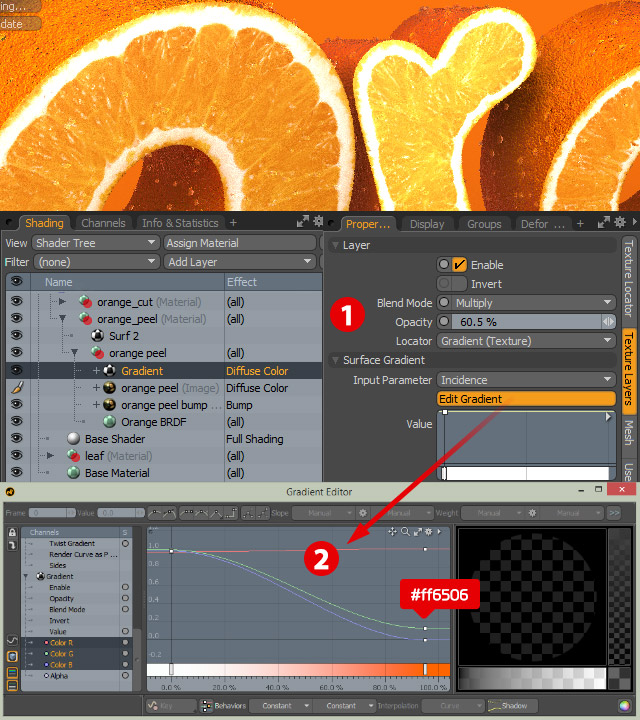
Go to Add layer > processing > Gradient.
Make sure that its properties are set to the same as shown on the screen. [1]
In Gradient Editor add 2 color keys. Fist white and second orange: #ff6506.
Step 4
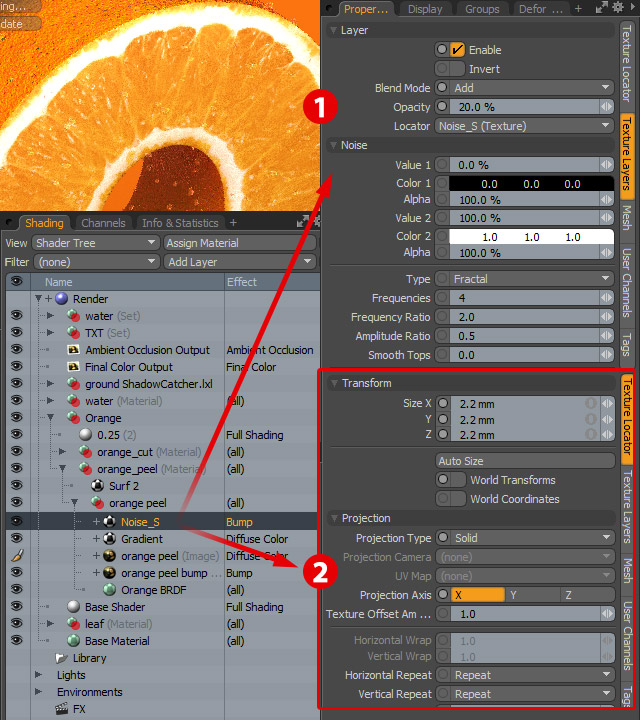
Now break surface of orange peel.
Go to Add layer > Textures > Noise
Change its name to: Noise_S
Set its properties as shown on the screen [1] and [2]
Step 5
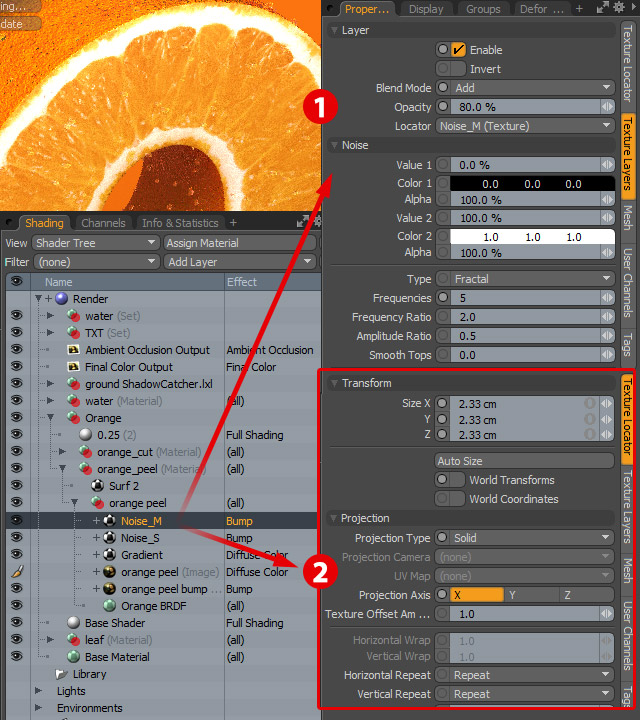
Duplicate Noise layer and change its name to: Noise_M.
Change its parameters to shown on the screen [1] and [2].
Step 6
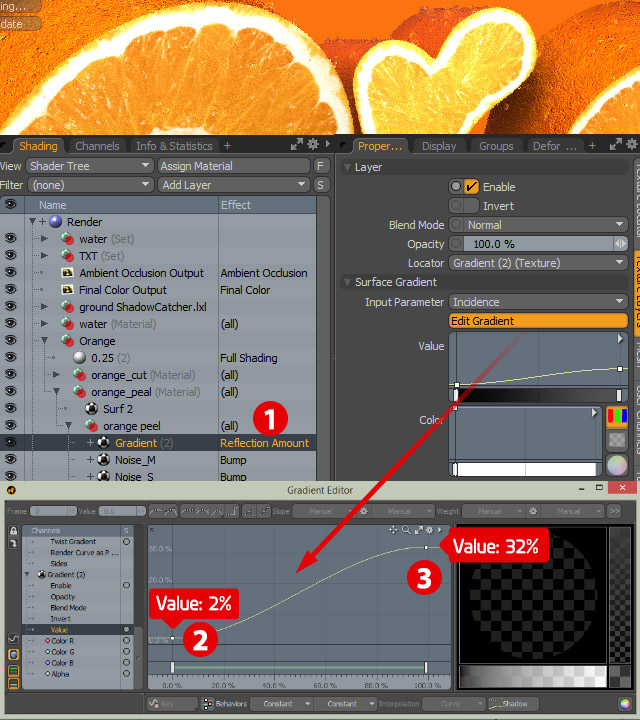
Go to Add layer > processing > Gradient.
Make sure that its properties are set to the same as shown on the screen. This should be Reflection Amount. [1]
In Gradient Editor add 2 value keys. Fist 2% [2] and second 32% [3]
17. Refine Leaf Material
Step 1
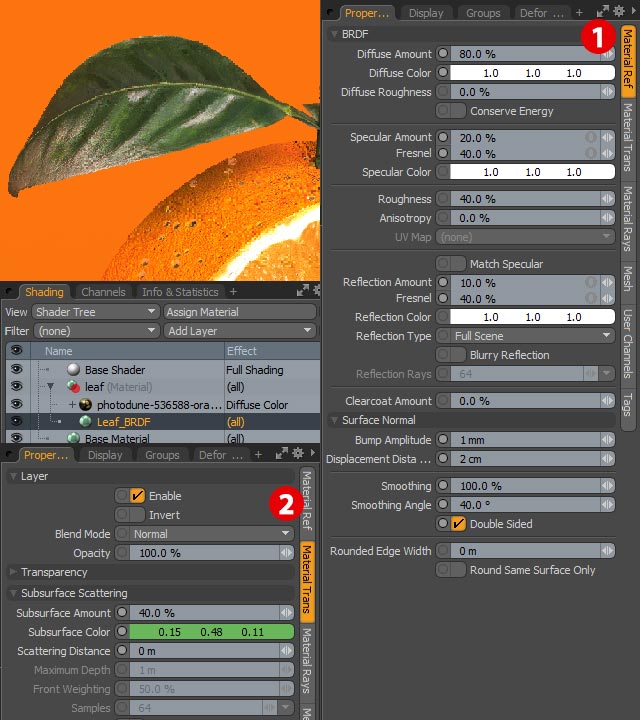
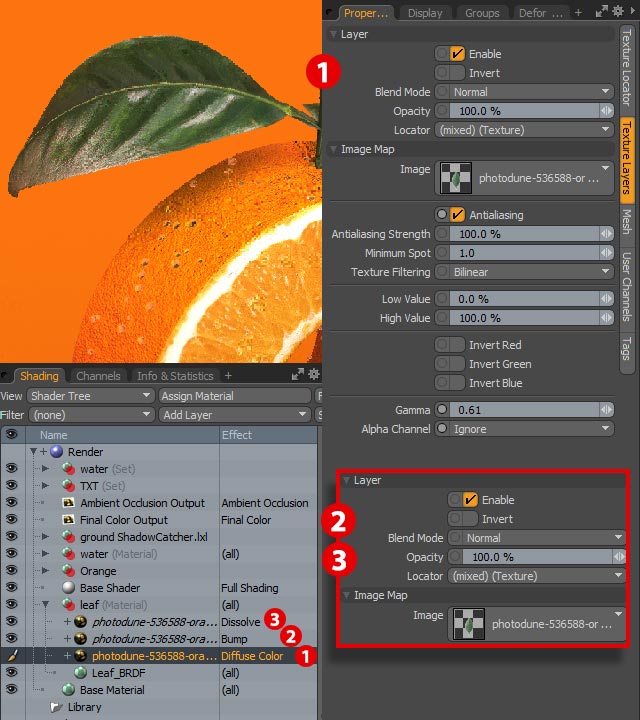
Now it is time to finalize leaf texture. Select Leaf_BRDF and set its parameters to shown on the screen. [1] and [2]
Step 2
Select leaf image [1] and create 2 instances from it. Choose option from right click menu
Then change one bitmap Effect to Bump. [2]
Change second instance Effect to Dissolve. [3]
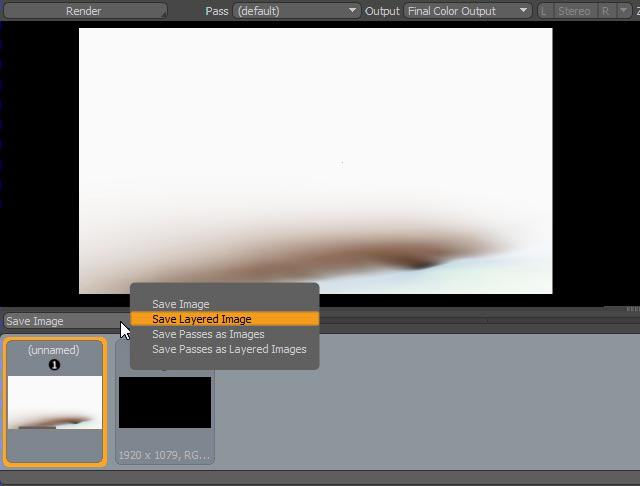
18. Render Images for Post-Production
Step 1
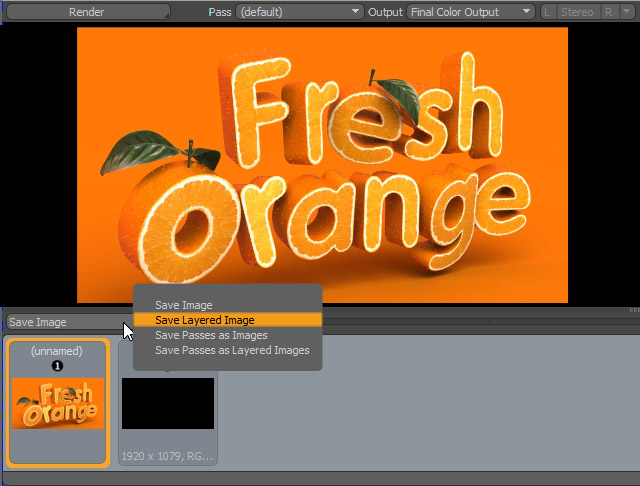
Press F9 to render image.
After rendering save it as Layered PSD file.Don't use jpg format, you will loose a lot of quality!
Step 2
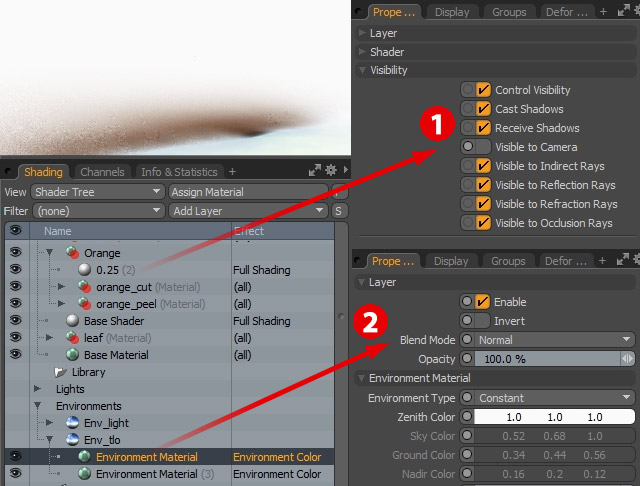
Now render only shadow of your letters.
In Shader Tree go to Orange group and select 0.25 Shader.
Turn off Visible to camera. [1] See how letters just vanish!
Then go to Env_tlo and duplicate Environment material.
Set its color to pure white.
Step 3
Press F9 to render image.
After rendering save it as Layered PSD file.
19. Create Final Image in Photoshop.
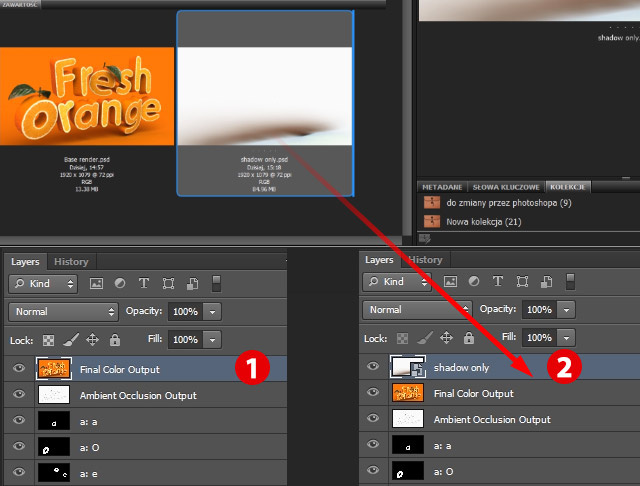
Step 1
Open first layered image. [1]
In Bridge grab second render, the one with shadow only.
Drag and Drop it into psd file as one of the layers. [2]
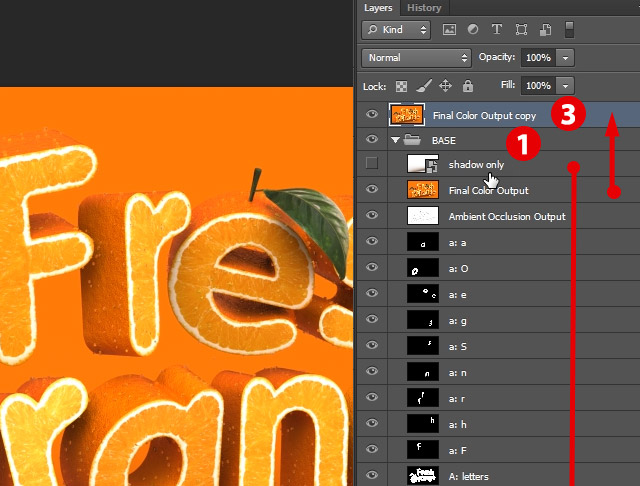
Step 2
Reorder layers to speed up work.
Create group (Command/Ctrl-G) called Base from all layers.
Select "Shadow only" layer and duplicate it.
Create group BG at the bottom of layer stack and put there Shadow only copy [2]
Select "Final Color Output" layer and move its copy to the top of layer stack. [3]
Step 3
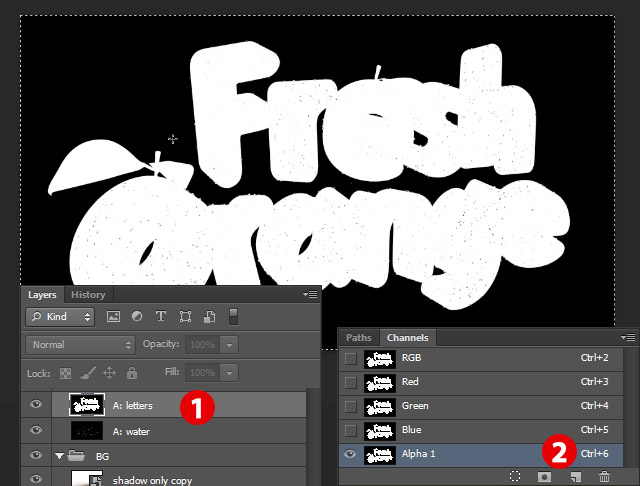
Now create Alpha channels from rendered selections sets.
Locate layer "A: letters" Press (Command/Ctrl-A) to select all pixels. Copy them.
In Channels palette create new channel and paste there pixels.
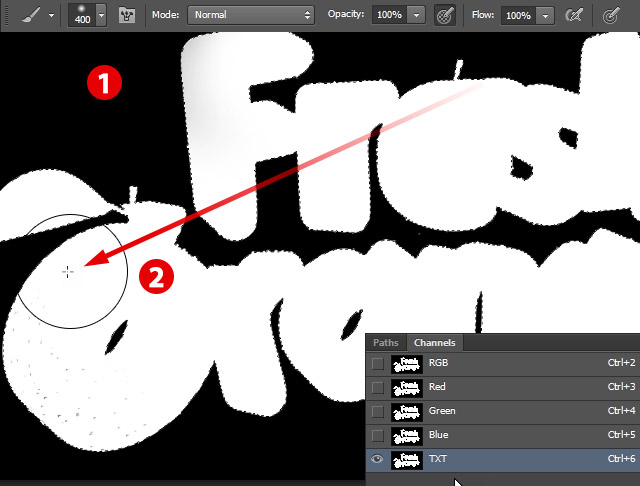
Step 4
Change its name to "TXT"
With magic wand select black background and than press (Command/Ctrl-Shift-I) to invert selection.
Pres B to activate Brush and paint with white color all little black spots.
Now you have clear text alpha channel.
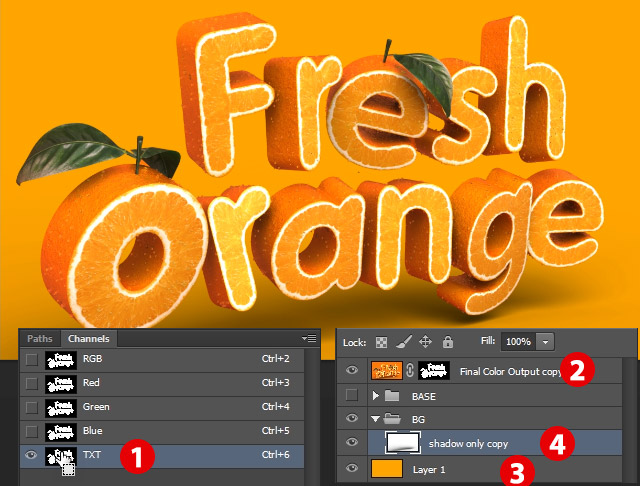
Step 5
Create section from this channel, hold down Alt and press on channel icon. [1]
Mask "Final Color Output copy" layer. [2]
Create new layer in BG folder, and fill it with light orange color. [3]
Select "shadow only copy" and set its blending mode to Multiply
Step 6
With "Shadow only copy" selected press (Alt-Shift-Command/Ctrl-B) to convert this layer to Black and White. [1]
Create Gradient map layer and clip it onto Shadow only copy. [2]
Make gradient from brown to white. [3]
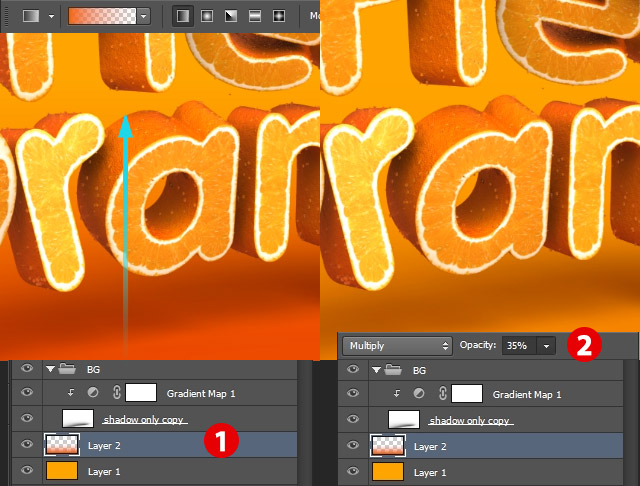
Step 7
Add gradient ramp layer over lowest layer. (G) [1]
Set it to Multiply and set its Opacity to 35%. [2]
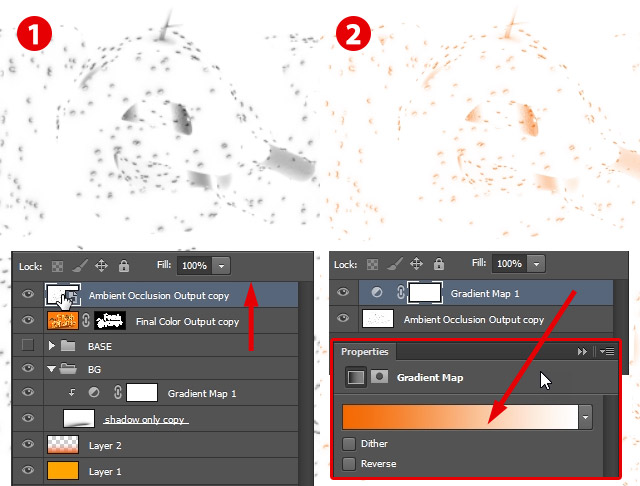
Step 8
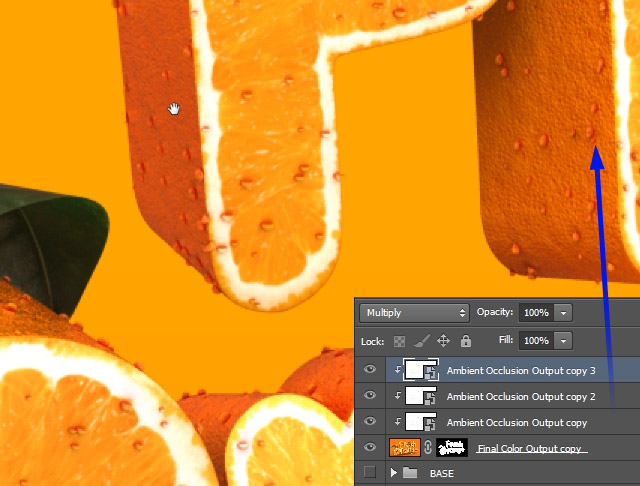
Bring to front "Ambient Occlusion Output copy" and change it to Smart object. [1]
Double click on it and inside smart object add Gradient Ramp to remap colors to worm orange. [2]
Save and close smart object.
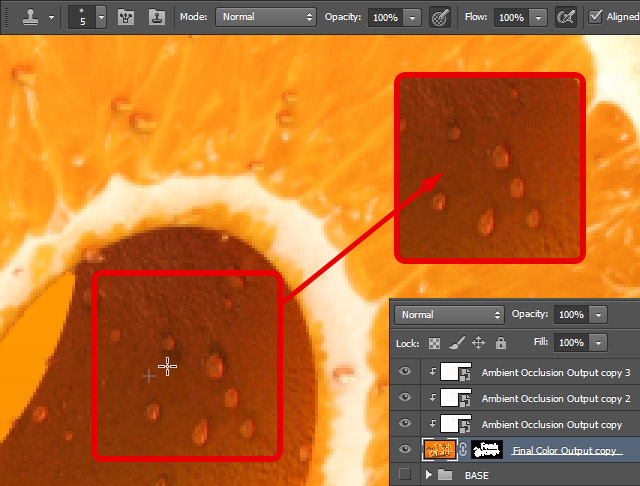
Step 9
Now you will have nice soft shadows over the drops of water.
Set this layer to multiply and clip it onto "Final Color Output".
Duplicate this smart object 2 times.
Step 10
Select "Final Color Output" and with the Clone Stamp (C) retouch any imperfections from render.
Step 11
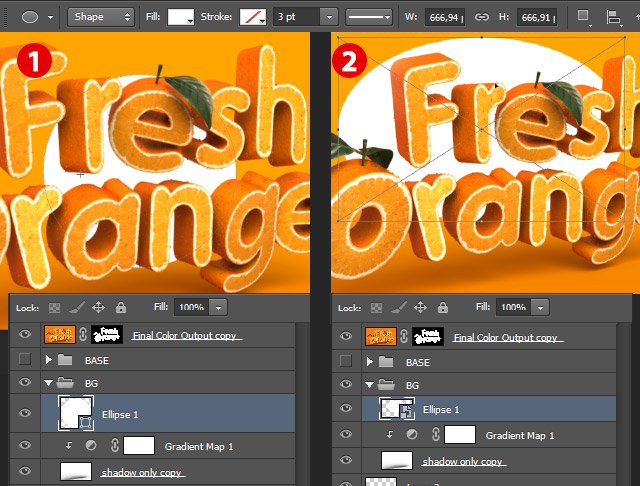
In BG group create white circle (U) and create smart object from it. Adjust its size like on the screen grabs.
Step 12
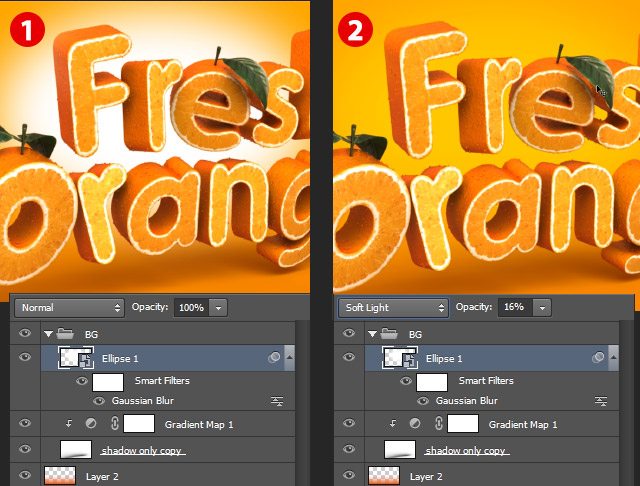
Go to filter > Blur > Gaussian Blur.
Play around with Blur settings until you find right one. [1]
Change blending mode to Soft Light 16%
Step 13
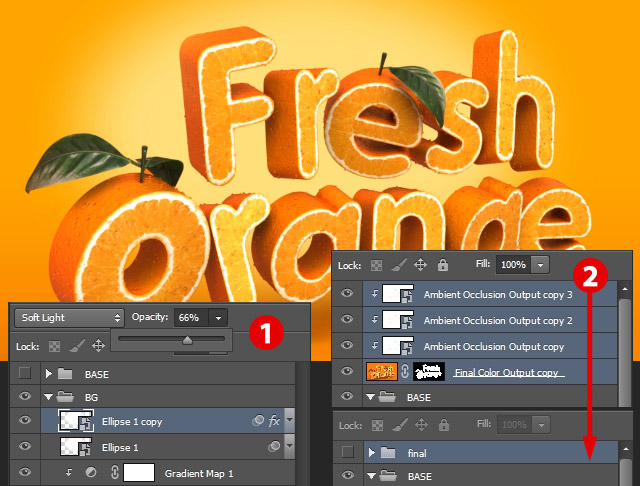
Duplicate Ellipse and change its Opacity to 66%. [2]
Select top layers and create group called "final"
Step 14
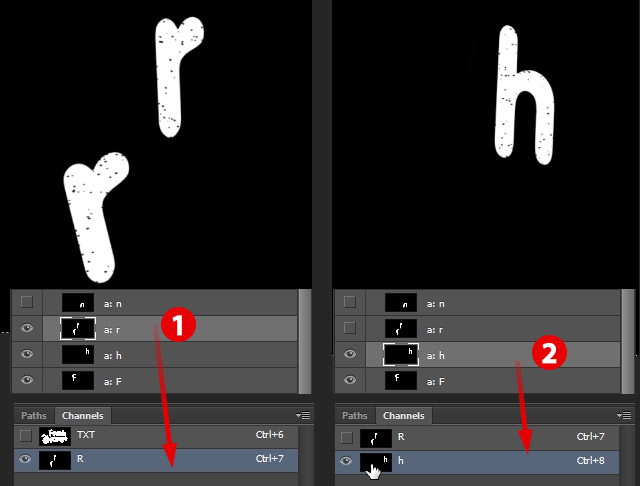
Create additional Alpha channels from rendered masks.
Select a:r Layer and press (Command/Ctrl-A) to select all pixels
Copy them than create new alpha channel and paste. [1]
Change its name to R.
Do the same for the letter h. [2]
Step 15
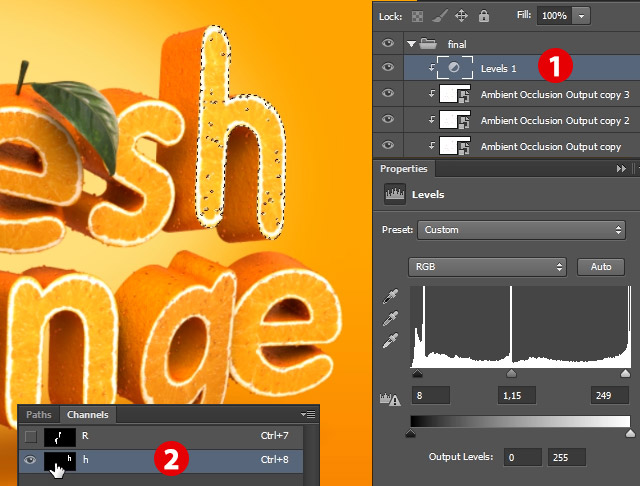
Add levels layer on top of all layers to correct color [1].
Create selection from channel h [2]
Step 16
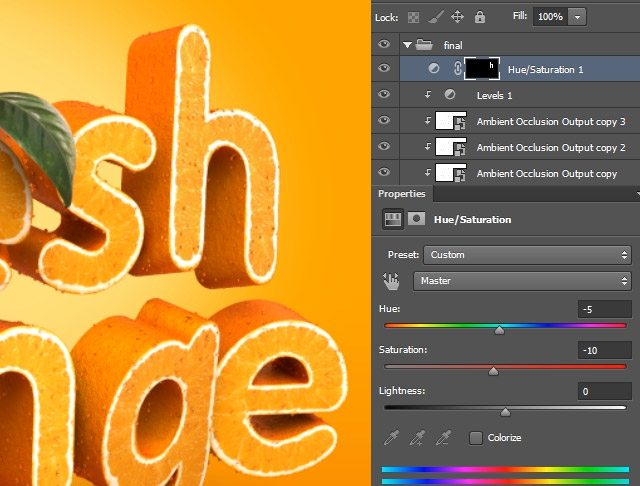
Add Hue/Saturation adjustment layer to correct color of letter h.
Step 17
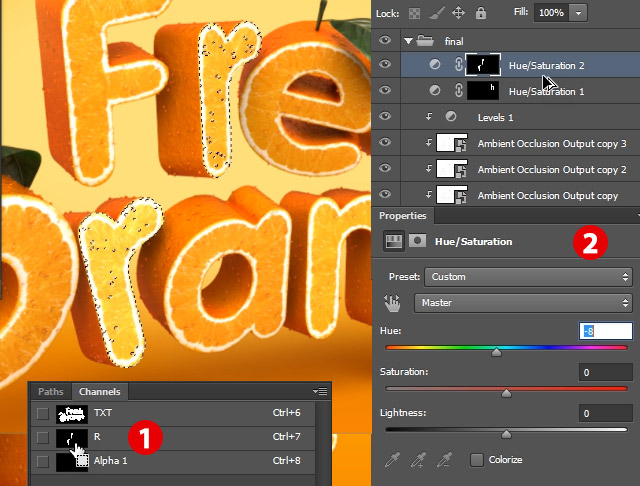
Create selection from channel R [1] and add Hue/Saturation adjustment layer to correct color [2].
Step 18
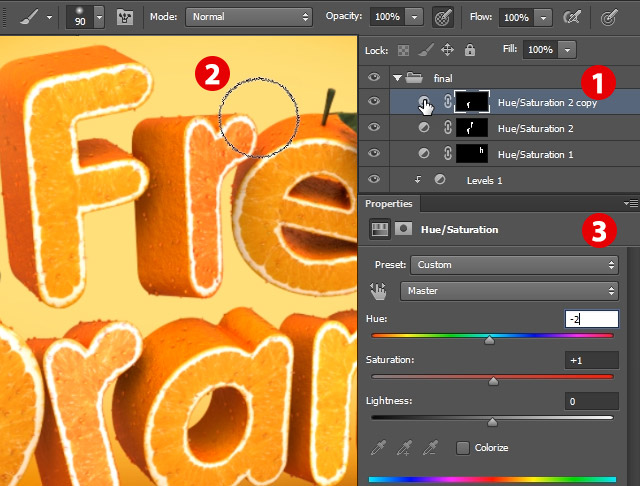
Duplicate Hue/Saturation adjustment layer over the r letters and mask unwanted part with brush.
Step 19
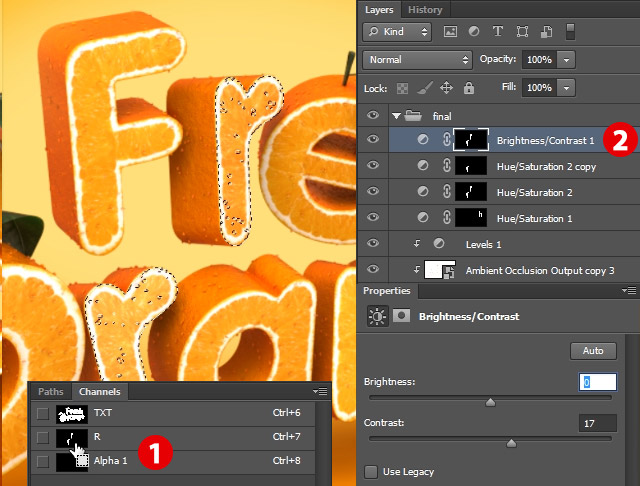
Make selection from R alpha channel [1] and add Brightness/Contrast adjustment layer to balance letters "r" [2].
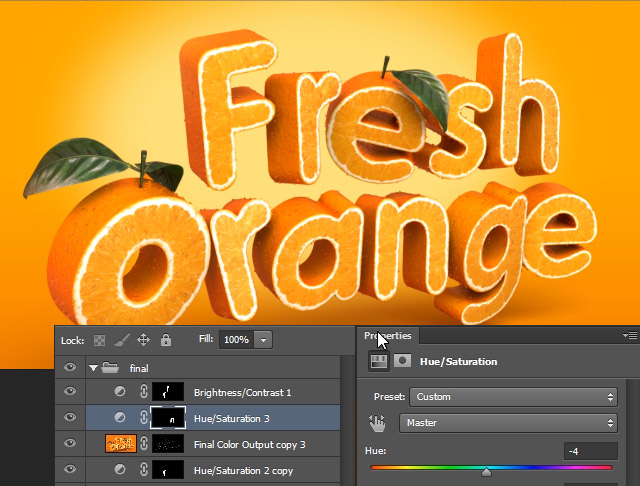
Step 20
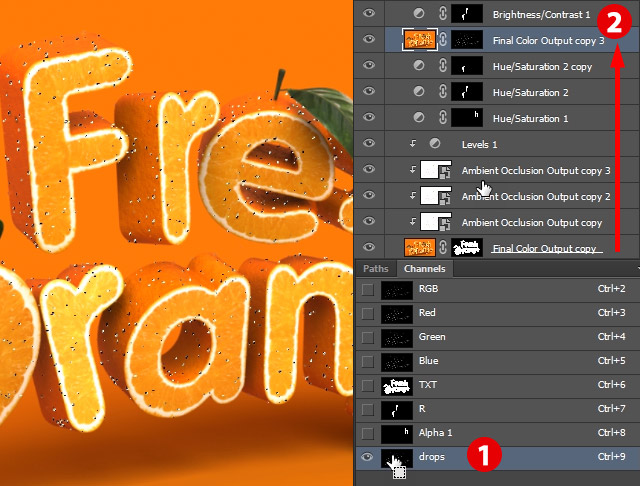
For the final effect duplicate "Final Color Output" and mask it with drops alpha channel [1]
Move this layer up in layer stack [2]
Step 21
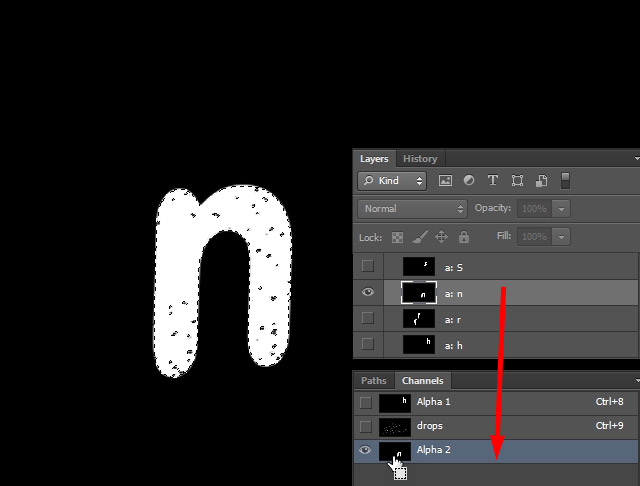
As before create alpha channel for letter "n" and make a selection.
Advertisement
Step 22
Adjust hue/saturation of letter n.
Conclusion
That is it! Your fruit textured text effect is now complete. I hope
you have enjoyed this tutorial and can use the techniques that you
learned to create some amazing 3D effects of your own.
Unknown
Lorem ipsum dolor sit amet, consectetur adipisicing elit, sed do eiusmod tempor incididunt ut labore et dolore magna aliqua. Ut enim ad minim veniam, quis nostrud exercitation.
Medical Disclaimer
The information on this site is not intended or implied to be a substitute for professional medical advice, diagnosis or treatment. All content, including text, graphics, images and information, contained on or available through this web site is for general information purposes only. Krobknea makes no representation and assumes no responsibility for the accuracy of information contained on or available through this web site, and such information is subject to change without notice. You are encouraged to confirm any information obtained from or through this web site with other sources, and review all information regarding any medical condition or treatment with your physician. NEVER DISREGARD PROFESSIONAL MEDICAL ADVICE OR DELAY SEEKING MEDICAL TREATMENT BECAUSE OF SOMETHING YOU HAVE READ ON OR ACCESSED THROUGH THIS WEB SITE.


.webp)

