In
this tutorial you'll get a full introduction to creating and
manipulating Perfect Shapes, the pre-made shape tools that are perfect
for creating various infographics and other designs in CorelDRAW.
Additionally, I'll introduce you to the Drop Shadow Tool, which not only
adds drop shadows to objects, but also allows you complete control over
the shadow's shape, range, and intensity.
1. Using Perfect Shapes in CorelDRAW
Step 1
You'll find an assortment of Perfect Shapes in the Toolbox under the Polygon Tool (Y) icon. I chose Flowchart Shapes to start this quick tutorial with, and from there I chose a shape from the drop-down menu in the Property Bar. Drag out the chosen shape and we'll manipulate it in the next step.
Step 2
Perfect Shapes are only so manipulable before they're Converted to Curves (Control-Q). You can Scale, Rotate,
and play with the object's properties as needed, but to add or delete
nodes and really play with the shape as you would any other object, you
must convert the object to its curves.
Working with this particular shape, open the Object Properties docker and set the Outline to None. Under Fill, choose Fountain Fill and select the colors of your choice. I opted for a light and medium hue of cyan. Right-click and Convert to Curves if you'd like to further manipulate the shape at the node level; otherwise let's move on.
Step 3
Finally with this shape style, Copy (Control-C) and Paste (Control-V) three instances of the shape, layer them on top of each other (see below), and hit Distribute Center Vertically so that your little wavy shapes line up evenly. Change the Fountain Fill of the front two shapes in the Object Properties docker, and let's move on to additional styles of Perfect Shapes.
2. Special Nodes and Effects on Text
Step 1
Select Banner Shapes from the Toolbox and choose the second banner from the drop-down menu in the Property Bar. Draw a banner. Note the red and yellow nodes in the upper left of the Perfect Shape.
Using the Shape Tool,
grab the yellow node and move it on the vertical axis. Reducing or
increasing the size of the banner's left tail also effects the center
fold and right tail.
This time, grab the red node with the Shape Tool.
Move the node on the horizontal axis and note how either lengthening or
shortening the center fold of the banner also affects the tails.
Step 2
Perfect Shapes will allow anything created on their paths to be affected when red and yellow nodes are manipulated. Using the Text Tool (F8), type within the shape's boundaries. When you do so, Perfect Shapes react the same way as other objects with type inside them.
Type on the path of the Perfect Shape.
In this case, do so on the center fold of the banner. Once you do,
manipulate the red and yellow nodes. Note how the text moves with the
changes in the Perfect Shape no matter which path the
type was placed on within the object. In a normal object, the type would
only be affected if a node on that exact path was manipulated.
3. Creating Simple Infographics
Step 1
Now
that we've gotten the basics of Perfect Shapes and their functions,
let's go over a common use of the tools: infographics. While complex
infographics can easily be created within the program, to keep this
brief, let's create a simple design now.
Under Callout Shapes, select the first design in the drop-down menu. Grab the red node and pull it down beneath the rectangle of the Perfect Shape. Be careful to make sure the node is in the center of the Callout Shape's tail.
As we did before, set the Outline to None and Fill to the Fountain Fill colors of your choosing.
Step 2
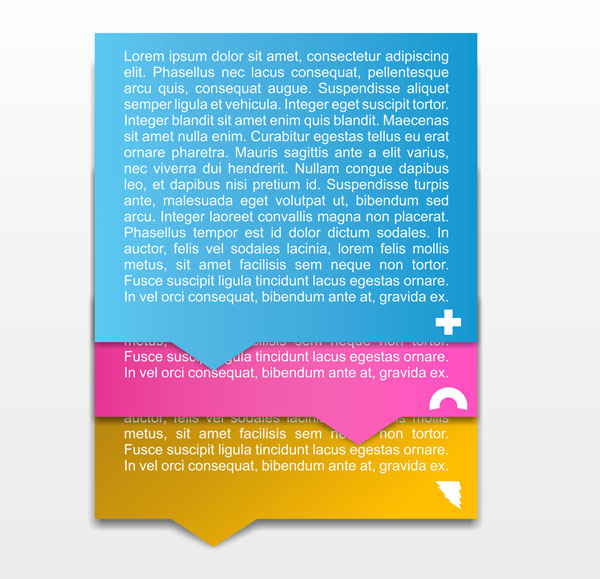
Copy and Paste three instances of the Callout Shape. Place each copied object behind the last, and move each down so they peek out from under the last one slightly. Change the Fountain Fill of the copied shapes to shades of pink and yellow. Select the center shape and hit Mirror Horizontally in the Property Bar so the tails of the shape are staggered.
Step 3
From the Basic Shapes options, select three different shapes for the bottom right corner of each Callout Shape drawn previously. Note how shapes with red nodes were altered as needed.
Step 4
Select the top Callout Shape and, using the Drop Shadow Tool (found in the Toolbox) drag out a Drop Shadow from the blue shape that aligns with the shape itself but is placed slightly below.
Hold down Control to keep the drop shadow on a straight line while pulling it out from the shape. In the Property Bar, set Shadow Feathering to a value of 4-7. Repeat this on the other two shapes.
Step 5
Use the Type Tool
to add whatever information your infographic may need. The design for
this tutorial is intended to be an interactive infographic which would
reveal each shape and its information as it was clicked.
To create this look, place each text object directly above its intended object in the Object Manager docker.
Great Job, You're Done!
The
next step of where your design goes is in your hands. Perhaps a static
infographic, with a different composition, or perhaps it's the start of
an interactive design compiled in a program like Corel Video
Studio or Adobe After Effects. Regardless of where you take the
techniques explored in this tutorial, do share your creations
with Perfect Shapes in the comments below.
For more CorelDRAW tutorials, check out these:
Lorem ipsum dolor sit amet, consectetur adipisicing elit, sed do eiusmod tempor incididunt ut labore et dolore magna aliqua. Ut enim ad minim veniam, quis nostrud exercitation.
Medical Disclaimer
The information on this site is not intended or implied to be a substitute for professional medical advice, diagnosis or treatment. All content, including text, graphics, images and information, contained on or available through this web site is for general information purposes only. Krobknea makes no representation and assumes no responsibility for the accuracy of information contained on or available through this web site, and such information is subject to change without notice. You are encouraged to confirm any information obtained from or through this web site with other sources, and review all information regarding any medical condition or treatment with your physician. NEVER DISREGARD PROFESSIONAL MEDICAL ADVICE OR DELAY SEEKING MEDICAL TREATMENT BECAUSE OF SOMETHING YOU HAVE READ ON OR ACCESSED THROUGH THIS WEB SITE.
 What You'll Be Creating


.webp)

